
User Guide
Page 6
English • Protect the power cord from being walked on or pinched, particularly at the plugs and the point where it exits from The AC receptacle. • The mains plug of ... expose this apparatus to rain or moisture. should be placed on the apparatus. • To completely disconnect this apparatus from the AC mains, disconnect the power supply cord plug from the apparatus. • Only use attachments/accessories speciåed by the manufacturer. • Unplug this apparatus during lightning storms or when...
English • Protect the power cord from being walked on or pinched, particularly at the plugs and the point where it exits from The AC receptacle. • The mains plug of ... expose this apparatus to rain or moisture. should be placed on the apparatus. • To completely disconnect this apparatus from the AC mains, disconnect the power supply cord plug from the apparatus. • Only use attachments/accessories speciåed by the manufacturer. • Unplug this apparatus during lightning storms or when...
User Guide
Page 10
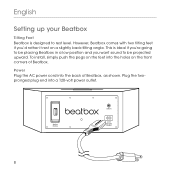
Power Plug the AC power cord into a 120-volt power outlet. Wireless Module LINE IN AC-IN 100-110V 50-60HZ 8 This is designed to be placing Beatbox in a low position and you want sound to rest level. Plug the twopronged plug end into the back of Beatbox. However, Beatbox comes with two tilting feet if you'd rather it rest on the front corners of Beatbox, as shown. English Setting up your Beatbox Tilting Feet Beatbox is ideal if you're going to be projected upward. To install, simply push the pegs on the feet into the holes on a slightly back-tilting angle.
Power Plug the AC power cord into a 120-volt power outlet. Wireless Module LINE IN AC-IN 100-110V 50-60HZ 8 This is designed to be placing Beatbox in a low position and you want sound to rest level. Plug the twopronged plug end into the back of Beatbox. However, Beatbox comes with two tilting feet if you'd rather it rest on the front corners of Beatbox, as shown. English Setting up your Beatbox Tilting Feet Beatbox is ideal if you're going to be projected upward. To install, simply push the pegs on the feet into the holes on a slightly back-tilting angle.
User Guide
Page 20
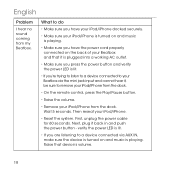
.... • Make sure you press the power button and verify the power LED is lit. • If you're trying to listen to a device connected to your Beatbox via AUX IN, make sure the device is turned on and music is lit. • If you have the power cord properly connected on the back of... your Beatbox and that device's volume. 18 What to do • Make sure you have your iPod/iPhone docked securely. • Make sure your iPod/iPhone is...
.... • Make sure you press the power button and verify the power LED is lit. • If you're trying to listen to a device connected to your Beatbox via AUX IN, make sure the device is turned on and music is lit. • If you have the power cord properly connected on the back of... your Beatbox and that device's volume. 18 What to do • Make sure you have your iPod/iPhone docked securely. • Make sure your iPod/iPhone is...

User Guide
Page 21
...the dock. My iPod®/ iPhone® does not charge up. • If the Beatbox is still not responding, contact the dealer you purchased them from, or Monster. • Make sure you have the power cord plugged into a working and the red LED is hot. Wait 5 seconds. Then reseat your... iPod/iPhone from , amplifer overdrive, and overheating. If the Beatbox has been running at it's highest power output for an extended period, the ampliåer may have the power cord properly connected on . • Raise the volume to do • Carefully check if the back...
...the dock. My iPod®/ iPhone® does not charge up. • If the Beatbox is still not responding, contact the dealer you purchased them from, or Monster. • Make sure you have the power cord plugged into a working and the red LED is hot. Wait 5 seconds. Then reseat your... iPod/iPhone from , amplifer overdrive, and overheating. If the Beatbox has been running at it's highest power output for an extended period, the ampliåer may have the power cord properly connected on . • Raise the volume to do • Carefully check if the back...

