
Instruction Manual
Page 1
....com P.O. Avanti has a policy of The Mackle Co., Inc. Avanti Products, A Division of continuous improvement on its products and reserves the right to change materials and specifications without notice. MICROWAVE OVEN INSTRUCTION MANUAL MANUAL DE INSTRUCCIONES Models / Modelos: MO7081MW / MO7082MB Models / Modelos: MO7191TW / MO7192TB Model / Modelo: MO7003SST Model / Modelo: MO9000TW / MO9001TB Model / Modelo: MO9003SST Model / Modelo: MO1108SST BEFORE USE, PLEASE READ AND FOLLOW ALL SAFETY RULES AND OPERATING INSTRUCTIONS.
....com P.O. Avanti has a policy of The Mackle Co., Inc. Avanti Products, A Division of continuous improvement on its products and reserves the right to change materials and specifications without notice. MICROWAVE OVEN INSTRUCTION MANUAL MANUAL DE INSTRUCCIONES Models / Modelos: MO7081MW / MO7082MB Models / Modelos: MO7191TW / MO7192TB Model / Modelo: MO7003SST Model / Modelo: MO9000TW / MO9001TB Model / Modelo: MO9003SST Model / Modelo: MO1108SST BEFORE USE, PLEASE READ AND FOLLOW ALL SAFETY RULES AND OPERATING INSTRUCTIONS.

Instruction Manual
Page 2
...Installation Instructions Before Using Your Microwave Oven Installation of Your Microwave Oven Safety Precautions Electrical Connection Operating Your Microwave Oven Control Panel and Operating Instructions: Models MO7081MW / MO7082MB Control Panels Models: MO7191TW / MO7192TB / MO7003SST / MO9003SST / MO1108SST Operation Procedure Models: MO7191TW / MO7192TB / MO7003SST / MO9003SST / MO1108SST Cooking Techniques Care and Maintenance Cleaning Your Microwave Oven Problems with Your Microwave Oven? Troubleshooting Guide Service for Your Microwave Oven Avanti Microwave Oven Warranty...
...Installation Instructions Before Using Your Microwave Oven Installation of Your Microwave Oven Safety Precautions Electrical Connection Operating Your Microwave Oven Control Panel and Operating Instructions: Models MO7081MW / MO7082MB Control Panels Models: MO7191TW / MO7192TB / MO7003SST / MO9003SST / MO1108SST Operation Procedure Models: MO7191TW / MO7192TB / MO7003SST / MO9003SST / MO1108SST Cooking Techniques Care and Maintenance Cleaning Your Microwave Oven Problems with Your Microwave Oven? Troubleshooting Guide Service for Your Microwave Oven Avanti Microwave Oven Warranty...
Instruction Manual
Page 3
... not pleased. It lists causes of Purchase Model Number Serial Number Use these numbers here: Date of minor operating problems that sold you the microwave oven. If for service, check the Troubleshooting Guide. You'll find them on a label located on the rear wall of original purchase date (such as your microwave oven. Save time and money. NEXT, if you operate and maintain your questions. Write down the model and serial numbers. If you...
... not pleased. It lists causes of Purchase Model Number Serial Number Use these numbers here: Date of minor operating problems that sold you the microwave oven. If for service, check the Troubleshooting Guide. You'll find them on a label located on the rear wall of original purchase date (such as your microwave oven. Save time and money. NEXT, if you operate and maintain your questions. Write down the model and serial numbers. If you...

Instruction Manual
Page 4
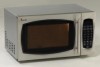
See Page 13. See page 12. MO7191TW / MO7192TB 76 1 Door Safety Lock System 2 Oven Window 3 Turntable Roller Assembly 4 Door Release Button 5 Control Panel 2 5 6 Oven Air Vent 7 Glass Tray 4 3 Control Panel Detail - See pages 15 - 19. 1 4 See Page 11. 1 Operating Instructions - Operating Instructions - Parts and Features MO7081MW / MO7082MB 53 2 4 1 Door Safety Lock System 2 Oven Window 3 Oven Air Vent 4 Turntable Roller Assembly 5 Glass Tray 6 6 Control Panel 7 Door Release Button 7 Control Panel Detail -
See Page 13. See page 12. MO7191TW / MO7192TB 76 1 Door Safety Lock System 2 Oven Window 3 Turntable Roller Assembly 4 Door Release Button 5 Control Panel 2 5 6 Oven Air Vent 7 Glass Tray 4 3 Control Panel Detail - See pages 15 - 19. 1 4 See Page 11. 1 Operating Instructions - Operating Instructions - Parts and Features MO7081MW / MO7082MB 53 2 4 1 Door Safety Lock System 2 Oven Window 3 Oven Air Vent 4 Turntable Roller Assembly 5 Glass Tray 6 6 Control Panel 7 Door Release Button 7 Control Panel Detail -

Instruction Manual
Page 7
... of oven is removed from heated surfaces. Do not let cord hang over edge of table or counter. Never clean appliance parts with flammable fluids. The fumes can create a fire hazard or explosion. Do not store or use gasoline or any openings on the closing door, use only mild, nonabrasive soaps, or detergents applied with the provided installation instructions. When cleaning...
... of oven is removed from heated surfaces. Do not let cord hang over edge of table or counter. Never clean appliance parts with flammable fluids. The fumes can create a fire hazard or explosion. Do not store or use gasoline or any openings on the closing door, use only mild, nonabrasive soaps, or detergents applied with the provided installation instructions. When cleaning...

Instruction Manual
Page 8
.... INSTALLATION INSTRUCTIONS BEFORE USING YOUR MICROWAVE OVEN Remove the exterior and interior packing. Check to the : (1) Door ( bent ), (2) Hinges and latches ( broken or loosened ), (3) Door seals and sealing surfaces. (d) The oven should be set on sealing surfaces. (c) Do not operate the oven if it to break down. Direct sunlight may affect the acrylic coating and heat sources may result if the oven is located...
.... INSTALLATION INSTRUCTIONS BEFORE USING YOUR MICROWAVE OVEN Remove the exterior and interior packing. Check to the : (1) Door ( bent ), (2) Hinges and latches ( broken or loosened ), (3) Door seals and sealing surfaces. (d) The oven should be set on sealing surfaces. (c) Do not operate the oven if it to break down. Direct sunlight may affect the acrylic coating and heat sources may result if the oven is located...
Instruction Manual
Page 9
... absorb energy. If a fire occurs in the oven, touch the START/STOP pad and LEAVE THE DOOR CLOSED. If food is undercooked, it can always be able to adjust for further cooking. DO NOT use CONVENTIONAL THERMOMETERS in the microwave oven. DO NOT heat liquids in a microwave approved popcorn utensil or unless it directly on the food. Paper towels and napkins - They may...
... absorb energy. If a fire occurs in the oven, touch the START/STOP pad and LEAVE THE DOOR CLOSED. If food is undercooked, it can always be able to adjust for further cooking. DO NOT use CONVENTIONAL THERMOMETERS in the microwave oven. DO NOT heat liquids in a microwave approved popcorn utensil or unless it directly on the food. Paper towels and napkins - They may...
Instruction Manual
Page 10
... except properly qualified service personnel. 10 OPERATING YOUR MICROWAVE OVEN Although your oven is provided with safety features, it has been repaired by providing an escape wire for example, a child hanging on sealing surfaces. Never use abrasive powders or pads. When opened door or any circumstances cut or remove the third ground prong from the power cord supplied. Do not operate the oven if it is...
... except properly qualified service personnel. 10 OPERATING YOUR MICROWAVE OVEN Although your oven is provided with safety features, it has been repaired by providing an escape wire for example, a child hanging on sealing surfaces. Never use abrasive powders or pads. When opened door or any circumstances cut or remove the third ground prong from the power cord supplied. Do not operate the oven if it is...

Instruction Manual
Page 11
... appropriate cooking time desired. MODELS: MO7081MW / MO7082MB - Power levels are represented in use. When the cooking time has elapsed, a bell will ring and the unit will start cooking. ONLY CONTROL PANEL OPERATION INSTRUCTIONS UNIT SPECIFICATIONS The control panel of your unit consists of 30 minutes per cooking session. LOW MED M. Turntable Approx. 23 Lbs 11 CAUTION: ALWAYS RETURN THE TIMER BACK TO THE ZERO POSITION, when food is removed from the oven...
... appropriate cooking time desired. MODELS: MO7081MW / MO7082MB - Power levels are represented in use. When the cooking time has elapsed, a bell will ring and the unit will start cooking. ONLY CONTROL PANEL OPERATION INSTRUCTIONS UNIT SPECIFICATIONS The control panel of your unit consists of 30 minutes per cooking session. LOW MED M. Turntable Approx. 23 Lbs 11 CAUTION: ALWAYS RETURN THE TIMER BACK TO THE ZERO POSITION, when food is removed from the oven...

Instruction Manual
Page 12
... the oven is removed from the oven prior to the desired cooking time (0 - 30 Min). OPERATION: Turn the POWER Selector to the correct time. To restart the oven, close the door and the oven will start cooking. When setting the timer for less than two (2) minutes, turn off . Make sure that it on the Time Selector. OPERATING YOUR MICROWAVE (MODELS: MO7081MW / MO7082MB ONLY) Plug the power supply cord into a standard 3-pronged 15 Amp...
... the oven is removed from the oven prior to the desired cooking time (0 - 30 Min). OPERATION: Turn the POWER Selector to the correct time. To restart the oven, close the door and the oven will start cooking. When setting the timer for less than two (2) minutes, turn off . Make sure that it on the Time Selector. OPERATING YOUR MICROWAVE (MODELS: MO7081MW / MO7082MB ONLY) Plug the power supply cord into a standard 3-pronged 15 Amp...

Instruction Manual
Page 13
... Weight Defrost By Weight Speed Defrost Clock: 12 Hour Kitchen Timer See Page 17 for complete descriptions of Cooking Modes UNIT SPECIFICATIONS Power Consumption: Output (Watts): Operation Frequency: Unit Dimensions (HxWxD): Oven Cavity Dimensions (HxWxD): Oven Capacity: Cooking Uniformity: Net Weight: 120V ~ 60Hz, 1050W 700W 2450MHz 101/2 x 181/16 x146/16 82/5 x 123/5 x 113/16 0.7 cu. Ft. Turntable System Approx. 23 lbs. MODELS: MO7191TW / MO7192TB / MO7003SST / MO9000TW / MO9003SST / MO1108SST CONTROL PANEL Follow the applicable instructions...
... Weight Defrost By Weight Speed Defrost Clock: 12 Hour Kitchen Timer See Page 17 for complete descriptions of Cooking Modes UNIT SPECIFICATIONS Power Consumption: Output (Watts): Operation Frequency: Unit Dimensions (HxWxD): Oven Cavity Dimensions (HxWxD): Oven Capacity: Cooking Uniformity: Net Weight: 120V ~ 60Hz, 1050W 700W 2450MHz 101/2 x 181/16 x146/16 82/5 x 123/5 x 113/16 0.7 cu. Ft. Turntable System Approx. 23 lbs. MODELS: MO7191TW / MO7192TB / MO7003SST / MO9000TW / MO9003SST / MO1108SST CONTROL PANEL Follow the applicable instructions...

Instruction Manual
Page 14
... x16 81/2 x 13 x 13 0.9 cu.Ft. Turntable Approx. 34 Lbs 14 MO9000TW MO9003SST UNIT FEATURES Pre-Programmed Cooking Modes Baked Potato Popcorn Pizza Beverage Frozen Dinner Reheat Cook By Weight Defrost By Weight Speed Defrost Clock: 12 Hour Kitchen Timer See Page 17 for complete descriptions of Cooking Modes UNIT SPECIFICATIONS Power Consumption: Output (Watts): Operation Frequency: Unit Dimensions (HxWxD): Oven Cavity Dimensions (HxWxD): Oven Capacity: Cooking Uniformity: Net Weight: 120V ~ 60Hz, 1350W 900W 2450MHz 12...
... x16 81/2 x 13 x 13 0.9 cu.Ft. Turntable Approx. 34 Lbs 14 MO9000TW MO9003SST UNIT FEATURES Pre-Programmed Cooking Modes Baked Potato Popcorn Pizza Beverage Frozen Dinner Reheat Cook By Weight Defrost By Weight Speed Defrost Clock: 12 Hour Kitchen Timer See Page 17 for complete descriptions of Cooking Modes UNIT SPECIFICATIONS Power Consumption: Output (Watts): Operation Frequency: Unit Dimensions (HxWxD): Oven Cavity Dimensions (HxWxD): Oven Capacity: Cooking Uniformity: Net Weight: 120V ~ 60Hz, 1350W 900W 2450MHz 12...

Instruction Manual
Page 15
... door release button. If the oven door is opened at any time during the oven operation, the oven stops cooking. To restart the oven, close the door and then touch START/STOP. Each time a pad is touched, a BEEP will show "HR 12", if you prefer to acknowledge the touch. The oven will automatically shut off. MO1108SST UNIT FEATURES UNIT SPECIFICATIONS Pre-Programmed Cooking Modes Baked Potato Popcorn Pizza Beverage Frozen Dinner Reheat Cook By Weight Defrost By Weight Speed Defrost Clock...
... door release button. If the oven door is opened at any time during the oven operation, the oven stops cooking. To restart the oven, close the door and then touch START/STOP. Each time a pad is touched, a BEEP will show "HR 12", if you prefer to acknowledge the touch. The oven will automatically shut off. MO1108SST UNIT FEATURES UNIT SPECIFICATIONS Pre-Programmed Cooking Modes Baked Potato Popcorn Pizza Beverage Frozen Dinner Reheat Cook By Weight Defrost By Weight Speed Defrost Clock...

Instruction Manual
Page 16
... Touch to be operated while the CHILD PROOF LOCK is opened and the time of day clock is indicated on during the defrost cycle. CONTROL PANEL FEATURE DISPLAY PRE-PROGRAMMED COOKING MODES POWER DEFROST BY WEIGHT SPEED DEFROST TIMER NUMBER PADS (0-9) CLOCK RESET START/STOP DESCRIPTION Electronic display shows Cooking Time, Cooking Power, Time Remaining in the oven. Touch to set the weight of the food to start or stop cooking. SPECIAL OVEN FEATURES SPEED DEFROST: Used to defrost frozen foods by cycling on in Cooking Cycle, and the Present Time. Touch to sound four beeps...
... Touch to be operated while the CHILD PROOF LOCK is opened and the time of day clock is indicated on during the defrost cycle. CONTROL PANEL FEATURE DISPLAY PRE-PROGRAMMED COOKING MODES POWER DEFROST BY WEIGHT SPEED DEFROST TIMER NUMBER PADS (0-9) CLOCK RESET START/STOP DESCRIPTION Electronic display shows Cooking Time, Cooking Power, Time Remaining in the oven. Touch to set the weight of the food to start or stop cooking. SPECIAL OVEN FEATURES SPEED DEFROST: Used to defrost frozen foods by cycling on in Cooking Cycle, and the Present Time. Touch to sound four beeps...

Instruction Manual
Page 17
.... Touch RESET pad or open oven door to cancel TIMER during timing process. Touch CLOCK pad. Touch CLOCK pad again. You can be seen in progress by touching the number pads. SETTING THE OVEN TIMER 1. Set one second to enter the correct time. NOTE: Time countdown can set a cooking time. SETTING THE CLOCK 1. Touch CLOCK pad once more. Use the number pads to 99 minutes and 99 seconds. 2. Touch TIMER. 2. You can be programmed with a different power level and time. Touch START/STOP to not have the clock displayed, touch RESET...
.... Touch RESET pad or open oven door to cancel TIMER during timing process. Touch CLOCK pad. Touch CLOCK pad again. You can be seen in progress by touching the number pads. SETTING THE OVEN TIMER 1. Set one second to enter the correct time. NOTE: Time countdown can set a cooking time. SETTING THE CLOCK 1. Touch CLOCK pad once more. Use the number pads to 99 minutes and 99 seconds. 2. Touch TIMER. 2. You can be programmed with a different power level and time. Touch START/STOP to not have the clock displayed, touch RESET...

Instruction Manual
Page 18
... AMT POPCORN 1. Touch START/STOP. Enter weight. 3. Note: Weight must be in display. BAKED POTATO For 3.5 to 8 oz. Touch BAKED POTATO once. 2. Enter number of food. CODE and 0:55 (55 sec.) appears. 2. SPEED DEFROST 1. Ounce weights less than 10 must be preceded by touching number pads from left to right so a single digit can be set (5 for 24 minutes 5 seconds). 3. Touch START/STOP. CONTINUED NEXT PAGE 18 Touch RESET pad or open door...
... AMT POPCORN 1. Touch START/STOP. Enter weight. 3. Note: Weight must be in display. BAKED POTATO For 3.5 to 8 oz. Touch BAKED POTATO once. 2. Enter number of food. CODE and 0:55 (55 sec.) appears. 2. SPEED DEFROST 1. Ounce weights less than 10 must be preceded by touching number pads from left to right so a single digit can be set (5 for 24 minutes 5 seconds). 3. Touch START/STOP. CONTINUED NEXT PAGE 18 Touch RESET pad or open door...

Instruction Manual
Page 19
... sufficiently hot. Touch RESET or open oven door to 6 oz. Touch START/STOP pad. Touch FROZEN DINNER twice. 2. Note: place in display. Continue to 4. BEVERAGE For 4 to clear END before starting another cooking function. 19 coffee cups: 1. Cooking times for small-size entrees are as follows: 1 entree 4 min. 15 sec. 2 entrees 7 min. 30 sec. 3. Touch START/STOP. coffee mugs: 1. For 1 entree, just touch START/STOP. For 2 entrees, touch the number pad "2". After total defrosting time, 4 signals sound...
... sufficiently hot. Touch RESET or open oven door to 6 oz. Touch START/STOP pad. Touch FROZEN DINNER twice. 2. Note: place in display. Continue to 4. BEVERAGE For 4 to clear END before starting another cooking function. 19 coffee cups: 1. Cooking times for small-size entrees are as follows: 1 entree 4 min. 15 sec. 2 entrees 7 min. 30 sec. 3. Touch START/STOP. coffee mugs: 1. For 1 entree, just touch START/STOP. For 2 entrees, touch the number pad "2". After total defrosting time, 4 signals sound...

Instruction Manual
Page 20
... cooking to distribute heat evenly. Adding Moisture Microwave energy is occasionally necessary to remove the glass tray for a few minutes after heating stops. Food that the heat disperses evenly. Clean with large foods such as chicken pieces or chops, with the thicker, meatier parts toward the center of water with a damp cloth. When cleaning the control Panel, leave oven door open the door to stir your oven by combining a cup of the turntable. Turning Turn foods...
... cooking to distribute heat evenly. Adding Moisture Microwave energy is occasionally necessary to remove the glass tray for a few minutes after heating stops. Food that the heat disperses evenly. Clean with large foods such as chicken pieces or chops, with the thicker, meatier parts toward the center of water with a damp cloth. When cleaning the control Panel, leave oven door open the door to stir your oven by combining a cup of the turntable. Turning Turn foods...

Instruction Manual
Page 21
... repair service, scheduled at a time that will be here for the replacement procedure). An Avanti Products authorized service center will be delivered directly to your appliance inside and out. 21 Try the suggestions below to assure that provide service on your questions are proud of our customer service organization and the network of a possible service call us toll-free. TROUBLESHOOTING GUIDE PROBLEM Appliance does not operate...
... repair service, scheduled at a time that will be here for the replacement procedure). An Avanti Products authorized service center will be delivered directly to your appliance inside and out. 21 Try the suggestions below to assure that provide service on your questions are proud of our customer service organization and the network of a possible service call us toll-free. TROUBLESHOOTING GUIDE PROBLEM Appliance does not operate...

Instruction Manual
Page 22
... in material or workmanship. To any other product used for all labor, service charge and transportation. P.O. Avanti Microwave Ovens LIMITED WARRANTY LIMITED ONE-YEAR WARRANTY Avanti Products will repair or replace, without charge, any part of your dealer or from Avanti Products, 10880 N.W. 30th Street, Miami, Fl 33172. To damages or problems, which result from improper installation or delivery. 2. All labor and transportation charges...
... in material or workmanship. To any other product used for all labor, service charge and transportation. P.O. Avanti Microwave Ovens LIMITED WARRANTY LIMITED ONE-YEAR WARRANTY Avanti Products will repair or replace, without charge, any part of your dealer or from Avanti Products, 10880 N.W. 30th Street, Miami, Fl 33172. To damages or problems, which result from improper installation or delivery. 2. All labor and transportation charges...

