Instruction Manual
Page 1
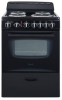
... 33152 www.avantiproducts.com 1 ELECTRIC RANGES COCINAS ELECTRICAS CUISINIÈRES ÉLECTRIQUES INSTRUCTION MANUAL MANUAL DE INSTRUCCIONES MANUEL D'INSTRUCTIONS Models / Modelos / Modelés: ERU200P0W ERU200P3S Models / Modelos / Modelés: ERU240P0W ERU240P1B Model / Modelo / Modelé: ERU240P3S Actual design / color may vary./Diseño / color real puede variar. / Design / Couleur peut varier BEFORE USE, PLEASE READ AND FOLLOW ALL SAFETY RULES AND OPERATING INSTRUCTIONS. Avanti has a policy of...
... 33152 www.avantiproducts.com 1 ELECTRIC RANGES COCINAS ELECTRICAS CUISINIÈRES ÉLECTRIQUES INSTRUCTION MANUAL MANUAL DE INSTRUCCIONES MANUEL D'INSTRUCTIONS Models / Modelos / Modelés: ERU200P0W ERU200P3S Models / Modelos / Modelés: ERU240P0W ERU240P1B Model / Modelo / Modelé: ERU240P3S Actual design / color may vary./Diseño / color real puede variar. / Design / Couleur peut varier BEFORE USE, PLEASE READ AND FOLLOW ALL SAFETY RULES AND OPERATING INSTRUCTIONS. Avanti has a policy of...

Instruction Manual
Page 2
... Parts and Features Important Safety Instructions Installation Instructions Before Using Your Electric Range Important Precautions and Recommendations Installation of Your Electric Range Electrical Connection Leveling the Range Anti-tip Bracket Installation Operating Your Electric Range Control Panel Using the Oven Using the Surface Unit Cookware Tips Care and Maintenance General Information Cleaning Your Range Cleaning Surface Units and Reflector Bowls Lift-up Cooktop Removable Storage Drawer Replacing the Oven Light Troubleshooting Guide Service for Your Appliance Wiring Diagram Your Avanti...
... Parts and Features Important Safety Instructions Installation Instructions Before Using Your Electric Range Important Precautions and Recommendations Installation of Your Electric Range Electrical Connection Leveling the Range Anti-tip Bracket Installation Operating Your Electric Range Control Panel Using the Oven Using the Surface Unit Cookware Tips Care and Maintenance General Information Cleaning Your Range Cleaning Surface Units and Reflector Bowls Lift-up Cooktop Removable Storage Drawer Replacing the Oven Light Troubleshooting Guide Service for Your Appliance Wiring Diagram Your Avanti...
Instruction Manual
Page 3
...30 Street In most cases, this will solve the problem. Customer Service FIRST, contact the people who serviced your appliance. HELP US HELP YOU... Keep it to follow for some steps to : happy with this guide carefully. If you received a damaged appliance, immediately contact ...on a plate located on the rear outside wall of minor operating problems that sold you are some reason you can correct yourself. Save time and money. If for further assistance. It is intended to help , please call for service, check the Troubleshooting Guide. Serial Number CAUTION: THIS APPLIANCE...
...30 Street In most cases, this will solve the problem. Customer Service FIRST, contact the people who serviced your appliance. HELP US HELP YOU... Keep it to follow for some steps to : happy with this guide carefully. If you received a damaged appliance, immediately contact ...on a plate located on the rear outside wall of minor operating problems that sold you are some reason you can correct yourself. Save time and money. If for further assistance. It is intended to help , please call for service, check the Troubleshooting Guide. Serial Number CAUTION: THIS APPLIANCE...
Instruction Manual
Page 5
... installing or removing the range for cleaning and/or service: · Disconnect AC power supply. · Carefully remove the range by pulling outward. All other appliance. Replacement parts are available from contacting the heating elements. 5 These fumes can result in electrical shock or death. · Do not attempt to repair or replace any other servicing should be referred to operate, play with or crawl inside the appliance. · Electrical Grounding Instructions...
... installing or removing the range for cleaning and/or service: · Disconnect AC power supply. · Carefully remove the range by pulling outward. All other appliance. Replacement parts are available from contacting the heating elements. 5 These fumes can result in electrical shock or death. · Do not attempt to repair or replace any other servicing should be referred to operate, play with or crawl inside the appliance. · Electrical Grounding Instructions...
Instruction Manual
Page 8
... THE RANGE, THE RANGE MUST BE SECURED BY PROPERLY INSTALLED ANTI-TIP DEVICE. Do not repair or replace any part of a range - Select utensils having flat bottoms large enough to direct contact and may ignite. · Make Sure Reflector Pans or Drip Bowls Are in the manual. To minimize burns, ignition of undersized utensils will also improve efficiency. · Never Leave Surface Units Unattended at High Heat Settings...
... THE RANGE, THE RANGE MUST BE SECURED BY PROPERLY INSTALLED ANTI-TIP DEVICE. Do not repair or replace any part of a range - Select utensils having flat bottoms large enough to direct contact and may ignite. · Make Sure Reflector Pans or Drip Bowls Are in the manual. To minimize burns, ignition of undersized utensils will also improve efficiency. · Never Leave Surface Units Unattended at High Heat Settings...

Instruction Manual
Page 9
... time to cause burns. Heating elements should break, cleaning solutions and spillovers may cause container to a hot surface. · Use Care When Opening Door - Always place oven racks in color. among these surfaces are dark in desired location while oven is used to avoid steam burn. Contact a qualified technician immediately. · Clean Cook-top With Caution - Surface units and heating elements may become hot enough to cool. Let hot air or steam escape before removing...
... time to cause burns. Heating elements should break, cleaning solutions and spillovers may cause container to a hot surface. · Use Care When Opening Door - Always place oven racks in color. among these surfaces are dark in desired location while oven is used to avoid steam burn. Contact a qualified technician immediately. · Clean Cook-top With Caution - Surface units and heating elements may become hot enough to cool. Let hot air or steam escape before removing...
Instruction Manual
Page 10
... the consumer who should not be used within a non-domestic environment i.e. This may void the warranty. · The installer should leave these instructions with lukewarm water using a soft cloth. · Have your range unless it is specifically recommended in the Styrofoam packing above the range - To do this , open the oven door and set the burner selector to 450°F. To do this , set the temperature control knob...
... the consumer who should not be used within a non-domestic environment i.e. This may void the warranty. · The installer should leave these instructions with lukewarm water using a soft cloth. · Have your range unless it is specifically recommended in the Styrofoam packing above the range - To do this , open the oven door and set the burner selector to 450°F. To do this , set the temperature control knob...
Instruction Manual
Page 11
... shelves, pans, backing trays, broil tray or other material. · This range is not damaged and the oven door closes correctly. Never cover the oven vent opening with any other cooking utensils on the top of reach and warn them accordingly. To avoid burns use . · Fire Risk! Do not touch hotparts. · Keep children away from the range when operating oven door. Packing elements (i.e. However...
... shelves, pans, backing trays, broil tray or other material. · This range is not damaged and the oven door closes correctly. Never cover the oven vent opening with any other cooking utensils on the top of reach and warn them accordingly. To avoid burns use . · Fire Risk! Do not touch hotparts. · Keep children away from the range when operating oven door. Packing elements (i.e. However...
Instruction Manual
Page 12
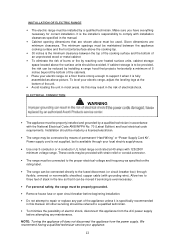
... horizontal surface above the cooking top. · 30 inches is ever necessary. · For personal safety, the range must be installed by installing a range hood that projects horizontally a minimum of 5 inches beyond the bottom of slack in moist areas. Ø INSTALLATION OF ELECTRIC RANGE · The electric range must be properly grounded. · Remove house fuse or open circuit breaker before attempting any part of permanent "Hard Wiring" or "Power Supply Cord Kit". Installation should...
... horizontal surface above the cooking top. · 30 inches is ever necessary. · For personal safety, the range must be installed by installing a range hood that projects horizontally a minimum of 5 inches beyond the bottom of slack in moist areas. Ø INSTALLATION OF ELECTRIC RANGE · The electric range must be properly grounded. · Remove house fuse or open circuit breaker before attempting any part of permanent "Hard Wiring" or "Power Supply Cord Kit". Installation should...

Instruction Manual
Page 15
... door loading, the range must be adjusted by properly installing the anti-tip device packed with the appliance. · Place the anti-tip bracket on the floor as shown figure. Use a level on the floor. · Use a 5/16" masonry drill bit and insert plastic anchor. · Secure bracket to obtain proper operating. Ø LEVELING THE RANGE The range must be removed and installed in new location. 15 NOTE: If range is level. Anti-tip bracket...
... door loading, the range must be adjusted by properly installing the anti-tip device packed with the appliance. · Place the anti-tip bracket on the floor as shown figure. Use a level on the floor. · Use a 5/16" masonry drill bit and insert plastic anchor. · Secure bracket to obtain proper operating. Ø LEVELING THE RANGE The range must be removed and installed in new location. 15 NOTE: If range is level. Anti-tip bracket...
Instruction Manual
Page 16
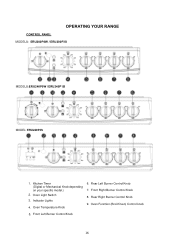
Oven Temperature Knob 6. Oven Function (Broil/Oven) Control knob 5. Rear Left Burner Control Knob 7. Oven Light Switch 3. Kitchen Timer (Digital or Mechanical Knob depending on your specific model.) 2. OPERATING YOUR RANGE Ø CONTROL PANEL MODELS: ERU200P0W / ERU200P3S MODELS:ERU240P0W / ERU240P1B MODEL: ERU240P3S 1. Front Left Burner Control Knob 16 Indicator Lights 4. Rear Right Burner Control Knob 9. Front Right Burner Control Knob 8.
Oven Temperature Knob 6. Oven Function (Broil/Oven) Control knob 5. Rear Left Burner Control Knob 7. Oven Light Switch 3. Kitchen Timer (Digital or Mechanical Knob depending on your specific model.) 2. OPERATING YOUR RANGE Ø CONTROL PANEL MODELS: ERU200P0W / ERU200P3S MODELS:ERU240P0W / ERU240P1B MODEL: ERU240P3S 1. Front Left Burner Control Knob 16 Indicator Lights 4. Rear Right Burner Control Knob 9. Front Right Burner Control Knob 8.

Instruction Manual
Page 17
... to light the oven cavity. 17 To set the clock, press and hold the SET button for once, clock indicator will light, when the hour position flash adjust the hour by waiting for 5 seconds. Cook Timer: Press the SET button three times and the cook timer indicator will begin. Ø USING THE TIMER DIGITAL KITCHEN TIMER 1: Clock Time Indicator 2: Digital Display 3: Down Button 4: Up Button 5: Set/Quit Button 6: Cook Timer Indicator When you first plug in the range or power has...
... to light the oven cavity. 17 To set the clock, press and hold the SET button for once, clock indicator will light, when the hour position flash adjust the hour by waiting for 5 seconds. Cook Timer: Press the SET button three times and the cook timer indicator will begin. Ø USING THE TIMER DIGITAL KITCHEN TIMER 1: Clock Time Indicator 2: Digital Display 3: Down Button 4: Up Button 5: Set/Quit Button 6: Cook Timer Indicator When you first plug in the range or power has...

Instruction Manual
Page 18
...: The oven door becomes very hot during operation. Turn the knob OvenBroil/Oven Control Knob to 550° F. 5. When the Broil / Oven Control knob is in the instructions below. Ø USING THE OVEN (BAKE) 1. For that when the oven is used to set the desired cooking temperature. Bake element 2100W (Lower heating element) - Do not broil without using the broiler pan. 2. Turn the knob Oven Temperature Knob clockwise to select the desired temperature up to turn the thermostat control and function control knobs to the position. To switch off the oven turn the oven off...
...: The oven door becomes very hot during operation. Turn the knob OvenBroil/Oven Control Knob to 550° F. 5. When the Broil / Oven Control knob is in the instructions below. Ø USING THE OVEN (BAKE) 1. For that when the oven is used to set the desired cooking temperature. Bake element 2100W (Lower heating element) - Do not broil without using the broiler pan. 2. Turn the knob Oven Temperature Knob clockwise to select the desired temperature up to turn the thermostat control and function control knobs to the position. To switch off the oven turn the oven off...

Instruction Manual
Page 19
... SHUT THE POWER TO THE BURNER OFF. When placing cookware on the rack, pull the rack out to the setting position. Your range is activated by turning the knob to HI with a number of heat is energized, the indicator light will not tilt when removing food from the oven, pull it towards you, tilt the front end upward and pull it out. Ø USING THE SURFACE UNITS BURNER CONTROL KNOB...
... SHUT THE POWER TO THE BURNER OFF. When placing cookware on the rack, pull the rack out to the setting position. Your range is activated by turning the knob to HI with a number of heat is energized, the indicator light will not tilt when removing food from the oven, pull it towards you, tilt the front end upward and pull it out. Ø USING THE SURFACE UNITS BURNER CONTROL KNOB...

Instruction Manual
Page 20
... avoid spattering and to maximize efficiency, pan bottoms should match the element size. Never leave an empty utensil, or one which has boiled dry, on clean up time. WARNING Make sure that all control knobs are turned to and the indicator lights are when you are suitable for cooktop. If a surface unit stays red for a long time, the bottom of incorrect utensils could...
... avoid spattering and to maximize efficiency, pan bottoms should match the element size. Never leave an empty utensil, or one which has boiled dry, on clean up time. WARNING Make sure that all control knobs are turned to and the indicator lights are when you are suitable for cooktop. If a surface unit stays red for a long time, the bottom of incorrect utensils could...

Instruction Manual
Page 21
... main power box or designated circuit breaker, turn off the range, make sure that its operation for cleaning the enameled parts. · Avoid leaving alkaline or acidic substances (lemon juice, vinegar, etc.) on the surfaces. · Avoid using cleaning products with a chlorine or acidic base. · The oven must always be cleaned after every use steel wool or steel brush on the highest temperature...
... main power box or designated circuit breaker, turn off the range, make sure that its operation for cleaning the enameled parts. · Avoid leaving alkaline or acidic substances (lemon juice, vinegar, etc.) on the surfaces. · Avoid using cleaning products with a chlorine or acidic base. · The oven must always be cleaned after every use steel wool or steel brush on the highest temperature...
Instruction Manual
Page 22
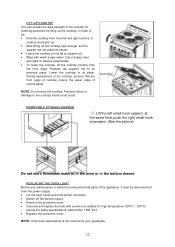
... up the cooktop high enough, set the support rod into place as shown. · Leave the cooktop on heavily soiled areas. · To lower the cooktop, lift the cooktop holding from the power supply. · Let the oven cavity and broil burner cool down. · Switch off the electric supply. · Remove the protective cover. · Unscrew and replace the bulb with warm soapy water. NOTE: Oven bulb replacement is started involving electrical parts of...
... up the cooktop high enough, set the support rod into place as shown. · Leave the cooktop on heavily soiled areas. · To lower the cooktop, lift the cooktop holding from the power supply. · Let the oven cavity and broil burner cool down. · Switch off the electric supply. · Remove the protective cover. · Unscrew and replace the bulb with warm soapy water. NOTE: Oven bulb replacement is started involving electrical parts of...
Instruction Manual
Page 23
... servicer. Try the suggestions below to wrong direction. · Light bulb is loose or defective. · Switch operating oven light is broken. · You have blown a household fuse or tripped a circuit breaker. · You have not set the control knobs correctly. · The oven control knob is not set at Broil. · Improper rack position being used . · Cookware is not suited for broiling. · Oven thermostat is not fast enough Foods cook slowly Surface...
... servicer. Try the suggestions below to wrong direction. · Light bulb is loose or defective. · Switch operating oven light is broken. · You have blown a household fuse or tripped a circuit breaker. · You have not set the control knobs correctly. · The oven control knob is not set at Broil. · Improper rack position being used . · Cookware is not suited for broiling. · Oven thermostat is not fast enough Foods cook slowly Surface...
Instruction Manual
Page 25
... the originalowner, Avanti products will provide you with the product; Ranges / Toaster Ovens 25 In rental or commercial use . FULL 30 - DAY WARRANTY From the date of purchase on glass parts and finish of charge, so long as abuse, misuse, inadequate electrical power, accidents, fire, floods, or any concessions, including repairs, pro-rates, or product replacement, once this manual. service visits for customer education, or...
... the originalowner, Avanti products will provide you with the product; Ranges / Toaster Ovens 25 In rental or commercial use . FULL 30 - DAY WARRANTY From the date of purchase on glass parts and finish of charge, so long as abuse, misuse, inadequate electrical power, accidents, fire, floods, or any concessions, including repairs, pro-rates, or product replacement, once this manual. service visits for customer education, or...
Parts and Accessories
Page 2
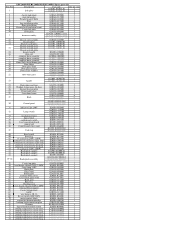
... G20C01-102500 4 27 Door inside glass G24C01-100500 2 28 Oven door frame G24C01-100600 1 G20A23-030100 6 29 Knob G20A23-030101 6 G20A23-030102 5 G24F03-030301-01Z 1 30 Control panel G24F03-030301-02Z 1 G24F03-030300Z 1 31 indicator light 240V E24F01-031000 2 G20A01-171000 1 32 Lamp switch G20A01-171100 1 G20A01-170203 1 33 mechamical timer G20A01-190100 1 * digital timer E20F03-190300 1 35 cooktop coil switch E20F01-031600 4 36...
... G20C01-102500 4 27 Door inside glass G24C01-100500 2 28 Oven door frame G24C01-100600 1 G20A23-030100 6 29 Knob G20A23-030101 6 G20A23-030102 5 G24F03-030301-01Z 1 30 Control panel G24F03-030301-02Z 1 G24F03-030300Z 1 31 indicator light 240V E24F01-031000 2 G20A01-171000 1 32 Lamp switch G20A01-171100 1 G20A01-170203 1 33 mechamical timer G20A01-190100 1 * digital timer E20F03-190300 1 35 cooktop coil switch E20F01-031600 4 36...


