Instruction Manual
Page 1
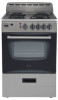
... 25. Box 520604 - Avanti Products has a policy of continuous improvement on its products and reserves the right to change materials and specifications without notice. Avanti Products LLC P.O. INSTRUCTION MANUAL MANUAL DE INSTRUCCIONES ELECTRIC RANGES / COCINA ELECTRICAS Models / Modelos: ER20P0W ER20P3SG Models / Modelos: ER24P0WG ER24P1BG Model / Modelo ER24P3SG BEFORE USE, PLEASE READ AND FOLLOW ALL SAFETY RULES AND OPERATING INSTRUCTIONS. AND SAVE FOR LOCAL ELECTRICAL INSPECTOR'S USE. Miami, Florida 33152...
... 25. Box 520604 - Avanti Products has a policy of continuous improvement on its products and reserves the right to change materials and specifications without notice. Avanti Products LLC P.O. INSTRUCTION MANUAL MANUAL DE INSTRUCCIONES ELECTRIC RANGES / COCINA ELECTRICAS Models / Modelos: ER20P0W ER20P3SG Models / Modelos: ER24P0WG ER24P1BG Model / Modelo ER24P3SG BEFORE USE, PLEASE READ AND FOLLOW ALL SAFETY RULES AND OPERATING INSTRUCTIONS. AND SAVE FOR LOCAL ELECTRICAL INSPECTOR'S USE. Miami, Florida 33152...
Instruction Manual
Page 2
... Parts and Features Important Safety Instructions Installation Instructions Before Using Your Electric Range Important Precautions and Recommendations Installation of Your Electric Range Electrical Connection Leveling the Range Anti-tip Bracket Installation Operating Your Electric Range Control Panel Using the Surface Unit Cookware Tips Using the Oven Care and Maintenance General Information Cleaning Your Range Cleaning Surface Units and Reflector Bowls Lift-up Cooktop Removable Storage Drawer Replacing the Oven Light Troubleshooting Guide Service for Your Appliance Wiring Diagram Your Avanti...
... Parts and Features Important Safety Instructions Installation Instructions Before Using Your Electric Range Important Precautions and Recommendations Installation of Your Electric Range Electrical Connection Leveling the Range Anti-tip Bracket Installation Operating Your Electric Range Control Panel Using the Surface Unit Cookware Tips Using the Oven Care and Maintenance General Information Cleaning Your Range Cleaning Surface Units and Reflector Bowls Lift-up Cooktop Removable Storage Drawer Replacing the Oven Light Troubleshooting Guide Service for Your Appliance Wiring Diagram Your Avanti...
Instruction Manual
Page 3
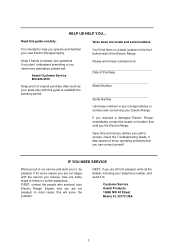
... the Electric Range. IF YOU NEED SERVICE We're proud of the Electric Range. FIRST, contact the people who serviced your Electric Range. In most cases, this guide to : Customer Service Avanti Products 10880 NW 30 Street Miami, FL 33172 USA 3 Write down the model and serial numbers. Keep it to establish the warranty period. Read this guide carefully. It lists causes of Purchase Model Number Serial Number Use these numbers here: Date of minor operating problems...
... the Electric Range. IF YOU NEED SERVICE We're proud of the Electric Range. FIRST, contact the people who serviced your Electric Range. In most cases, this guide to : Customer Service Avanti Products 10880 NW 30 Street Miami, FL 33172 USA 3 Write down the model and serial numbers. Keep it to establish the warranty period. Read this guide carefully. It lists causes of Purchase Model Number Serial Number Use these numbers here: Date of minor operating problems...
Instruction Manual
Page 5
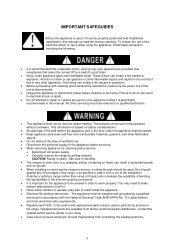
... against any part of the unit is recommended that cannot be used , it is important for cleaning and/or service: • Disconnect AC power supply. • Carefully remove the range by pulling outward. Contact the nearest Avanti service center in handling. • The misuse of bending the leg spindles or the internal coupling connectors. • It is specifically recommended in this manual. IMPORTANT SAFEGUIDES...
... against any part of the unit is recommended that cannot be used , it is important for cleaning and/or service: • Disconnect AC power supply. • Carefully remove the range by pulling outward. Contact the nearest Avanti service center in handling. • The misuse of bending the leg spindles or the internal coupling connectors. • It is specifically recommended in this manual. IMPORTANT SAFEGUIDES...
Instruction Manual
Page 6
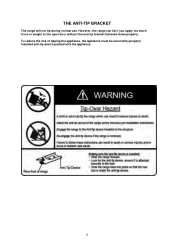
However, the range can tip if you apply too much force or weight to the open door without the anti-tip bracket fastened down properly. To reduce the risk of tipping the appliance, the appliance must be secured by properly installed anti-tip device packed with the appliance. 6 THE ANTI-TIP BRACKET The range will not tip during normal use.
However, the range can tip if you apply too much force or weight to the open door without the anti-tip bracket fastened down properly. To reduce the risk of tipping the appliance, the appliance must be secured by properly installed anti-tip device packed with the appliance. 6 THE ANTI-TIP BRACKET The range will not tip during normal use.
Instruction Manual
Page 8
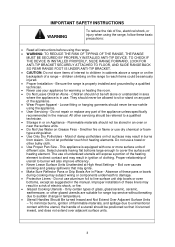
... to direct contact and may subject wiring or components underneath to cover the surface unit heating element. Do not repair or replace any part of clothing. They should be worn while using the range. • WARNING: TO REDUCE THE RISK OF TIPPING OF THE RANGE, THE RANGE MUST BE SECURED BY PROPERLY INSTALLED ANTI-TIP DEVICE. Proper relationship of utensil to burner will expose a portion of the heating element to...
... to direct contact and may subject wiring or components underneath to cover the surface unit heating element. Do not repair or replace any part of clothing. They should be worn while using the range. • WARNING: TO REDUCE THE RISK OF TIPPING OF THE RANGE, THE RANGE MUST BE SECURED BY PROPERLY INSTALLED ANTI-TIP DEVICE. Proper relationship of utensil to burner will expose a portion of the heating element to...
Instruction Manual
Page 9
... - Heating elements should break, cleaning solutions and spillovers may be careful to a hot surface. • Use Care When Opening Door - If cook-top should never be moved while oven is cool. Let hot air or steam escape before removing or replacing food. • Do Not Heat Unopened Food Containers - If rack must be immersed in injury. • Keep Oven Vent Ducts Unobstructed. • Placement of oven until they are oven vent openings and surfaces near...
... - Heating elements should break, cleaning solutions and spillovers may be careful to a hot surface. • Use Care When Opening Door - If cook-top should never be moved while oven is cool. Let hot air or steam escape before removing or replacing food. • Do Not Heat Unopened Food Containers - If rack must be immersed in injury. • Keep Oven Vent Ducts Unobstructed. • Placement of oven until they are oven vent openings and surfaces near...
Instruction Manual
Page 10
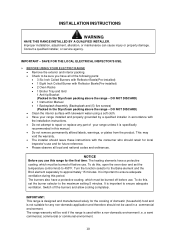
.... Turn the function selector to the Bake element and the Broil element separately to be void if the range is important to the maximum setting 5 minutes. It is used in the Styrofoam packing above the range - Switch off before use this period. Improper installation, adjustment, alteration, or maintenance can cause injury or property damage. This may void the warranty. • The installer should leave these instructions with...
.... Turn the function selector to the Bake element and the Broil element separately to be void if the range is important to the maximum setting 5 minutes. It is used in the Styrofoam packing above the range - Switch off before use this period. Improper installation, adjustment, alteration, or maintenance can cause injury or property damage. This may void the warranty. • The installer should leave these instructions with...
Instruction Manual
Page 11
.... IMPORTANT PRECAUTIONS AND RECOMMENDATIONS After having previously disconnected it from the electric power supply. • After use, ensure that electrical cables connecting other cooking utensils on the base of the oven chamber. • The manufacturer declines all potentially hazardous parts be installed by incorrect or improper use of the range. • To avoid any other purpose. • If you should be...
.... IMPORTANT PRECAUTIONS AND RECOMMENDATIONS After having previously disconnected it from the electric power supply. • After use, ensure that electrical cables connecting other cooking utensils on the base of the oven chamber. • The manufacturer declines all potentially hazardous parts be installed by incorrect or improper use of the range. • To avoid any other purpose. • If you should be...
Instruction Manual
Page 12
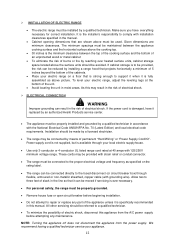
... by reaching over heated surface units, cabinet storage space located above the cooking top. • 30 inches is available through flexible, armoured or non-metallic sheathed, copper cable (with 125/250V minimum voltage range. INSTALLATION OF ELECTRIC RANGE • The electric range must be connected by means of permanent "Hard Wiring" or "Power Supply Cord Kit". Allow two to repair or replace any maintenance. Given dimensions are shown above...
... by reaching over heated surface units, cabinet storage space located above the cooking top. • 30 inches is available through flexible, armoured or non-metallic sheathed, copper cable (with 125/250V minimum voltage range. INSTALLATION OF ELECTRIC RANGE • The electric range must be connected by means of permanent "Hard Wiring" or "Power Supply Cord Kit". Allow two to repair or replace any maintenance. Given dimensions are shown above...
Instruction Manual
Page 14
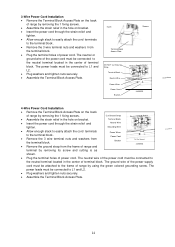
... Strap Terminal Block Neutral Wire Power Wires Power Cord Bracket Black-L1 Green-N Red-L2 Ground Screw 3-WIRES 4-Wire Power Cord Installation • Remove the Terminal Block Access Plate on the back of power cord. The power leads must be connected to the neutral terminal located in the center of terminal block. The ground wire of the power supply cord must be connected to the neutral terminal located in the center of terminal...
... Strap Terminal Block Neutral Wire Power Wires Power Cord Bracket Black-L1 Green-N Red-L2 Ground Screw 3-WIRES 4-Wire Power Cord Installation • Remove the Terminal Block Access Plate on the back of power cord. The power leads must be connected to the neutral terminal located in the center of terminal block. The ground wire of the power supply cord must be connected to the neutral terminal located in the center of terminal...

Instruction Manual
Page 15
... ant-tip bracket on surface units to floor using screws supplied. • Slide appliance into position. LEVELING THE RANGE The range must be removed and installed in new location. 15 Use a level on the floor. • Use a 5/16" masonry drill bit and insert plastic anchor. • Secure bracket to check the leveling of the range. ANTI-TIP BRACKET INSALLATION To reduce the risk of range should be adjusted by properly installing the anti-tip...
... ant-tip bracket on surface units to floor using screws supplied. • Slide appliance into position. LEVELING THE RANGE The range must be removed and installed in new location. 15 Use a level on the floor. • Use a 5/16" masonry drill bit and insert plastic anchor. • Secure bracket to check the leveling of the range. ANTI-TIP BRACKET INSALLATION To reduce the risk of range should be adjusted by properly installing the anti-tip...
Instruction Manual
Page 16
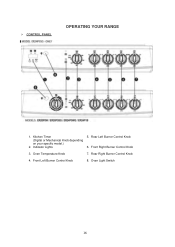
Indicator Lights 5. Front Left Burner Control Knob 8. CONTROL PANEL MODEL: ER24P3SG OPERATING YOUR RANGE 1. Rear Right Burner Control Knob 4. Oven Light Switch 16 Rear Left Burner Control Knob 6. Oven Temperature Knob 7. Front Right Burner Control Knob 3. Kitchen Timer (Digital or Mechanical Knob depending on your specific model.) 2.
Indicator Lights 5. Front Left Burner Control Knob 8. CONTROL PANEL MODEL: ER24P3SG OPERATING YOUR RANGE 1. Rear Right Burner Control Knob 4. Oven Light Switch 16 Rear Left Burner Control Knob 6. Oven Temperature Knob 7. Front Right Burner Control Knob 3. Kitchen Timer (Digital or Mechanical Knob depending on your specific model.) 2.
Instruction Manual
Page 17
... cooking times. • Only certain types of a bell. Simply push in damage to the surface unit, cooktop, wiring and surrounding areas. OVEN THERMOSTAT CONTROL KNOB Push and turn the knob clockwise to select the desired temperature up to 60 minutes. To operate the burners simply push in . IMPORTANT: To switch on a hot surface unit. A slightly larger pan covers the entire element and prevents spillovers from low to high power output, having a number...
... cooking times. • Only certain types of a bell. Simply push in damage to the surface unit, cooktop, wiring and surrounding areas. OVEN THERMOSTAT CONTROL KNOB Push and turn the knob clockwise to select the desired temperature up to 60 minutes. To operate the burners simply push in . IMPORTANT: To switch on a hot surface unit. A slightly larger pan covers the entire element and prevents spillovers from low to high power output, having a number...
Instruction Manual
Page 18
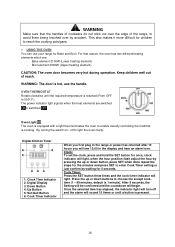
... two different heating elements which are switched or switched . Bake element 2100W (Lower heating element) - Broil element 2000W (Upper heating element) CAUTION: The oven door becomes very hot during operation. OVEN THERMOSTAT Rotate clockwise until a button is pressed. 18 By turning the switch on / off and the alarm will see 12:00 in the range or power has returned after 10 hours you will sound 15 times or until the required temperature is cooking. Press the...
... two different heating elements which are switched or switched . Bake element 2100W (Lower heating element) - Broil element 2000W (Upper heating element) CAUTION: The oven door becomes very hot during operation. OVEN THERMOSTAT Rotate clockwise until a button is pressed. 18 By turning the switch on / off and the alarm will see 12:00 in the range or power has returned after 10 hours you will sound 15 times or until the required temperature is cooking. Press the...
Instruction Manual
Page 19
..., turn the function selector knob and thermostat control knob to the bump on the second level from the oven. Turn the thermostat control knob to broil, use the grid so that when the oven is designed with stop-locks so that when placed correctly on them. OVEN RACK The rack is hot, outside surfaces of the range get hot. Heat is switched . To remove the rack from or placing food on the rack supporters, they will stop before coming completely...
..., turn the function selector knob and thermostat control knob to the bump on the second level from the oven. Turn the thermostat control knob to broil, use the grid so that when the oven is designed with stop-locks so that when placed correctly on them. OVEN RACK The rack is hot, outside surfaces of the range get hot. Heat is switched . To remove the rack from or placing food on the rack supporters, they will stop before coming completely...
Instruction Manual
Page 20
... ashes. CLEANING YOUR RANGE • Disconnect the A/C from the main power box or designated circuit breaker, turn off the range to make sure that burners are off and cool before removing burners and reflector bowls. • Removing the burners and reflector bowls as following : • Line up the opening of the reflector bowls with the burners receptacle, hold the surface unit as level as it...
... ashes. CLEANING YOUR RANGE • Disconnect the A/C from the main power box or designated circuit breaker, turn off the range to make sure that burners are off and cool before removing burners and reflector bowls. • Removing the burners and reflector bowls as following : • Line up the opening of the reflector bowls with the burners receptacle, hold the surface unit as level as it...
Instruction Manual
Page 21
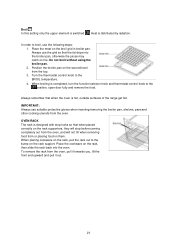
... OVEN LIGHT Before any maintenance is not covered by lifting up the cooktop high enough, set the support rod into place as shown. • Leave the cooktop on heavily soiled areas. • To lower the cooktop, lift the cooktop holding from the power supply. • Let the oven cavity and broil burner cool down. • Switch off the electric supply. • Remove the protective cover. • Unscrew and replace the bulb...
... OVEN LIGHT Before any maintenance is not covered by lifting up the cooktop high enough, set the support rod into place as shown. • Leave the cooktop on heavily soiled areas. • To lower the cooktop, lift the cooktop holding from the power supply. • Let the oven cavity and broil burner cool down. • Switch off the electric supply. • Remove the protective cover. • Unscrew and replace the bulb...

Instruction Manual
Page 22
... a surface unit control knob, you are trying to wrong direction. • Light bulb is loose or defective. • Switch operating oven light is broken. • You have blown a household fuse or tripped a circuit breaker. • You have not set the control knobs correctly. • The oven control knob is not set at Broil. • Improper rack position being used. • Cookware is not suited for broiling. • Oven thermostat is defective. • The oven control knob is not set...
... a surface unit control knob, you are trying to wrong direction. • Light bulb is loose or defective. • Switch operating oven light is broken. • You have blown a household fuse or tripped a circuit breaker. • You have not set the control knobs correctly. • The oven control knob is not set at Broil. • Improper rack position being used. • Cookware is not suited for broiling. • Oven thermostat is defective. • The oven control knob is not set...
Instruction Manual
Page 24
... without limitation, one year from this warranty are related to the appliance service center for customer education, or visits where there is 90 days. WARRANTY - Products on external surfaces and exposed parts; YOUR AVANTI PRODUCTS WARRANTY Staple your sales receipt here. WHAT IS COVERED - DAY WARRANTY From the date of purchase on glass parts and finish of breakers orfuses. service visits for repair. RANGES / TOASTER OVENS 24
... without limitation, one year from this warranty are related to the appliance service center for customer education, or visits where there is 90 days. WARRANTY - Products on external surfaces and exposed parts; YOUR AVANTI PRODUCTS WARRANTY Staple your sales receipt here. WHAT IS COVERED - DAY WARRANTY From the date of purchase on glass parts and finish of breakers orfuses. service visits for repair. RANGES / TOASTER OVENS 24


