User Guide
Page 3
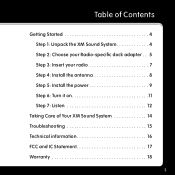
Table of Contents Getting Started 4 Step 1: Unpack the XM Sound System 4 Step 2: Choose your Radio-specific dock adapter . . .5 Step 3: Insert your radio 7 Step 4: Install the antenna 8 Step 5: Install the power 9 Step 6: Turn it on 11 Step 7: Listen 12 Taking Care of Your XM Sound System 14 Troubleshooting 15 Technical information 16 FCC and IC Statement 17 Warranty 18 3
Table of Contents Getting Started 4 Step 1: Unpack the XM Sound System 4 Step 2: Choose your Radio-specific dock adapter . . .5 Step 3: Insert your radio 7 Step 4: Install the antenna 8 Step 5: Install the power 9 Step 6: Turn it on 11 Step 7: Listen 12 Taking Care of Your XM Sound System 14 Troubleshooting 15 Technical information 16 FCC and IC Statement 17 Warranty 18 3
User Guide
Page 4
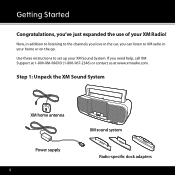
Use these instructions to XM radio in the car, you need help, call XM Support at 1-800-XM-RADIO (1-800-967-2346) or contact us at www.xmradio.com. Getting Started Congratulations, you've just expanded the use of your XM Sound System. Now, in addition to listening to the channels you love in your home or on the go. If you can listen to set up your XM Radio! Step 1: Unpack the XM Sound System XM home antenna Power supply 4 XM sound system Radio-speci c dock adapters
Use these instructions to XM radio in the car, you need help, call XM Support at 1-800-XM-RADIO (1-800-967-2346) or contact us at www.xmradio.com. Getting Started Congratulations, you've just expanded the use of your XM Sound System. Now, in addition to listening to the channels you love in your home or on the go. If you can listen to set up your XM Radio! Step 1: Unpack the XM Sound System XM home antenna Power supply 4 XM sound system Radio-speci c dock adapters
User Guide
Page 5
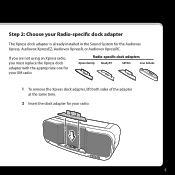
If you are not using an Xpress radio, you must replace the Xpress dock adapter with the appropriate one for your radio. 5 Radio-specific dock adapters Xpress family RoadyXT SKYFi3 inno & Helix 1 To remove the Xpress dock adapter, lift both sides of the adapter at the same time. 2 Insert the dock adapter for your Radio-specific dock adapter The Xpress dock adapter is already installed in the Sound System for the Audiovox Xpress, Audiovox XpressEZ, Audiovox XpressR, or Audiovox XpressRC. Step 2: Choose your XM radio.
If you are not using an Xpress radio, you must replace the Xpress dock adapter with the appropriate one for your radio. 5 Radio-specific dock adapters Xpress family RoadyXT SKYFi3 inno & Helix 1 To remove the Xpress dock adapter, lift both sides of the adapter at the same time. 2 Insert the dock adapter for your Radio-specific dock adapter The Xpress dock adapter is already installed in the Sound System for the Audiovox Xpress, Audiovox XpressEZ, Audiovox XpressR, or Audiovox XpressRC. Step 2: Choose your XM radio.
User Guide
Page 7
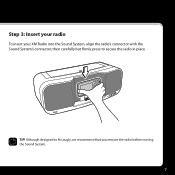
TIP! Step 3: Insert your radio To insert your XM Radio into the Sound System, align the radio's connector with the Sound System's connector, then carefully but firmly press to fit snugly, we recommend that you remove the radio before moving the Sound System. 7 Although designed to secure the radio in place.
TIP! Step 3: Insert your radio To insert your XM Radio into the Sound System, align the radio's connector with the Sound System's connector, then carefully but firmly press to fit snugly, we recommend that you remove the radio before moving the Sound System. 7 Although designed to secure the radio in place.
User Guide
Page 9
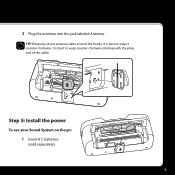
It is best to warp counter clockwise starting with the plug end of the cable. TIP! Step 5: Install the power To use your Sound System on the go: 1 Insert 8 C batteries (sold separately). 9 3 Plug the antenna into the jack labeled Antenna. Wrap any excess antenna cable around the hooks, it is best to wrap it counter clockwise.
It is best to warp counter clockwise starting with the plug end of the cable. TIP! Step 5: Install the power To use your Sound System on the go: 1 Insert 8 C batteries (sold separately). 9 3 Plug the antenna into the jack labeled Antenna. Wrap any excess antenna cable around the hooks, it is best to wrap it counter clockwise.
User Guide
Page 10
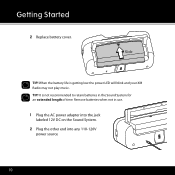
Slide TIP! TIP! When the battery life is not recommended to retain batteries in use. 1 Plug the AC power adapter into the jack labeled 12V DC on the Sound System. 2 Plug the other end into any 110-120V power source 10 Getting Started 2 Replace battery cover. It is getting low the power LED will blink and your XM Radio may not play music. Remove batteries when not in the Sound System for an extended length of time.
Slide TIP! TIP! When the battery life is not recommended to retain batteries in use. 1 Plug the AC power adapter into the jack labeled 12V DC on the Sound System. 2 Plug the other end into any 110-120V power source 10 Getting Started 2 Replace battery cover. It is getting low the power LED will blink and your XM Radio may not play music. Remove batteries when not in the Sound System for an extended length of time.
User Guide
Page 11
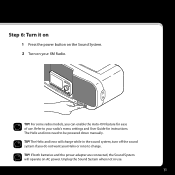
...your radio's menu settings and User Guide for ease of use . 11 Unplug the Sound System when not in the sound system, turn off the sound system if you can enable the Auto-ON feature for instructions. Refer to your XM Radio. The Helix and inno need to charge. TIP! Step 6: Turn it ...on 1 Press the power button on the Sound System. 2 Turn on AC power. TIP! For some radio models, you do not want ...
...your radio's menu settings and User Guide for ease of use . 11 Unplug the Sound System when not in the sound system, turn off the sound system if you can enable the Auto-ON feature for instructions. Refer to your XM Radio. The Helix and inno need to charge. TIP! Step 6: Turn it ...on 1 Press the power button on the Sound System. 2 Turn on AC power. TIP! For some radio models, you do not want ...
User Guide
Page 12
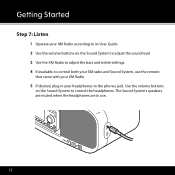
The Sound System's speakers are muted when the headphones are in your headphones to the phones jack. Getting Started Step 7: Listen 1 Operate your XM Radio according to its User Guide. 2 Use the volume buttons on the Sound System to control the headphones. Use the volume buttons on the Sound System to adjust the sound level 3 Use the XM Radio to adjust the bass and treble settings. 4 If available, to control both your XM radio and Sound System, use the remote that came with your XM Radio 5 If desired, plug in use. 12
The Sound System's speakers are muted when the headphones are in your headphones to the phones jack. Getting Started Step 7: Listen 1 Operate your XM Radio according to its User Guide. 2 Use the volume buttons on the Sound System to control the headphones. Use the volume buttons on the Sound System to adjust the sound level 3 Use the XM Radio to adjust the bass and treble settings. 4 If available, to control both your XM radio and Sound System, use the remote that came with your XM Radio 5 If desired, plug in use. 12
User Guide
Page 13
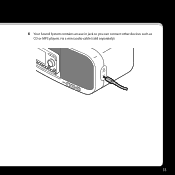
6 Your Sound System contains an aux in jack so you can connect other devices such as CD or MP3 players via a mini audio cable (sold separately). 13
6 Your Sound System contains an aux in jack so you can connect other devices such as CD or MP3 players via a mini audio cable (sold separately). 13
User Guide
Page 14
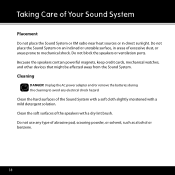
..., keep credit cards, mechanical watches, and other devices that might be affected away from the Sound System. Clean the hard surfaces of Your Sound System Placement Do not place the Sound System or XM radio near heat sources or in areas of the speakers with a mild detergent solution. Unplug the AC power adapter and/or remove the batteries...
..., keep credit cards, mechanical watches, and other devices that might be affected away from the Sound System. Clean the hard surfaces of Your Sound System Placement Do not place the Sound System or XM radio near heat sources or in areas of the speakers with a mild detergent solution. Unplug the AC power adapter and/or remove the batteries...
User Guide
Page 15
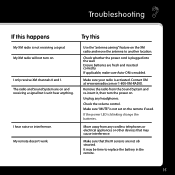
.... Move away from the Sound System and re-insert it, then turn on the XM radio and move the antenna to replace the battery in t-he 15 The radio and Sound System are on the remote if used. Contact XM at www.xmradio.com or 1-800-XM-RADIO. time to another location.... Troubleshooting If this happens Try this My XM radio is blinking change the batteries. Make sure "MUTE" is...
.... Move away from the Sound System and re-insert it, then turn on the XM radio and move the antenna to replace the battery in t-he 15 The radio and Sound System are on the remote if used. Contact XM at www.xmradio.com or 1-800-XM-RADIO. time to another location.... Troubleshooting If this happens Try this My XM radio is blinking change the batteries. Make sure "MUTE" is...
User Guide
Page 16
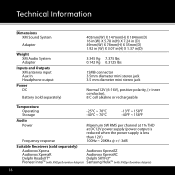
... Dimensions XM Sound System Adapter 405mm(W) X 147mm(H) X 184mm(D) 16 in(W) X 5.78 in(H) X 7.24 in (D) 49mm(W) X 78mm(H) X 35mm(D) 1.92 in (W) X 3.07 in(H) X 1.37 in(D) Weight XM Audio System Adapter 3.345 Kg 7.375 lbs 0.142 Kg 0.3125 lbs Inputs and Outputs XM antenna ...reduced when the power supply is less than 12V.) 100Hz ~ 20KHz @ +/- 3dB Suitable Receivers (sold separately) Audiovox Xpress Audiovox XpressEZ Audiovox XpressR Audiovox XpressRC Delphi RoadyXT® Delphi SKYFi3® Pioneer inno™ (with XM2go Boombox Adapter) Samsung Helix™ ...
... Dimensions XM Sound System Adapter 405mm(W) X 147mm(H) X 184mm(D) 16 in(W) X 5.78 in(H) X 7.24 in (D) 49mm(W) X 78mm(H) X 35mm(D) 1.92 in (W) X 3.07 in(H) X 1.37 in(D) Weight XM Audio System Adapter 3.345 Kg 7.375 lbs 0.142 Kg 0.3125 lbs Inputs and Outputs XM antenna ...reduced when the power supply is less than 12V.) 100Hz ~ 20KHz @ +/- 3dB Suitable Receivers (sold separately) Audiovox Xpress Audiovox XpressEZ Audiovox XpressR Audiovox XpressRC Delphi RoadyXT® Delphi SKYFi3® Pioneer inno™ (with XM2go Boombox Adapter) Samsung Helix™ ...

