User Guide
Page 3
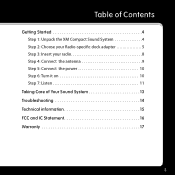
Table of Contents Getting Started 4 Step 1: Unpack the XM Compact Sound System 4 Step 2: Choose your Radio-specific dock adapter 5 Step 3: Insert your radio 8 Step 4: Connect the antenna 9 Step 5: Connect the power 10 Step 6: Turn it on 10 Step 7: Listen 11 Taking Care of Your Sound System 13 Troubleshooting 14 Technical information 15 FCC and IC Statement 16 Warranty 17 3
Table of Contents Getting Started 4 Step 1: Unpack the XM Compact Sound System 4 Step 2: Choose your Radio-specific dock adapter 5 Step 3: Insert your radio 8 Step 4: Connect the antenna 9 Step 5: Connect the power 10 Step 6: Turn it on 10 Step 7: Listen 11 Taking Care of Your Sound System 13 Troubleshooting 14 Technical information 15 FCC and IC Statement 16 Warranty 17 3
User Guide
Page 4
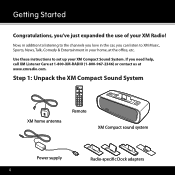
...the XM Compact Sound System XM home antenna info display menu mute + 1 2 3 4 5 6 7 8 9 jump 0 fav Remote XM Compact sound system Power supply 4 Radio-speci c Dock adapters Getting Started Congratulations, you've just expanded the use of your home, at www.xmradio.com. If you can listen to set up your XM Compact Sound System.... Now, in addition to listening to the channels you love in your XM Radio! Use these instructions to XM Music, Sports, News, Talk, Comedy & Entertainment in the car,...
...the XM Compact Sound System XM home antenna info display menu mute + 1 2 3 4 5 6 7 8 9 jump 0 fav Remote XM Compact sound system Power supply 4 Radio-speci c Dock adapters Getting Started Congratulations, you've just expanded the use of your home, at www.xmradio.com. If you can listen to set up your XM Compact Sound System.... Now, in addition to listening to the channels you love in your XM Radio! Use these instructions to XM Music, Sports, News, Talk, Comedy & Entertainment in the car,...
User Guide
Page 5
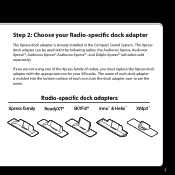
...adapter is already installed in the Compact Sound System. The name of each dock adapter is molded into the bottom surface of radios, you must replace the Xpress dock adapter with the following radios: the Audiovox Xpress, Audiovox XpressEZ, Audiovox XpressR, Audiovox XpressRC, and Delphi XpressRC (all ...radios sold separately). Step 2: Choose your XM radio. turn the dock adapter over to see the name. Radio-specific...
...adapter is already installed in the Compact Sound System. The name of each dock adapter is molded into the bottom surface of radios, you must replace the Xpress dock adapter with the following radios: the Audiovox Xpress, Audiovox XpressEZ, Audiovox XpressR, Audiovox XpressRC, and Delphi XpressRC (all ...radios sold separately). Step 2: Choose your XM radio. turn the dock adapter over to see the name. Radio-specific...
User Guide
Page 8
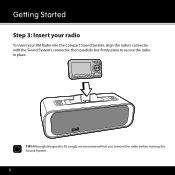
TIP! Getting Started Step 3: Insert your radio To insert your XM Radio into the Compact Sound System, align the radio's connector with the Sound System's connector, then carefully but firmly press to fit snugly, we recommend that you remove the radio before moving the Sound System. 8 Although designed to secure the radio in place.
TIP! Getting Started Step 3: Insert your radio To insert your XM Radio into the Compact Sound System, align the radio's connector with the Sound System's connector, then carefully but firmly press to fit snugly, we recommend that you remove the radio before moving the Sound System. 8 Although designed to secure the radio in place.
User Guide
Page 10
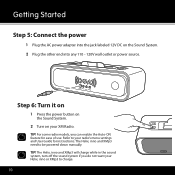
...down manually. Refer to your radio's menu settings and User Guide for ease of use. The Helix, inno and XMp3 will charge while in the sound system, turn off the sound system if you can enable the Auto-ON feature for instructions. TIP! For some radio models, you do not want your... XM Radio. TIP! The Helix, inno and XMp3 need to charge. 10 Step 6: Turn it on 1 Press the power button on the Sound System. 2 Turn on the Sound System. 2 Plug the other end into any 110 - 120V wall outlet or power ...
...down manually. Refer to your radio's menu settings and User Guide for ease of use. The Helix, inno and XMp3 will charge while in the sound system, turn off the sound system if you can enable the Auto-ON feature for instructions. TIP! For some radio models, you do not want your... XM Radio. TIP! The Helix, inno and XMp3 need to charge. 10 Step 6: Turn it on 1 Press the power button on the Sound System. 2 Turn on the Sound System. 2 Plug the other end into any 110 - 120V wall outlet or power ...
User Guide
Page 11
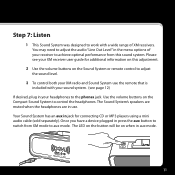
... achieve optimal performance from XM mode to aux mode. Your Sound System has an aux in jack for additional information on the Sound System or remote control to adjust the sound level. 3 To control both your XM radio and Sound System use . The LED on the button will be on the Compact Sound System to control the headphones. The Sound System's speakers are muted when...
... achieve optimal performance from XM mode to aux mode. Your Sound System has an aux in jack for additional information on the Sound System or remote control to adjust the sound level. 3 To control both your XM radio and Sound System use . The LED on the button will be on the Compact Sound System to control the headphones. The Sound System's speakers are muted when...

User Guide
Page 13
... prone to avoid any electrical shock hazard. Do not place the Sound System on an inclined or unstable surface, in direct sunlight. Do not block the speakers or ventilation ports. Clean the hard surfaces of Your Sound System Placement Do not place the Sound System or XM radio near heat sources or in areas of abrasive pad, scouring...
... prone to avoid any electrical shock hazard. Do not place the Sound System on an inclined or unstable surface, in direct sunlight. Do not block the speakers or ventilation ports. Clean the hard surfaces of Your Sound System Placement Do not place the Sound System or XM radio near heat sources or in areas of abrasive pad, scouring...
User Guide
Page 14
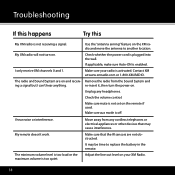
...set on your radio is not receiving a signal. Move away from the Sound System and ing a signal but I can't hear anything. It may cause interference. My XM radio will not turn the power on . Contact XM at www.xmradio.com or 1-800-XM-RADIO. re-insert it, then turn on . Unplug any cordless telephones... or electrical appliances or other devices that the IR sensors are on the XM radio and move the antenna to replace the battery in the remote. Use the "antenna aiming" feature on and receiv- I hear noise or interference....
...set on your radio is not receiving a signal. Move away from the Sound System and ing a signal but I can't hear anything. It may cause interference. My XM radio will not turn the power on . Contact XM at www.xmradio.com or 1-800-XM-RADIO. re-insert it, then turn on . Unplug any cordless telephones... or electrical appliances or other devices that the IR sensors are on the XM radio and move the antenna to replace the battery in the remote. Use the "antenna aiming" feature on and receiv- I hear noise or interference....
User Guide
Page 15
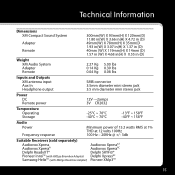
Technical Information Dimensions XM Compact Sound System Adapter Remote 300mm(W) X 93mm(H) X 120mm(D) 11.80 in(W) X 3.66 in(H) X 4.72 in (D) 49mm(W) X 78mm(H) X 35mm(D 1.93 in(W) X 3.07 in(H) X 1.37 in (D) 40mm (W) X 119mm(H) X 14mm (D) 1.57 in (W) X 4.68 in(H) X 0.55 in (D) Weight XM Audio System Adapter Remote 2.27 Kg 5....1% THD at 12 volts 100Hz 100 Hz - 20KHz @ +/- 3db Suitable Receivers (sold separately) Audiovox Xpress Audiovox XpressR Delphi RoadyXT® Pioneer inno™ (with XM2go Boombox Adapter) Samsung Helix™ (with XM2go Boombox Adapter...
Technical Information Dimensions XM Compact Sound System Adapter Remote 300mm(W) X 93mm(H) X 120mm(D) 11.80 in(W) X 3.66 in(H) X 4.72 in (D) 49mm(W) X 78mm(H) X 35mm(D 1.93 in(W) X 3.07 in(H) X 1.37 in (D) 40mm (W) X 119mm(H) X 14mm (D) 1.57 in (W) X 4.68 in(H) X 0.55 in (D) Weight XM Audio System Adapter Remote 2.27 Kg 5....1% THD at 12 volts 100Hz 100 Hz - 20KHz @ +/- 3db Suitable Receivers (sold separately) Audiovox Xpress Audiovox XpressR Delphi RoadyXT® Pioneer inno™ (with XM2go Boombox Adapter) Samsung Helix™ (with XM2go Boombox Adapter...

