User Guide
Page 3
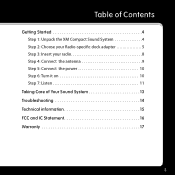
Table of Contents Getting Started 4 Step 1: Unpack the XM Compact Sound System 4 Step 2: Choose your Radio-specific dock adapter 5 Step 3: Insert your radio 8 Step 4: Connect the antenna 9 Step 5: Connect the power 10 Step 6: Turn it on 10 Step 7: Listen 11 Taking Care of Your Sound System 13 Troubleshooting 14 Technical information 15 FCC and IC Statement 16 Warranty 17 3
Table of Contents Getting Started 4 Step 1: Unpack the XM Compact Sound System 4 Step 2: Choose your Radio-specific dock adapter 5 Step 3: Insert your radio 8 Step 4: Connect the antenna 9 Step 5: Connect the power 10 Step 6: Turn it on 10 Step 7: Listen 11 Taking Care of Your Sound System 13 Troubleshooting 14 Technical information 15 FCC and IC Statement 16 Warranty 17 3
User Guide
Page 4
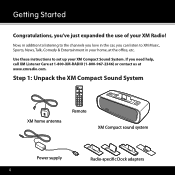
..., News, Talk, Comedy & Entertainment in your XM Compact Sound System. Step 1: Unpack the XM Compact Sound System XM home antenna info display menu mute + 1 2 3 4 5 6 7 8 9 jump 0 fav Remote XM Compact sound system Power supply 4 Radio-speci c Dock adapters If you 've just expanded the use of your XM Radio! Getting Started Congratulations, you need help, call XM Listener Care at 1-800-XM-RADIO (1-800-967-2346) or contact us at...
..., News, Talk, Comedy & Entertainment in your XM Compact Sound System. Step 1: Unpack the XM Compact Sound System XM home antenna info display menu mute + 1 2 3 4 5 6 7 8 9 jump 0 fav Remote XM Compact sound system Power supply 4 Radio-speci c Dock adapters If you 've just expanded the use of your XM Radio! Getting Started Congratulations, you need help, call XM Listener Care at 1-800-XM-RADIO (1-800-967-2346) or contact us at...
User Guide
Page 5
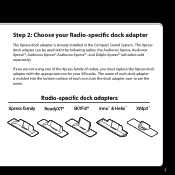
...of radios, you must replace the Xpress dock adapter with the following radios: the Audiovox Xpress, Audiovox XpressEZ, Audiovox XpressR, Audiovox XpressRC, and Delphi XpressRC (all radios sold separately). Step 2: Choose your XM radio. ...turn the dock adapter over to see the name. If you are not using one for your Radio-specific dock adapter The Xpress dock adapter is molded into the bottom surface of each dock adapter is already installed in the Compact Sound System...
...of radios, you must replace the Xpress dock adapter with the following radios: the Audiovox Xpress, Audiovox XpressEZ, Audiovox XpressR, Audiovox XpressRC, and Delphi XpressRC (all radios sold separately). Step 2: Choose your XM radio. ...turn the dock adapter over to see the name. If you are not using one for your Radio-specific dock adapter The Xpress dock adapter is molded into the bottom surface of each dock adapter is already installed in the Compact Sound System...
User Guide
Page 8
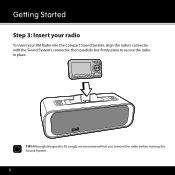
Although designed to secure the radio in place. TIP! Getting Started Step 3: Insert your radio To insert your XM Radio into the Compact Sound System, align the radio's connector with the Sound System's connector, then carefully but firmly press to fit snugly, we recommend that you remove the radio before moving the Sound System. 8
Although designed to secure the radio in place. TIP! Getting Started Step 3: Insert your radio To insert your XM Radio into the Compact Sound System, align the radio's connector with the Sound System's connector, then carefully but firmly press to fit snugly, we recommend that you remove the radio before moving the Sound System. 8
User Guide
Page 10
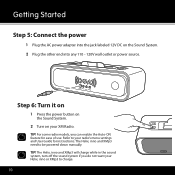
...Getting Started Step 5: Connect the power 1 Plug the AC power adapter into the jack labeled 12V DC on your XM Radio. Step 6: Turn it on 1 Press the power button on the Sound System. 2 Turn on the Sound System. 2 Plug the other end into any 110 - 120V wall outlet or power source. The Helix, inno and ...XMp3 need to charge. 10 TIP! For some radio models, you do not want your Helix, inno or XMp3 to...
...Getting Started Step 5: Connect the power 1 Plug the AC power adapter into the jack labeled 12V DC on your XM Radio. Step 6: Turn it on 1 Press the power button on the Sound System. 2 Turn on the Sound System. 2 Plug the other end into any 110 - 120V wall outlet or power source. The Helix, inno and ...XMp3 need to charge. 10 TIP! For some radio models, you do not want your Helix, inno or XMp3 to...
User Guide
Page 11
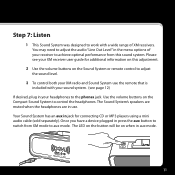
... this adjustment. 2 Use the volume buttons on the Sound System or remote control to adjust the sound level. 3 To control both your XM radio and Sound System use . Once you have a device plugged in jack for additional information on this sound system. The LED on the button will be on when ...your receiver to achieve optimal performance from XM mode to aux mode. Use the volume buttons on the Compact Sound System to adjust the audio "Line Out Level" in aux mode. 11 The Sound System's speakers are muted when the headphones are in your XM receiver user guide for connecting CD or...
... this adjustment. 2 Use the volume buttons on the Sound System or remote control to adjust the sound level. 3 To control both your XM radio and Sound System use . Once you have a device plugged in jack for additional information on this sound system. The LED on the button will be on when ...your receiver to achieve optimal performance from XM mode to aux mode. Use the volume buttons on the Compact Sound System to adjust the audio "Line Out Level" in aux mode. 11 The Sound System's speakers are muted when the headphones are in your XM receiver user guide for connecting CD or...

User Guide
Page 13
...Clean the hard surfaces of the Sound System with a soft cloth slightly moistened with a dry lint brush. Because the speakers contain powerful magnets, keep credit cards, mechanical watches, and other devices that might be affected away from the Sound System. Do not use any electrical shock...surfaces of the speakers with a mild detergent solution. Cleaning DANGER! Do not block the speakers or ventilation ports. Unplug the AC power adapter during the cleaning to mechanical shock. Taking Care of Your Sound System Placement Do not place the Sound System or XM radio near heat sources ...
...Clean the hard surfaces of the Sound System with a soft cloth slightly moistened with a dry lint brush. Because the speakers contain powerful magnets, keep credit cards, mechanical watches, and other devices that might be affected away from the Sound System. Do not use any electrical shock...surfaces of the speakers with a mild detergent solution. Cleaning DANGER! Do not block the speakers or ventilation ports. Unplug the AC power adapter during the cleaning to mechanical shock. Taking Care of Your Sound System Placement Do not place the Sound System or XM radio near heat sources ...
User Guide
Page 14
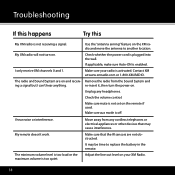
...It may cause interference. Troubleshooting If this happens Try this My XM radio is enabled. The radio and Sound System are not obstructed. re-insert it, then turn on your radio is activated. Check the volume control. Move away from the Sound System and ing a signal but I can't hear anything. Adjust the... line out level on . My XM radio will not turn the power on the XM radio and move the antenna to replace ...
...It may cause interference. Troubleshooting If this happens Try this My XM radio is enabled. The radio and Sound System are not obstructed. re-insert it, then turn on your radio is activated. Check the volume control. Move away from the Sound System and ing a signal but I can't hear anything. Adjust the... line out level on . My XM radio will not turn the power on the XM radio and move the antenna to replace ...

