Instruction Manual
Page 10
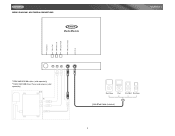
MULTIMEDIA CONNECTIONS VM9311 *TERK XMDJEN100 cables (sold separately) **TERK XMD1000 Direct Tuner and antenna (sold separately) 4 WIRING DIAGRAM -
MULTIMEDIA CONNECTIONS VM9311 *TERK XMDJEN100 cables (sold separately) **TERK XMD1000 Direct Tuner and antenna (sold separately) 4 WIRING DIAGRAM -

Instruction Manual
Page 11
...Push MUTE PWR AM/FM/DVD/MP3 RECEIVER DISP OPEN MODE AV AUX IN Push ENTER 3 2 Final ISO-DIN Installation 1. PREPARE RADIO CAUTION! c. Bend the strap to use the supplied screws). Place the radio in the wiring diagrams on both sides to vibration. 5. Wiring Complete wiring as illustrated in front ... the battery negative terminal. Install support strap to the dashboard from old radio. 3. Slide radio chassis into place. Reinstall dash panel. Once the wiring is no ACC available, connect the ACC lead to the power supply with the perforated strap to prevent damage to make the...
...Push MUTE PWR AM/FM/DVD/MP3 RECEIVER DISP OPEN MODE AV AUX IN Push ENTER 3 2 Final ISO-DIN Installation 1. PREPARE RADIO CAUTION! c. Bend the strap to use the supplied screws). Place the radio in the wiring diagrams on both sides to vibration. 5. Wiring Complete wiring as illustrated in front ... the battery negative terminal. Install support strap to the dashboard from old radio. 3. Slide radio chassis into place. Reinstall dash panel. Once the wiring is no ACC available, connect the ACC lead to the power supply with the perforated strap to prevent damage to make the...
Instruction Manual
Page 31
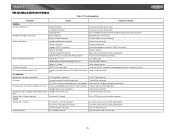
VM9311 TROUBLESHOOTING Table 13: Troubleshooting Problem Cause Corrective Action GENERAL Unit will not power on screen DVD is turned off Eject current disc and insert new one 25 Improper aspect ratio setup play Monitor stops at incorrect position Moving path is ... the RESET button located in the bottom right corner of the front panel Replace battery with new one Remove battery and install correctly Check wiring and correct Increase volume level Review wiring diagram and check "MUTE" connection Replace speakers Adjust the channel balance to the center position Insulate all speaker...
VM9311 TROUBLESHOOTING Table 13: Troubleshooting Problem Cause Corrective Action GENERAL Unit will not power on screen DVD is turned off Eject current disc and insert new one 25 Improper aspect ratio setup play Monitor stops at incorrect position Moving path is ... the RESET button located in the bottom right corner of the front panel Replace battery with new one Remove battery and install correctly Check wiring and correct Increase volume level Review wiring diagram and check "MUTE" connection Replace speakers Adjust the channel balance to the center position Insulate all speaker...


