
Owners Manual
Page 7
...)___ 21 Changing the Subtitle Language 21 Changing the Vocal Language 21 Zoom (To Enlarge a Picture) 21 Viewing Different Angles 22 Viewing the Main Disc Menu 22 Viewing the Playback Time, Title, Chapter Status 22 Playing Audio CDs 24 Playing MP3 Discs 24 Playing A JPEG FILE 26 SETUP (Language, Video, Rating...
...)___ 21 Changing the Subtitle Language 21 Changing the Vocal Language 21 Zoom (To Enlarge a Picture) 21 Viewing Different Angles 22 Viewing the Main Disc Menu 22 Viewing the Playback Time, Title, Chapter Status 22 Playing Audio CDs 24 Playing MP3 Discs 24 Playing A JPEG FILE 26 SETUP (Language, Video, Rating...
Owners Manual
Page 13
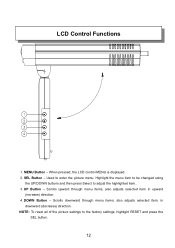
...) direction. 4. NOTE: To reset all of the picture settings to adjust the highlighted item.. 3. UP Button - Scrolls upward through menu items; also adjusts selected item; LCD Control Functions 1. SEL Button - Highlight the menu item to be changed using the UP/DOWN buttons and then press Select to the factory settings, highlight RESET...
...) direction. 4. NOTE: To reset all of the picture settings to adjust the highlighted item.. 3. UP Button - Scrolls upward through menu items; also adjusts selected item; LCD Control Functions 1. SEL Button - Highlight the menu item to be changed using the UP/DOWN buttons and then press Select to the factory settings, highlight RESET...

Owners Manual
Page 15
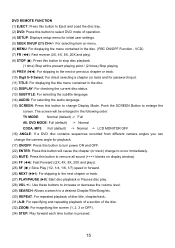
REMOTE CONTROL FUNCTIONS (1) EJECT (2) DVD (3) TV (4) SETUP (5) SEEK DN, SEEKUP (6) MENU (7) FR(WW) (8) STOP(■) (9) PREV (IWW) (10) Digit 0-9 Select (11) TITLE (12) DISPLAY (13) SUB TITLE (14) AUDIO (15) SCREEN (16) ANGLE (AP) (17) ON/OFF (18) A/V (19) AM/FM (20) TEL (21) CH+, CH(22) ENTER (23) MUTE (24) FF (XX) (25) SF (IX) (26) NEXT (XXI) (27) PLAY/PAUSE (XII) (28) VOL +/(29) SEARCH (30) REPEAT (31) A-B Repeat (32) ZOOM (33) DELETE (34) STEP (ADD) 14
REMOTE CONTROL FUNCTIONS (1) EJECT (2) DVD (3) TV (4) SETUP (5) SEEK DN, SEEKUP (6) MENU (7) FR(WW) (8) STOP(■) (9) PREV (IWW) (10) Digit 0-9 Select (11) TITLE (12) DISPLAY (13) SUB TITLE (14) AUDIO (15) SCREEN (16) ANGLE (AP) (17) ON/OFF (18) A/V (19) AM/FM (20) TEL (21) CH+, CH(22) ENTER (23) MUTE (24) FF (XX) (25) SF (IX) (26) NEXT (XXI) (27) PLAY/PAUSE (XII) (28) VOL +/(29) SEARCH (30) REPEAT (31) A-B Repeat (32) ZOOM (33) DELETE (34) STEP (ADD) 14
Owners Manual
Page 16
...chapter or track. (10) Digit 0~9 Select: For direct selecting a chapter (or tack) and for password input. (11) TITLE: For displaying the title menu contained in the disc. (12) DISPLAY: For checking the current disc status. (13) SUBTITLE: For selecting the subtitle language (14) AUDIO: For selecting ... tray. (2) DVD: Press this button to change to occur immediately. (23) MUTE: Press this button to remove all sound (++++ blanks on menu. (6) MENU: For displaying the menu contained in the disc. (PBC ON/OFF Function - The screen will be enlarged in the following order: TV MODE: Normal (default) ->...
...chapter or track. (10) Digit 0~9 Select: For direct selecting a chapter (or tack) and for password input. (11) TITLE: For displaying the title menu contained in the disc. (12) DISPLAY: For checking the current disc status. (13) SUBTITLE: For selecting the subtitle language (14) AUDIO: For selecting ... tray. (2) DVD: Press this button to change to occur immediately. (23) MUTE: Press this button to remove all sound (++++ blanks on menu. (6) MENU: For displaying the menu contained in the disc. (PBC ON/OFF Function - The screen will be enlarged in the following order: TV MODE: Normal (default) ->...
Owners Manual
Page 21
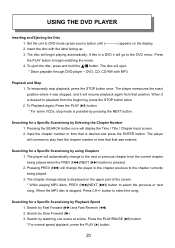
... Slow Forward (IX) 3. Press the PLAY/PAUSE (XII) button. * For normal speed playback, press the PLAY (X) button. 20 The disc will change to the DVD menu. The player memorizes the exact position where it was stopped, and it will commence play from the current chapter being played. 3. Pressing the SEARCH button...
... Slow Forward (IX) 3. Press the PLAY/PAUSE (XII) button. * For normal speed playback, press the PLAY (X) button. 20 The disc will change to the DVD menu. The player memorizes the exact position where it was stopped, and it will commence play from the current chapter being played. 3. Pressing the SEARCH button...
Owners Manual
Page 23
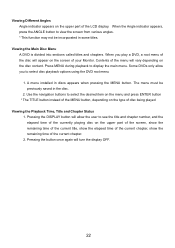
...the elapsed time of the current chapter, show the remaining time of your Monitor. Press MENU during playback to select disc playback options using the DVD root menu 1. Some DVDs only allow you play a DVD, a root menu of the disc will allow the user to view the screen from various angles. *... This function may not be previously saved in discs appears when pressing the MENU button. Viewing the Main Disc Menu A DVD is divided into sections called titles and chapters. When the Angle indicator appears, press the ANGLE button to see the...
...the elapsed time of the current chapter, show the remaining time of your Monitor. Press MENU during playback to select disc playback options using the DVD root menu 1. Some DVDs only allow you play a DVD, a root menu of the disc will allow the user to view the screen from various angles. *... This function may not be previously saved in discs appears when pressing the MENU button. Viewing the Main Disc Menu A DVD is divided into sections called titles and chapters. When the Angle indicator appears, press the ANGLE button to see the...

Owners Manual
Page 25
.... 4. USING THE REPEAT FEATURE The default mode for the Repeat feature is a digital audio format. When an MP3 disc is compressed into the unit, the menu screen appears automatically. The number of audio quality. The selected repeat option loops repeatedly until its turned off. An audio CD-quality song is inserted... options, the repeat option changes. Pressing REPEAT consecutively changes the repeat options: • Repeat Single- repeats the track that is displayed. You can use the menu screen to remove the display. 1.
.... 4. USING THE REPEAT FEATURE The default mode for the Repeat feature is a digital audio format. When an MP3 disc is compressed into the unit, the menu screen appears automatically. The number of audio quality. The selected repeat option loops repeatedly until its turned off. An audio CD-quality song is inserted... options, the repeat option changes. Pressing REPEAT consecutively changes the repeat options: • Repeat Single- repeats the track that is displayed. You can use the menu screen to remove the display. 1.
Owners Manual
Page 27
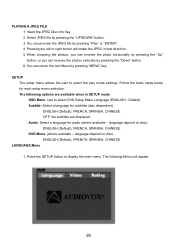
... are displayed. When browsing the photos, you can reverse the photo horizontally by pressing the "Up" button, or you can return the root Menu by pressing the "Down" button. 6. OFF: No subtitles are available when in that direction. 5. language depend on disc). Insert the JPEG... Disc into tray. 2. You can reverse the photos vertically by pressing "MENU" key. ENGLISH (Default), FRENCH, SPANISH, CHINESE. language depend on disc). Select JPEG file by pressing "Play" or "ENTER". 4. ENGLISH (Default), ...
... are displayed. When browsing the photos, you can reverse the photo horizontally by pressing the "Up" button, or you can return the root Menu by pressing the "Down" button. 6. OFF: No subtitles are available when in that direction. 5. language depend on disc). Insert the JPEG... Disc into tray. 2. You can reverse the photos vertically by pressing "MENU" key. ENGLISH (Default), FRENCH, SPANISH, CHINESE. language depend on disc). Select JPEG file by pressing "Play" or "ENTER". 4. ENGLISH (Default), ...

Owners Manual
Page 28
Press ENTER button to its right. Press the f or g button to highlight the next sub-menu item for selection. 6. Press ENTER, the following screen will appear. 3. Each sub-menu item provides a number of option items to display the sub-menu. 5. Press the ENTER button to highlight the desired menu item. 4. Use the f or g buttons to select the option item. 7. Use the f or g buttons to exit the SETUP mode. 27 2. Press the SETUP button to highlight the desired option item for setup and repeat steps 3 and 6. 8.
Press ENTER button to its right. Press the f or g button to highlight the next sub-menu item for selection. 6. Press ENTER, the following screen will appear. 3. Each sub-menu item provides a number of option items to display the sub-menu. 5. Press the ENTER button to highlight the desired menu item. 4. Use the f or g buttons to select the option item. 7. Use the f or g buttons to exit the SETUP mode. 27 2. Press the SETUP button to highlight the desired option item for setup and repeat steps 3 and 6. 8.

Owners Manual
Page 29
... on the screen with a black strip at both the top and bottom of the screen. * 16:9 : When the player is connected to display the main menu (see sample screen under LANGUAGE Menu) 2. Press the SETUP button to a wide screen TV, a wide picture is shown on the full screen(Default). 28 VIDEO...
... on the screen with a black strip at both the top and bottom of the screen. * 16:9 : When the player is connected to display the main menu (see sample screen under LANGUAGE Menu) 2. Press the SETUP button to a wide screen TV, a wide picture is shown on the full screen(Default). 28 VIDEO...
Owners Manual
Page 30
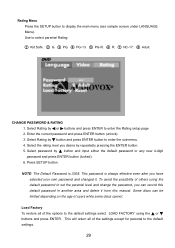
... button. 5. Some discs can record this manual. Adult. CHANGE PASSWORD & RATING 1. Select Rating by g button and press ENTER button to display the main menu (see sample screen under LANGUAGE Menu). Select Rating by h or d buttons and press ENTER to select parental Rating: 1 2 3 4 5 6 7 8 Kid Safe. This will return all of the settings except... level and change the password, you have selected your own password and changed it from this default password in another area and delete it . Rating Menu Press the SETUP button to enter the sub...
... button. 5. Some discs can record this manual. Adult. CHANGE PASSWORD & RATING 1. Select Rating by g button and press ENTER button to display the main menu (see sample screen under LANGUAGE Menu). Select Rating by h or d buttons and press ENTER to select parental Rating: 1 2 3 4 5 6 7 8 Kid Safe. This will return all of the settings except... level and change the password, you have selected your own password and changed it from this default password in another area and delete it . Rating Menu Press the SETUP button to enter the sub...
Owners Manual
Page 32
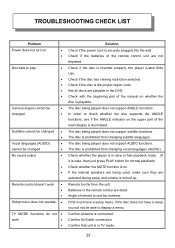
...Camera angles cannot be • changed • Subtitles cannot be changed • • Vocal languages (AUDIO) • cannot be able to display a menu. The disc being used, make sure they are dead. Not all discs are not depleted. if the disc does not have a setup...have a setup you will not be changed • No sound output • • • Remote control doesn't work • • • Setup menu does not operate • TV MODE functions do not • work • • Solution Check if the power cord is prohibited from changing vocal languages...
...Camera angles cannot be • changed • Subtitles cannot be changed • • Vocal languages (AUDIO) • cannot be able to display a menu. The disc being used, make sure they are dead. Not all discs are not depleted. if the disc does not have a setup...have a setup you will not be changed • No sound output • • • Remote control doesn't work • • • Setup menu does not operate • TV MODE functions do not • work • • Solution Check if the power cord is prohibited from changing vocal languages...
