
Owners Manual
Page 4
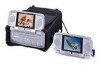
... Headphone Jacks Figure 1 E. Unzip the lower compartment of the system. 4 Powering the Unit 1. D. Plug one end of the AC to Figure 1. Feature List 1.) One Video Cassette Player with Built In VHF/UHF/CATV Tuner system 2.) Two 5" LCD Monitors with AUX Inputs 3.) One Infra Red Remote Control 4.) One Bag (for carrying the unit... 6.) Two Pouches (for the detachable monitors) 7.) One DC Power Adaptor (cigarette lighter adapter) 8.) One AC to DC Power Adapter (two piece set) 9.) Two DIN Cable 10.) One Dipole Antenna 11.) One Slip-on the rear of the bag and take out the AC/ DC adapter.
... Headphone Jacks Figure 1 E. Unzip the lower compartment of the system. 4 Powering the Unit 1. D. Plug one end of the AC to Figure 1. Feature List 1.) One Video Cassette Player with Built In VHF/UHF/CATV Tuner system 2.) Two 5" LCD Monitors with AUX Inputs 3.) One Infra Red Remote Control 4.) One Bag (for carrying the unit... 6.) Two Pouches (for the detachable monitors) 7.) One DC Power Adaptor (cigarette lighter adapter) 8.) One AC to DC Power Adapter (two piece set) 9.) Two DIN Cable 10.) One Dipole Antenna 11.) One Slip-on the rear of the bag and take out the AC/ DC adapter.

Owners Manual
Page 6
If in the vehicle, insert one end of the DIN cable into the MONITOR PORT on the side of the main unit. After plugging in the bag and insert the other end into the MONITOR PORT ... in the main unit, DC 12V power, Audio/Video and IR signals will supply inside power to the monitor, there is no need for another power source to be connected to the MONITOR PORT on rear of the detached monitor, slide the cable through DIN cable to Figure 5 and 6. When the monitor is separated...
If in the vehicle, insert one end of the DIN cable into the MONITOR PORT on the side of the main unit. After plugging in the bag and insert the other end into the MONITOR PORT ... in the main unit, DC 12V power, Audio/Video and IR signals will supply inside power to the monitor, there is no need for another power source to be connected to the MONITOR PORT on rear of the detached monitor, slide the cable through DIN cable to Figure 5 and 6. When the monitor is separated...
Owners Manual
Page 8
Insert one end of the DIN cable into the MONITOR PORT on the side of the detached monitor, slide the cable through the slot in the bag, and insert the other end into the MONITOR PORT on a flat surface. 5. Remove the second monitor and its pouch ...
Insert one end of the DIN cable into the MONITOR PORT on the side of the detached monitor, slide the cable through the slot in the bag, and insert the other end into the MONITOR PORT on a flat surface. 5. Remove the second monitor and its pouch ...

Owners Manual
Page 9
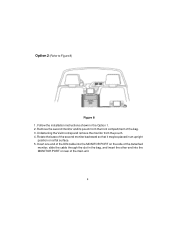
... to feed the bottom piece of the pouch into the MONITOR PORT on rear of the detached monitor, slide the cable through the slot in the Option 1. 2. Insert one end of the DIN cable into the long slot of the strap while holding the buckle until the pouch is tightly secured. 3. Option 3 (Refer...
... to feed the bottom piece of the pouch into the MONITOR PORT on rear of the detached monitor, slide the cable through the slot in the Option 1. 2. Insert one end of the DIN cable into the long slot of the strap while holding the buckle until the pouch is tightly secured. 3. Option 3 (Refer...
Owners Manual
Page 11
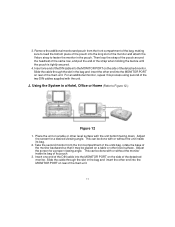
... or without the monitor inside its pouch. 3. Insert one end of its bag. 2. Using the System in the pouch. Insert one end of the DIN cable into the long slot of the detached monitor. 3. Place the unit on the side of the monitor and attach the Velcro strap to fasten the... monitor in a Hotel, Office or Home (Refer to feed the bottom piece of the pouch into the MONITOR PORT on rear of the two DIN cables supplied with the unit bottom facing down. Adjust the screen for a proper viewing angle. Take the second monitor from the front compartment of the bag...
... or without the monitor inside its pouch. 3. Insert one end of its bag. 2. Using the System in the pouch. Insert one end of the DIN cable into the long slot of the detached monitor. 3. Place the unit on the side of the monitor and attach the Velcro strap to fasten the... monitor in a Hotel, Office or Home (Refer to feed the bottom piece of the pouch into the MONITOR PORT on rear of the two DIN cables supplied with the unit bottom facing down. Adjust the screen for a proper viewing angle. Take the second monitor from the front compartment of the bag...

Owners Manual
Page 15
...unit. R. Support External Monitors Contact an authorized Audiovox dealer for information on ordering an additional external monitors (max number of the monitor, and both internal speakers will be turned off. The DIN cable supplies 12V DC power, Audio/Video and IR Signals to the SP Mode Fast/...may be supported). Simply plug in the headset to the MONITOR PORT on the side of two external monitors can be used with the "Video In a Bag" System. Specification: Color System NTSC Screen Size 5 Inches RemoteControl Infraredrays Antenna External Dipole Antenna TVChannels 2~6 (VHF low), 7~...
...unit. R. Support External Monitors Contact an authorized Audiovox dealer for information on ordering an additional external monitors (max number of the monitor, and both internal speakers will be turned off. The DIN cable supplies 12V DC power, Audio/Video and IR Signals to the SP Mode Fast/...may be supported). Simply plug in the headset to the MONITOR PORT on the side of two external monitors can be used with the "Video In a Bag" System. Specification: Color System NTSC Screen Size 5 Inches RemoteControl Infraredrays Antenna External Dipole Antenna TVChannels 2~6 (VHF low), 7~...