
User Guide
Page 3
... enjoying its sophisticated technology allows you to consolidate the clutter of your original remote controls into one easy-to-use unit that will not have to operate with your DIRECTV Universal Remote Control, you will control four components, including a DIRECTV Receiver, TV, ...DVD, stereo, or second TV). Moreover, its features. 3 Please follow the instructions detailed in this guide to help program control of older or dis- program the remote when the batteries are replaced Before using your particular component. continued components • Memory protection to ensure you may ...
... enjoying its sophisticated technology allows you to consolidate the clutter of your original remote controls into one easy-to-use unit that will not have to operate with your DIRECTV Universal Remote Control, you will control four components, including a DIRECTV Receiver, TV, ...DVD, stereo, or second TV). Moreover, its features. 3 Please follow the instructions detailed in this guide to help program control of older or dis- program the remote when the batteries are replaced Before using your particular component. continued components • Memory protection to ensure you may ...

User Guide
Page 4
... page 9.) Press FORMAT to select the available inputs on or off . (NOTE: These keys are only active after the remote has been setup for any selected program. Press ACTIVE to display the DIRECTV Program Guide. Jumps ahead in a recording. Slide the MODE switch to the DIRECTV, AV1, AV2 or TV positions to select...
... page 9.) Press FORMAT to select the available inputs on or off . (NOTE: These keys are only active after the remote has been setup for any selected program. Press ACTIVE to display the DIRECTV Program Guide. Jumps ahead in a recording. Slide the MODE switch to the DIRECTV, AV1, AV2 or TV positions to select...

User Guide
Page 5
... mode, or other menu for your DIRECTV® Receiver's user guide. (Not available on all DIRECTV Receivers.) Press VOL to display current channel and program information when watching live TV. Press MENU to live TV or in the Guide to display the Mini-Guide. Press GREEN in the Guide. Press...the ARROW keys to jump 12 hours back. Press RED in the Guide to move around in menu screens or the Program Guide. The volume key is only active when the remote is set up for another selected device. Other functions vary-look for onscreen hints or refer to your TV. 5 To...
... mode, or other menu for your DIRECTV® Receiver's user guide. (Not available on all DIRECTV Receivers.) Press VOL to display current channel and program information when watching live TV. Press MENU to live TV or in the Guide to display the Mini-Guide. Press GREEN in the Guide. Press...the ARROW keys to jump 12 hours back. Press RED in the Guide to move around in menu screens or the Program Guide. The volume key is only active when the remote is set up for another selected device. Other functions vary-look for onscreen hints or refer to your TV. 5 To...
User Guide
Page 7
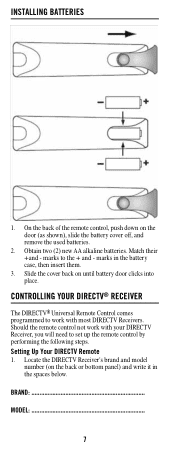
INSTALLING BATTERIES 1. Match their +and - CONTROLLING YOUR DIRECTV® RECEIVER The DIRECTV® Universal Remote Control comes programmed to work with most DIRECTV Receivers. marks to set up the remote control by performing the following steps. Locate the DIRECTV Receiver's brand and model number (on until battery door clicks into place. ... Slide the cover back on the back or bottom panel) and write it in the battery case, then insert them. 3. Should the remote control not work with your DIRECTV Receiver, you will need to the + and - BRAND MODEL 7 On the back of the...
INSTALLING BATTERIES 1. Match their +and - CONTROLLING YOUR DIRECTV® RECEIVER The DIRECTV® Universal Remote Control comes programmed to work with most DIRECTV Receivers. marks to set up the remote control by performing the following steps. Locate the DIRECTV Receiver's brand and model number (on until battery door clicks into place. ... Slide the cover back on the back or bottom panel) and write it in the battery case, then insert them. 3. Should the remote control not work with your DIRECTV Receiver, you will need to the + and - BRAND MODEL 7 On the back of the...


