Owners Manual
Page 1
AUDIOVOX.COM PLV1615CS1 / AUDIOVOX / ENGLISH SIZE: 148 X 210 MM MATERIAL: 80G WOODFREE PAPER 100% 19-04-2007 128-8059 Printed in China 811-161S91W220 FPE1507 15" FLAT PANEL LCD TV FOR ASSISTANCE CALL CUSTOMER SERVICE AT 1-800-645-4994 OR VISIT US AT WWW.
AUDIOVOX.COM PLV1615CS1 / AUDIOVOX / ENGLISH SIZE: 148 X 210 MM MATERIAL: 80G WOODFREE PAPER 100% 19-04-2007 128-8059 Printed in China 811-161S91W220 FPE1507 15" FLAT PANEL LCD TV FOR ASSISTANCE CALL CUSTOMER SERVICE AT 1-800-645-4994 OR VISIT US AT WWW.
Owners Manual
Page 7
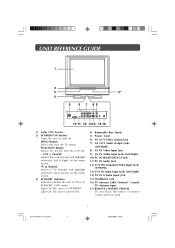
... unit is ON or in STANDBY. MENU Button Enters and exits the TV menu. FUNCTION Button Selects TV, AV IN, YUV IN or PC IN. - Coaxial TV Antenna Input 17) REMOTE CONTROL SENSOR Do not block this sensor or remote... control will not work. 7 PLV1615CS1- E1-23.pmd 7 20/04/2007, 15:35 Light On: The unit is in STANDBY (OFF) mode. UNIT REFERENCE GUIDE 3 17 4 5 6 7 89 10 11 12 1314 15 16 1) Color LCD... Input Jacks (Left/Right) 14) AV IN S-Video Input Jack 15) Headphone Jack 16) TV Antenna Cable Terminal -
... unit is ON or in STANDBY. MENU Button Enters and exits the TV menu. FUNCTION Button Selects TV, AV IN, YUV IN or PC IN. - Coaxial TV Antenna Input 17) REMOTE CONTROL SENSOR Do not block this sensor or remote... control will not work. 7 PLV1615CS1- E1-23.pmd 7 20/04/2007, 15:35 Light On: The unit is in STANDBY (OFF) mode. UNIT REFERENCE GUIDE 3 17 4 5 6 7 89 10 11 12 1314 15 16 1) Color LCD... Input Jacks (Left/Right) 14) AV IN S-Video Input Jack 15) Headphone Jack 16) TV Antenna Cable Terminal -
Owners Manual
Page 14
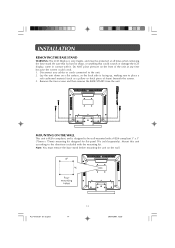
...the front of foam) beneath the screen. 3. Disconnect any time because the screen could scratch or damage the LCD display, come in contact with the mounting kit. Note: You must be wall-mounted with a VESA-compliant 3"... x 3" (75mm x 75mm) mounting kit designed for flat-panel TVs (sold separately). Be sure that no hard or sharp, or anything that could crack. 1. Remove the ...and then remove the BASE STAND from the unit. E1-23.pmd 14 20/04/2007, 15:36 Mount this unit according to the directions included with it. MOUNTING ON THE WALL This ...
...the front of foam) beneath the screen. 3. Disconnect any time because the screen could scratch or damage the LCD display, come in contact with the mounting kit. Note: You must be wall-mounted with a VESA-compliant 3"... x 3" (75mm x 75mm) mounting kit designed for flat-panel TVs (sold separately). Be sure that no hard or sharp, or anything that could crack. 1. Remove the ...and then remove the BASE STAND from the unit. E1-23.pmd 14 20/04/2007, 15:36 Mount this unit according to the directions included with it. MOUNTING ON THE WALL This ...


