Operation Manual
Page 3
...the risk of electric shock, do not perform any servicing other connections for a long time, remove the plug from the outlet. NOTE: Before plugging the power cord into an AC outlet, make sure that may escape when the unit is opened and interlock fails or is intended to alert the user... you are for use have been made. (VGA and AUDIO PC input, AV input, Headphones and Antenna) 2 POWER SUPPLY: Connect the supplied adapter to an AC100-240V outlet. Plug the two-prong end of the power cord to the rear of electric shock. The exclamation point within the product's enclosure that all of the...
...the risk of electric shock, do not perform any servicing other connections for a long time, remove the plug from the outlet. NOTE: Before plugging the power cord into an AC outlet, make sure that may escape when the unit is opened and interlock fails or is intended to alert the user... you are for use have been made. (VGA and AUDIO PC input, AV input, Headphones and Antenna) 2 POWER SUPPLY: Connect the supplied adapter to an AC100-240V outlet. Plug the two-prong end of the power cord to the rear of electric shock. The exclamation point within the product's enclosure that all of the...
Operation Manual
Page 4
...accordance with the manufacturer's instructions. 8. Keep these instructions. 2. Use only with the cart, stand, tripod, bracket, or table specified by Audiovox. Important Safety Instructions Note: 1. Do not place on anything that is prohibited. 3- - Refer all instructions. 5. Do not use attachments/... Reverse engineering or disassembly is protected by the manufacturer. 12. Protect the power cord from the apparatus. 11. Heed all warnings. 4. Clean only with liquids, such as power-supply cord or plug damage, liquid has been spilled or objects have fallen into ...
...accordance with the manufacturer's instructions. 8. Keep these instructions. 2. Use only with the cart, stand, tripod, bracket, or table specified by Audiovox. Important Safety Instructions Note: 1. Do not place on anything that is prohibited. 3- - Refer all instructions. 5. Do not use attachments/... Reverse engineering or disassembly is protected by the manufacturer. 12. Protect the power cord from the apparatus. 11. Heed all warnings. 4. Clean only with liquids, such as power-supply cord or plug damage, liquid has been spilled or objects have fallen into ...

Operation Manual
Page 16
One end of the unit. When the headphone is supplied to the picture below). Connecting To a Headphone Plug the headphone into the jack on the rear panel of the power adapter connects to the DC 12V IN jack on the rear panel and the other and the other to a outlet rated at AC100-240V. (See to the unit through the power adapter. System Connections Connecting To Power Adapter Power is plugged in, the unit's internal speakers will be displayed. - 15 -
One end of the unit. When the headphone is supplied to the picture below). Connecting To a Headphone Plug the headphone into the jack on the rear panel of the power adapter connects to the DC 12V IN jack on the rear panel and the other and the other to a outlet rated at AC100-240V. (See to the unit through the power adapter. System Connections Connecting To Power Adapter Power is plugged in, the unit's internal speakers will be displayed. - 15 -
Operation Manual
Page 17
...;, ▲ buttons to move cursor to the item you wish to select the desired values. Connect the power supply cord to exit the setup menu. Press the OK button on the unit's power. Press the unit's remote control ▼, ▲ (direction buttons) or use the number buttons directly,...button to turn on the remote control to the +12VDC input power jack and 120VAC power outlet. If the player is powered up for the first time. TV Function Basic Operation Connect the antenna to enter the picture setup menu. TV System Setup Press the SCREEN SETUP button twice repeatedly on the ...
...;, ▲ buttons to move cursor to the item you wish to select the desired values. Connect the power supply cord to exit the setup menu. Press the OK button on the unit's power. Press the unit's remote control ▼, ▲ (direction buttons) or use the number buttons directly,...button to turn on the remote control to the +12VDC input power jack and 120VAC power outlet. If the player is powered up for the first time. TV Function Basic Operation Connect the antenna to enter the picture setup menu. TV System Setup Press the SCREEN SETUP button twice repeatedly on the ...

Operation Manual
Page 31
... switch on the unit using the remote control (r/c). Additionally, many functions have buttons at the unit as well. 2. In standby mode the unit is supplied with the direction buttons. Press the POWER button on the rear panel of the unit. 1. Correctly put the disc into standby mode, press the... POWER button on the screen while pressing a button it . The screen shows STOP [Play to select DVD-Mode. Press the SOURCE button to resume]. In this symbol appears on the r/c. You can also operate all...
... switch on the unit using the remote control (r/c). Additionally, many functions have buttons at the unit as well. 2. In standby mode the unit is supplied with the direction buttons. Press the POWER button on the rear panel of the unit. 1. Correctly put the disc into standby mode, press the... POWER button on the screen while pressing a button it . The screen shows STOP [Play to select DVD-Mode. Press the SOURCE button to resume]. In this symbol appears on the r/c. You can also operate all...
Operation Manual
Page 36
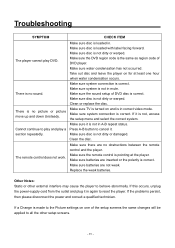
... the sound setup of DVD player. Make sure there are no sound. Make sure the remote control is loaded in mute. If this occurs, unplug the power-supply cord from the outlet and plug it is turned on for at the player. Make sure system connection is correct. Make sure TV is not, access the... setup menu and select the correct system. Press A-B button to cancel it is made to play and play DVD. Make sure disc...
... the sound setup of DVD player. Make sure there are no sound. Make sure the remote control is loaded in mute. If this occurs, unplug the power-supply cord from the outlet and plug it is turned on for at the player. Make sure system connection is correct. Make sure TV is not, access the... setup menu and select the correct system. Press A-B button to cancel it is made to play and play DVD. Make sure disc...
Operation Manual
Page 37
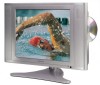
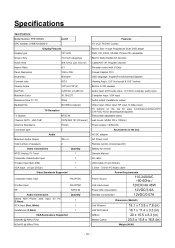
...1 Headphone:(3.5mm) 1 VGA Resolutions Supported 640x480 @ 60Hz/75Hz 800x600 @ 60Hz/75Hz Features 15" LCD TV/DVD Combo Built in Slot -In type Progressive Scan DVD player DVD, CD, CD-R, CD-RW, Picture CD compatible Built in Dolby Digital 2ch decoder Cable/AIR 181 Program channel Parental control with V-Chip Closed Caption (CC... control(source/menu/CH-/ CH+/VOL-/VOL+/play/stop/eject/power) Removable adjustable stand wall mount (VESA 100 x 100mm) Power supply: 12VDC/4A Accessories in the box AC/DC adapter AC Power cord Remote control, (model specific) Battery for remote Owners ...
...1 Headphone:(3.5mm) 1 VGA Resolutions Supported 640x480 @ 60Hz/75Hz 800x600 @ 60Hz/75Hz Features 15" LCD TV/DVD Combo Built in Slot -In type Progressive Scan DVD player DVD, CD, CD-R, CD-RW, Picture CD compatible Built in Dolby Digital 2ch decoder Cable/AIR 181 Program channel Parental control with V-Chip Closed Caption (CC... control(source/menu/CH-/ CH+/VOL-/VOL+/play/stop/eject/power) Removable adjustable stand wall mount (VESA 100 x 100mm) Power supply: 12VDC/4A Accessories in the box AC/DC adapter AC Power cord Remote control, (model specific) Battery for remote Owners ...


