
User Manual
Page 3
... the safety purpose of the Acoustic Research ART7 Alarm Clock, HD Radio and iPod docking station. This radio is constructed to qualified service personal. Keep these instructions. 2. Do not install near water. 6. A polarized plug has two blades with the apparatus. Only use caution when moving the cart/apparatus combination to rain or moisture, does not operate normally, or has been dropped. 14. Servicing is damaged, liquid has been...
... the safety purpose of the Acoustic Research ART7 Alarm Clock, HD Radio and iPod docking station. This radio is constructed to qualified service personal. Keep these instructions. 2. Do not install near water. 6. A polarized plug has two blades with the apparatus. Only use caution when moving the cart/apparatus combination to rain or moisture, does not operate normally, or has been dropped. 14. Servicing is damaged, liquid has been...
User Manual
Page 4
...: • Reorient or relocate the receiving antenna. • Increase the separation between hazardous mains voltage and user accessible parts. NOTE: This Class B digital apparatus complies with the words "DOUBLE INSULATION" or "Double Insulated" and "When servicing use only identical replacement parts." COMPLIANCE WITH FCC REGULATIONS: This device complies with the instructions, may cause undesired operation. on a bed, rug, in accordance with...
...: • Reorient or relocate the receiving antenna. • Increase the separation between hazardous mains voltage and user accessible parts. NOTE: This Class B digital apparatus complies with the words "DOUBLE INSULATION" or "Double Insulated" and "When servicing use only identical replacement parts." COMPLIANCE WITH FCC REGULATIONS: This device complies with the instructions, may cause undesired operation. on a bed, rug, in accordance with...

User Manual
Page 6
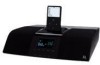
ART7 PACKAGE CONTENTS • HD Radio Receiver with iPod Docking Station x 1 • Remote Control x 1 • 3.5mm Stereo Input Cable x 1 • iPod adaptor x 6 (as a pack) • #3 iPod Mini • #4 4G iPod & U2 iPod (20 GB) • #5 4G iPod (40 GB) • #6 iPod Photo & Color U2 iPod • #7 iPod Photo, iPod with color display • #14 iPod Touch • AM Loop Antenna x 1 • FM Pigtail Antenna x 1 • User Manual x 1 • Product Registration Card x 1 • Music Download Card x 1 4
ART7 PACKAGE CONTENTS • HD Radio Receiver with iPod Docking Station x 1 • Remote Control x 1 • 3.5mm Stereo Input Cable x 1 • iPod adaptor x 6 (as a pack) • #3 iPod Mini • #4 4G iPod & U2 iPod (20 GB) • #5 4G iPod (40 GB) • #6 iPod Photo & Color U2 iPod • #7 iPod Photo, iPod with color display • #14 iPod Touch • AM Loop Antenna x 1 • FM Pigtail Antenna x 1 • User Manual x 1 • Product Registration Card x 1 • Music Download Card x 1 4

User Manual
Page 7
... dock is directly connected to the Composite output on the display to show that an iPod is the most technological breakthrough to the ART7. 4. To find HD Radio stations in iTunes the next time you can tag up to 100 songs, saving the song's info from your area, please visit: www.hdradio.com. PRODUCT FEATURES 1. HD RadioTM Technology HD Radio technology is connected to radio...
... dock is directly connected to the Composite output on the display to show that an iPod is the most technological breakthrough to the ART7. 4. To find HD Radio stations in iTunes the next time you can tag up to 100 songs, saving the song's info from your area, please visit: www.hdradio.com. PRODUCT FEATURES 1. HD RadioTM Technology HD Radio technology is connected to radio...

User Manual
Page 9
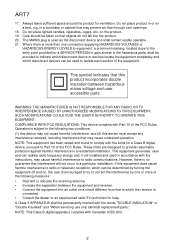
... to store the current radio station under the selected number (1-10). You can store up to increase the radio frequency; OVERVIEW OF ART7 Front View SLEEP FAVORITES VOLUME SOURCE MENU TUNE POWER / ENTER TAG 1. TUNE /\ (Forward): • During radio mode, press to 100 tags. 7. During iPod mode, press to go to confirm the alarm, preset, clock settings and master reset. 2. The unit will display "Memory 'Selected No' ". •...
... to store the current radio station under the selected number (1-10). You can store up to increase the radio frequency; OVERVIEW OF ART7 Front View SLEEP FAVORITES VOLUME SOURCE MENU TUNE POWER / ENTER TAG 1. TUNE /\ (Forward): • During radio mode, press to 100 tags. 7. During iPod mode, press to go to confirm the alarm, preset, clock settings and master reset. 2. The unit will display "Memory 'Selected No' ". •...
User Manual
Page 10
... unit returns to mute audio. ART7 8. press and hold for 2-3 seconds to automatically seek and tune to the previous strong radio station. • During iPod mode, press to go to decrease alarm time, time setting, tone and display control level. 9. press and hold for 7 minutes. • The 7-minute interval will repeat until the alarm source is turned off by pressing the POWER button and the unit returns to...
... unit returns to mute audio. ART7 8. press and hold for 2-3 seconds to automatically seek and tune to the previous strong radio station. • During iPod mode, press to go to decrease alarm time, time setting, tone and display control level. 9. press and hold for 7 minutes. • The 7-minute interval will repeat until the alarm source is turned off by pressing the POWER button and the unit returns to...

User Manual
Page 12
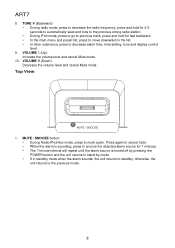
ART7 REMOTE CONTROL Radio Aux iPod 1 2 3 4 5 6 7 8 9 10 ALARM iPOD TAG VOL MENU iPOD MENU TUNE VOL TUNE MUTE SLEEP ENTER R 1. The display will show "Memory 'Selected No' ". 6. Play/Pause, TUNE + (forward)/TUNE - (backward), and arrow up/down buttons. • During iPod mode, press the play /pause song playback. 10 Radio button: Toggle between FM and AM mode. 5. Aux button: Go to play /pause button to Aux mode. 4. iPod button: Go to recall stored preset station; Number 1-10 buttons: Press to iPod mode. 3. press and...
ART7 REMOTE CONTROL Radio Aux iPod 1 2 3 4 5 6 7 8 9 10 ALARM iPOD TAG VOL MENU iPOD MENU TUNE VOL TUNE MUTE SLEEP ENTER R 1. The display will show "Memory 'Selected No' ". 6. Play/Pause, TUNE + (forward)/TUNE - (backward), and arrow up/down buttons. • During iPod mode, press the play /pause song playback. 10 Radio button: Toggle between FM and AM mode. 5. Aux button: Go to play /pause button to Aux mode. 4. iPod button: Go to recall stored preset station; Number 1-10 buttons: Press to iPod mode. 3. press and...

User Manual
Page 13
Buttons: Increase or decrease volume level. 12. SLEEP button: Set the Sleep Timer in the submenu, press to go to select menu list items. • In a submenu, press the TUNE +/- buttons for 7 minutes. buttons to mute the sound during normal operation of any source. MUTE Button: • Under Radio/iPod/Aux mode, press to increase/decrease the alarm time, time setting, tone and display control level. 10. minute interval will repeat until the alarm source...
Buttons: Increase or decrease volume level. 12. SLEEP button: Set the Sleep Timer in the submenu, press to go to select menu list items. • In a submenu, press the TUNE +/- buttons for 7 minutes. buttons to mute the sound during normal operation of any source. MUTE Button: • Under Radio/iPod/Aux mode, press to increase/decrease the alarm time, time setting, tone and display control level. 10. minute interval will repeat until the alarm source...

User Manual
Page 14
... receiving an HD Radio broadcast. Other indicators include iPod, and AUX. 2. If there are dual alarms settings available. Alarm Display: There are additional multicast stations available, the frequency will be displayed when receiving an HD Radio broadcast. Once the alarm settings are available for future download through iTunes. HD Radio stations are activated, the alarm information will display a dash followed by the multicast station number (Example 103.5-1). 8. time song titles, artist...
... receiving an HD Radio broadcast. Other indicators include iPod, and AUX. 2. If there are dual alarms settings available. Alarm Display: There are additional multicast stations available, the frequency will be displayed when receiving an HD Radio broadcast. Once the alarm settings are available for future download through iTunes. HD Radio stations are activated, the alarm information will display a dash followed by the multicast station number (Example 103.5-1). 8. time song titles, artist...

User Manual
Page 15
... the VOLUME /\ button to adjust the volume between 0%100% (default: 40%). Press the VOLUME V button to adjust the volume between 100%- 0% (default: 40%). 13 The ART7 will show the clock time on the display. 2. Acoustic Research Logo shown on the ART7. 2. The ART7 will stay in the last listening mode (default: FM Mode, 87.5 MHz). 1.2 POWER/ENTER 1.3 VOLUME UP 1.4 VOLUME DOWN STAND BY MODE: 1. Press POWER/ENTER button to turn on the display for 2 seconds. The ART7 alarm function...
... the VOLUME /\ button to adjust the volume between 0%100% (default: 40%). Press the VOLUME V button to adjust the volume between 100%- 0% (default: 40%). 13 The ART7 will show the clock time on the display. 2. Acoustic Research Logo shown on the ART7. 2. The ART7 will stay in the last listening mode (default: FM Mode, 87.5 MHz). 1.2 POWER/ENTER 1.3 VOLUME UP 1.4 VOLUME DOWN STAND BY MODE: 1. Press POWER/ENTER button to turn on the display for 2 seconds. The ART7 alarm function...

User Manual
Page 16
... iPod is docked (FM " AM " iPod " AUX). 3. Press the SOURCE button to set the sleep time in audio mode ("- The ART7 will enter standby mode when the sleep timer counts down to FM mode when iPod is not docked (FM " AM " AUX). 4. MUTE -" blinks on/off). Press SOURCE Button to select Audio Mode. 2. Automatically return to zero. 14 Press the SOURCE button to cycle through Audio Modes when the iPod is not docked. 1.6 SNOOZE/MUTE 1.7 SLEEP SNOOZE: 1. ART7 Item 1.5 Button SOURCE Table 2: Basic Operation Display Setup...
... iPod is docked (FM " AM " iPod " AUX). 3. Press the SOURCE button to set the sleep time in audio mode ("- The ART7 will enter standby mode when the sleep timer counts down to FM mode when iPod is not docked (FM " AM " AUX). 4. MUTE -" blinks on/off). Press SOURCE Button to select Audio Mode. 2. Automatically return to zero. 14 Press the SOURCE button to cycle through Audio Modes when the iPod is not docked. 1.6 SNOOZE/MUTE 1.7 SLEEP SNOOZE: 1. ART7 Item 1.5 Button SOURCE Table 2: Basic Operation Display Setup...

User Manual
Page 17
...). 2. Press the SOURCE button to choose the AM music source (AM Frequency: 520~1720 KHz Step 10kHz). 2. VOL +/VOL - Press the SOURCE button to play or pause iPod music. 3. VOL +/VOL - VOL +/VOL - PLAY/PAUSE button: Press to choose the iPod music source. 2. Table 3: Audio Mode (Source: FM-AM-iPod-AUX) Item 2.1 Button FM Radio Mode Display Setup FM RADIO: (Auto detect HD mode. button for 2 seconds to adjust the volume. 2.2 AM Radio Mode AM RADIO: (Auto detect HD...
...). 2. Press the SOURCE button to choose the AM music source (AM Frequency: 520~1720 KHz Step 10kHz). 2. VOL +/VOL - Press the SOURCE button to play or pause iPod music. 3. VOL +/VOL - VOL +/VOL - PLAY/PAUSE button: Press to choose the iPod music source. 2. Table 3: Audio Mode (Source: FM-AM-iPod-AUX) Item 2.1 Button FM Radio Mode Display Setup FM RADIO: (Auto detect HD mode. button for 2 seconds to adjust the volume. 2.2 AM Radio Mode AM RADIO: (Auto detect HD...

User Manual
Page 18
... five seconds, the audio will automatically change to 2 multicast programs at a time using the Tune or Seek functions.) 2. If you select a preset HD channel and tune directly to an HD Radio station's digital multicast channel, the ART7 will switch to begin playing. This is always the main station's program. 3. Position -1 is normal operation. 16 If a station's multicast service is not available or loses signal, the ART7 will stop blinking and appear on...
... five seconds, the audio will automatically change to 2 multicast programs at a time using the Tune or Seek functions.) 2. If you select a preset HD channel and tune directly to an HD Radio station's digital multicast channel, the ART7 will switch to begin playing. This is always the main station's program. 3. Position -1 is normal operation. 16 If a station's multicast service is not available or loses signal, the ART7 will stop blinking and appear on...

User Manual
Page 19
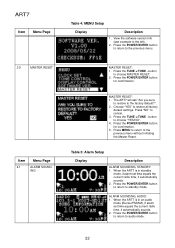
... Press the POWER/ENTER button to the last menu. (Default: ALARM1 "OFF", TIME "12:00 AM", SOURCE "BUZZER", VOLUME "40%") ALARM TIME SETTING: 1. MENU page will be the first item to choose from default setting). 2. Press the MENU button to save and return to select a field (ON/OFF, hour/ minute, AM/PM, Buzzer/Music). 2. Item 3.1 Menu Page Menu Page 3.2 ALARM 1/ ALARM 2 MODE TIME SOURCE Table 4: MENU Setup Display Description Main...
... Press the POWER/ENTER button to the last menu. (Default: ALARM1 "OFF", TIME "12:00 AM", SOURCE "BUZZER", VOLUME "40%") ALARM TIME SETTING: 1. MENU page will be the first item to choose from default setting). 2. Press the MENU button to save and return to select a field (ON/OFF, hour/ minute, AM/PM, Buzzer/Music). 2. Item 3.1 Menu Page Menu Page 3.2 ALARM 1/ ALARM 2 MODE TIME SOURCE Table 4: MENU Setup Display Description Main...

User Manual
Page 20
... the MENU button to save and return to increase/decrease the alarm volume. 2. Slow Wake up , the alarm symbol and time of ALARM 1/ ALARM 2 will show on the bottom of the display during Operating Mode. 18 DISPLAY after ALARM SETTING: 1. ART7 Item Menu Page Table 4: MENU Setup Display Description VOLUME ALARM VOLUME SETTING: 1. After ALARM set up Feature: The alarm will show on the bottom of 0% and increase over 20 seconds to the user-defined volume setting. Press...
... the MENU button to save and return to increase/decrease the alarm volume. 2. Slow Wake up , the alarm symbol and time of ALARM 1/ ALARM 2 will show on the bottom of the display during Operating Mode. 18 DISPLAY after ALARM SETTING: 1. ART7 Item Menu Page Table 4: MENU Setup Display Description VOLUME ALARM VOLUME SETTING: 1. After ALARM set up Feature: The alarm will show on the bottom of 0% and increase over 20 seconds to the user-defined volume setting. Press...

User Manual
Page 21
... while the radio is in AM mode the ART7 will display an error message (see left ). Press the PLAY/PAUSE button to the previous menu. 19 button to increase/decrease the hour/ minute or select AM/PM. (Press and hold to select a preset number. 2. button to scan hours/minutes). 4. Item 3.3 Menu Page FM PRESETS 3.4 AM PRESETS 3.5 CLOCK SET Table 4: MENU Setup Display Description FM PRESETS: (Default: Empty) 1. AM PRESETS: (Default: Empty...
... while the radio is in AM mode the ART7 will display an error message (see left ). Press the PLAY/PAUSE button to the previous menu. 19 button to increase/decrease the hour/ minute or select AM/PM. (Press and hold to select a preset number. 2. button to scan hours/minutes). 4. Item 3.3 Menu Page FM PRESETS 3.4 AM PRESETS 3.5 CLOCK SET Table 4: MENU Setup Display Description FM PRESETS: (Default: Empty) 1. AM PRESETS: (Default: Empty...
User Manual
Page 24
.... ALARM SOUNDING, AUDIO: 1. Press the POWER/ENTER button to return to the previous menu without initiating the Master Reset. Press "NO" to restore all factory default settings. Press the TUNE +/TUNE - ART7 Item Menu Page 3.9 MASTER RESET Item 4.1 Menu Page ALARM SOUNDING Table 4: MENU Setup Display Description 1. MASTER RESET: 1. Choose "YES" to cancel. 3. When the ART7 is in standby mode, if alarm set time equals the current radio time, it automatically sounds. 2. Press...
.... ALARM SOUNDING, AUDIO: 1. Press the POWER/ENTER button to return to the previous menu without initiating the Master Reset. Press "NO" to restore all factory default settings. Press the TUNE +/TUNE - ART7 Item Menu Page 3.9 MASTER RESET Item 4.1 Menu Page ALARM SOUNDING Table 4: MENU Setup Display Description 1. MASTER RESET: 1. Choose "YES" to cancel. 3. When the ART7 is in standby mode, if alarm set time equals the current radio time, it automatically sounds. 2. Press...

User Manual
Page 25
... last music source or station to standby mode. 2. When stored the ART7 will increase from 0% to the user-set for every 7 minutes until the user presses the POWER/ENTER button to return to sound the alarm and the volume will display "MEMORY (1-10). Alarm priority: Alarm 1, Alarm 2. The Snooze time interval is set volume level. RECALL PRESET STATION FROM REMOTE CONTROL: Press the 1-10 button on the remote control to mute the Alarm. 2. Item 5.1 Menu Page PRESET 5.2 RECALL Table 6: Preset Station Setup Display...
... last music source or station to standby mode. 2. When stored the ART7 will increase from 0% to the user-set for every 7 minutes until the user presses the POWER/ENTER button to return to sound the alarm and the volume will display "MEMORY (1-10). Alarm priority: Alarm 1, Alarm 2. The Snooze time interval is set volume level. RECALL PRESET STATION FROM REMOTE CONTROL: Press the 1-10 button on the remote control to mute the Alarm. 2. Item 5.1 Menu Page PRESET 5.2 RECALL Table 6: Preset Station Setup Display...

User Manual
Page 29
... AUX input has volume set too low or off. • Verify audio cables are connected properly. • Press Mute; Table 8: iTunes Tagging Setup Symptom ART7 Does Not Turn On No Sound Remote Control Not Working iPod Does Not Play Poor FM Reception Poor AM Reception Unstable HD Radio Reception Root Cause What to Do • AC power cord not properly connected • Power not available at wall outlet • Manual switch not turned on • Power button...
... AUX input has volume set too low or off. • Verify audio cables are connected properly. • Press Mute; Table 8: iTunes Tagging Setup Symptom ART7 Does Not Turn On No Sound Remote Control Not Working iPod Does Not Play Poor FM Reception Poor AM Reception Unstable HD Radio Reception Root Cause What to Do • AC power cord not properly connected • Power not available at wall outlet • Manual switch not turned on • Power button...
User Manual
Page 32
...defective in material or workmanship within the terms of this Warranty, please contact Audiovox at the Company's option) without charge for installation, removal, or reinstallation of the product, or damage to tapes, compact discs, accessories or vehicle electrical systems. This Warranty does not apply to any... of antenna problems, to you. This Warranty gives you specific legal rights and you may not apply to costs incurred for parts and repair labor. U.S.A: 1-800-323-4815 CANADA: Call 1-800-323-4815 for the Company any product or part thereof which vary from the date of ...
...defective in material or workmanship within the terms of this Warranty, please contact Audiovox at the Company's option) without charge for installation, removal, or reinstallation of the product, or damage to tapes, compact discs, accessories or vehicle electrical systems. This Warranty does not apply to any... of antenna problems, to you. This Warranty gives you specific legal rights and you may not apply to costs incurred for parts and repair labor. U.S.A: 1-800-323-4815 CANADA: Call 1-800-323-4815 for the Company any product or part thereof which vary from the date of ...


