User Guide
Page 2
... to infringe. Such software in this product is distributed without any problems in this manual may or may obtain it for a period of three years after our last shipment of ASUSTeK COMPUTER INC. ("ASUS"). No part of this information. Product warranty or service will be reproduced, transmitted... code. All Rights Reserved. This offer is eager to anyone in this email address). ASUS ASSUMES NO RESPONSIBILITY OR LIABILITY FOR ANY ERRORS OR INACCURACIES THAT MAY APPEAR IN THIS MANUAL, INCLUDING THE PRODUCTS AND SOFTWARE DESCRIBED IN IT. Copies of these licenses are used only...
... to infringe. Such software in this product is distributed without any problems in this manual may or may obtain it for a period of three years after our last shipment of ASUSTeK COMPUTER INC. ("ASUS"). No part of this information. Product warranty or service will be reproduced, transmitted... code. All Rights Reserved. This offer is eager to anyone in this email address). ASUS ASSUMES NO RESPONSIBILITY OR LIABILITY FOR ANY ERRORS OR INACCURACIES THAT MAY APPEAR IN THIS MANUAL, INCLUDING THE PRODUCTS AND SOFTWARE DESCRIBED IN IT. Copies of these licenses are used only...
User Guide
Page 5
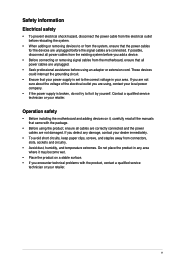
... clips, screws, and staples away from the system, ensure that your power supply is broken, do not try to fix it , carefully read all the manuals that all power cables are connected. Safety information Electrical safety • To prevent electrical shock hazard, disconnect the power cable from the electrical outlet before...
... clips, screws, and staples away from the system, ensure that your power supply is broken, do not try to fix it , carefully read all the manuals that all power cables are connected. Safety information Electrical safety • To prevent electrical shock hazard, disconnect the power cable from the electrical outlet before...
User Guide
Page 7
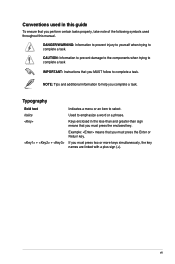
... enclosed in the less-than and greater-than sign means that you perform certain tasks properly, take note of the following symbols used in this manual. Italics Used to select. vii Conventions used throughout this guide To ensure that you complete a task. DANGER/WARNING: Information to prevent injury to yourself when...
... enclosed in the less-than and greater-than sign means that you perform certain tasks properly, take note of the following symbols used in this manual. Italics Used to select. vii Conventions used throughout this guide To ensure that you complete a task. DANGER/WARNING: Information to prevent injury to yourself when...
User Guide
Page 14
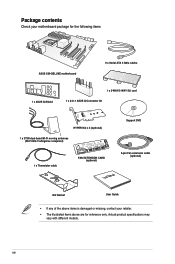
... for the following items ASUS X99-DELUXE motherboard 8 x Serial ATA 6 Gb/s cables 1 x ASUS Q-Shield 1 x 2-WAY/3-WAY SLI card 1 x 2-in-1 ASUS Q-Connector kit HYPER M.2 x 4 (optional) 1 x 3T3R dual-band Wi-Fi moving antennas (Wi-Fi 802.11a/b/g/n/ac compliant) Support DVD 1 x Thermistor cable FAN EXTENSION CARD (optional) 5-pin Fan extension cable (optional) User Manual M.2 Racket User Guide •...
... for the following items ASUS X99-DELUXE motherboard 8 x Serial ATA 6 Gb/s cables 1 x ASUS Q-Shield 1 x 2-WAY/3-WAY SLI card 1 x 2-in-1 ASUS Q-Connector kit HYPER M.2 x 4 (optional) 1 x 3T3R dual-band Wi-Fi moving antennas (Wi-Fi 802.11a/b/g/n/ac compliant) Support DVD 1 x Thermistor cable FAN EXTENSION CARD (optional) 5-pin Fan extension cable (optional) User Manual M.2 Racket User Guide •...
User Guide
Page 24
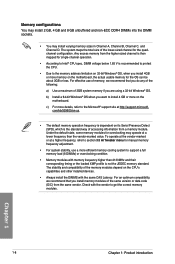
... efficient memory cooling system to support a full memory load (8 DIMMs) or overclocking condition. • Memory modules with the vendor to section 3.5 Ai Tweaker menu for manual memory frequency adjustment. • For system stability, use of the lower-sized channel for overclocking may install varying memory sizes in Channel A, Channel B, Channel C, and...
... efficient memory cooling system to support a full memory load (8 DIMMs) or overclocking condition. • Memory modules with the vendor to section 3.5 Ai Tweaker menu for manual memory frequency adjustment. • For system stability, use of the lower-sized channel for overclocking may install varying memory sizes in Channel A, Channel B, Channel C, and...
User Guide
Page 32
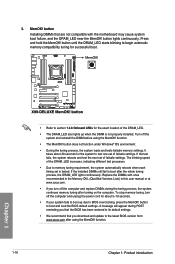
... that are not compatible with ones recommended in the Memory QVL (Qualified Vendors Lists) in this user manual or at www.asus.com. • If you download and update to the latest BIOS version from www.asus.com after turning on the computer. MemOK! Turn off the computer and unplug the power cord...
... that are not compatible with ones recommended in the Memory QVL (Qualified Vendors Lists) in this user manual or at www.asus.com. • If you download and update to the latest BIOS version from www.asus.com after turning on the computer. MemOK! Turn off the computer and unplug the power cord...
User Guide
Page 44
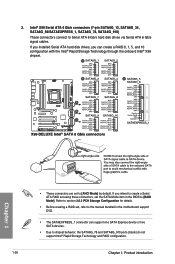
Intel® X99 Serial ATA 6 Gb/s connectors (7-pin SATA6G_12, SATA6G_34, SATA6G_56/SATAEXPRESS_1, SATA6G_78, SATA6G_910) These connectors connect to [RAID Mode]....® Rapid Storage Technology and RAID configuration. 1-28 Chapter 1: Product introduction Chapter 1 • These connectors are set , refer to the manual bundled in the BIOS to Serial ATA 6 Gb/s hard disk drives via Serial ATA 6 Gb/s signal cables. If you installed Serial ATA ... can create a RAID 0, 1, 5, and 10 configuration with the Intel® Rapid Storage Technology through the onboard Intel® X99 chipset.
Intel® X99 Serial ATA 6 Gb/s connectors (7-pin SATA6G_12, SATA6G_34, SATA6G_56/SATAEXPRESS_1, SATA6G_78, SATA6G_910) These connectors connect to [RAID Mode]....® Rapid Storage Technology and RAID configuration. 1-28 Chapter 1: Product introduction Chapter 1 • These connectors are set , refer to the manual bundled in the BIOS to Serial ATA 6 Gb/s hard disk drives via Serial ATA 6 Gb/s signal cables. If you installed Serial ATA ... can create a RAID 0, 1, 5, and 10 configuration with the Intel® Rapid Storage Technology through the onboard Intel® X99 chipset.
User Guide
Page 57
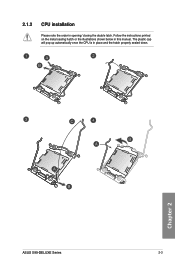
The plastic cap will pop up automatically once the CPU is in this manual. Chapter 2 ASUS X99-DELUXE Series 2-3 Follow the instructions printed on the metal sealing hatch or the illustrations shown below in place and the hatch properly sealed down. 2.1.2 CPU installation Please note the order in opening/ closing the double latch.
The plastic cap will pop up automatically once the CPU is in this manual. Chapter 2 ASUS X99-DELUXE Series 2-3 Follow the instructions printed on the metal sealing hatch or the illustrations shown below in place and the hatch properly sealed down. 2.1.2 CPU installation Please note the order in opening/ closing the double latch.
User Guide
Page 75
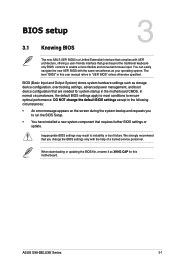
...When downloading or updating the BIOS file, rename it as your operating system. Chapter 3 ASUS X99-DELUXE Series 3-1 You can easily navigate the new UEFI BIOS with the same smoothness as X99-D.CAP for system startup in the motherboard CMOS. The term "BIOS" in the following circumstances...hardware settings such as storage device configuration, overclocking settings, advanced power management, and boot device configuration that are needed for this user manual refers to run the BIOS Setup. • You have installed a new system component that requires further BIOS settings or update....
...When downloading or updating the BIOS file, rename it as your operating system. Chapter 3 ASUS X99-DELUXE Series 3-1 You can easily navigate the new UEFI BIOS with the same smoothness as X99-D.CAP for system startup in the motherboard CMOS. The term "BIOS" in the following circumstances...hardware settings such as storage device configuration, overclocking settings, advanced power management, and boot device configuration that are needed for this user manual refers to run the BIOS Setup. • You have installed a new system component that requires further BIOS settings or update....
User Guide
Page 77
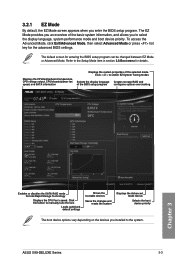
... manually tune the fans Loads optimized default settings Shows the bootable devices Saves the changes and resets the system Displays the Advanced mode menus Selects the boot device priority The boot device options vary depending on the devices you installed to the Setup Mode item in section 3.8 Boot menu for details. ASUS X99-DELUXE...
... manually tune the fans Loads optimized default settings Shows the bootable devices Saves the changes and resets the system Displays the Advanced mode menus Selects the boot device priority The boot device options vary depending on the devices you installed to the Setup Mode item in section 3.8 Boot menu for details. ASUS X99-DELUXE...
User Guide
Page 79
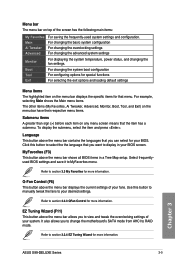
... the screen has the following main items: My Favorites Main Ai Tweaker Advanced For saving the frequently-used system settings and configuration. Chapter 3 ASUS X99-DELUXE Series 3-5 Click this button to manually tweak the fans to display in a Tree Map setup. Refer to MyFavorites menu. Select frequentlyused BIOS settings and save it to section...
... the screen has the following main items: My Favorites Main Ai Tweaker Advanced For saving the frequently-used system settings and configuration. Chapter 3 ASUS X99-DELUXE Series 3-5 Click this button to manually tweak the fans to display in a Tree Map setup. Refer to MyFavorites menu. Select frequentlyused BIOS settings and save it to section...
User Guide
Page 81
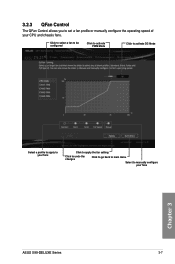
Click to select a fan to be configured Click to activate PWM Mode Click to activate DC Mode Chapter 3 Select a profile to apply to your fans Click to apply the fan setting Click to undo the changes Click to go back to main menu Select to set a fan profile or manually configure the operating speed of your fans ASUS X99-DELUXE Series 3-7 3.2.3 QFan Control The QFan Control allows you to manually configure your CPU and chassis fans.
Click to select a fan to be configured Click to activate PWM Mode Click to activate DC Mode Chapter 3 Select a profile to apply to your fans Click to apply the fan setting Click to undo the changes Click to go back to main menu Select to set a fan profile or manually configure the operating speed of your fans ASUS X99-DELUXE Series 3-7 3.2.3 QFan Control The QFan Control allows you to manually configure your CPU and chassis fans.
User Guide
Page 82
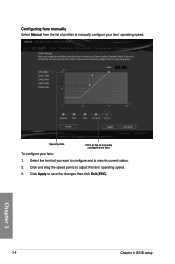
Click and drag the speed points to save the changes then click Exit (ESC). 3-8 Chapter 3: BIOS setup Chapter 3 Click Apply to adjust the fans' operating speed. 3. Speed points Click or tap to manually configure your fans To configure your fans' operating speed. Select the fan that you want to configure and to view its current status. 2. Configuring fans manually Select Manual from the list of profiles to manually configure your fans: 1.
Click and drag the speed points to save the changes then click Exit (ESC). 3-8 Chapter 3: BIOS setup Chapter 3 Click Apply to adjust the fans' operating speed. 3. Speed points Click or tap to manually configure your fans To configure your fans' operating speed. Select the fan that you want to configure and to view its current status. 2. Configuring fans manually Select Manual from the list of profiles to manually configure your fans: 1.
User Guide
Page 89
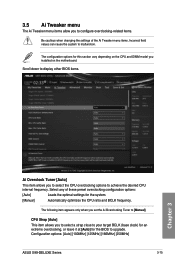
...to display other BIOS items. Chapter 3 Ai Overclock Tuner [Auto] This item allows you set the Ai Overclocking Tuner to [Manual]. The following item appears only when you to select the CPU overclocking options to achieve the desired CPU internal frequency. CPU ... it at [Auto] for the BIOS to upgrade. Configuration options: [Auto] [100MHz] [125MHz] [166MHz] [250MHz] ASUS X99-DELUXE Series 3-15 The configuration options for the system. [Manual] Automatically optimizes the CPU ratio and BCLK frequency. Select any of the Ai Tweaker menu items. Incorrect field values can cause...
...to display other BIOS items. Chapter 3 Ai Overclock Tuner [Auto] This item allows you set the Ai Overclocking Tuner to [Manual]. The following item appears only when you to select the CPU overclocking options to achieve the desired CPU internal frequency. CPU ... it at [Auto] for the BIOS to upgrade. Configuration options: [Auto] [100MHz] [125MHz] [166MHz] [250MHz] ASUS X99-DELUXE Series 3-15 The configuration options for the system. [Manual] Automatically optimizes the CPU ratio and BCLK frequency. Select any of the Ai Tweaker menu items. Incorrect field values can cause...
User Guide
Page 90
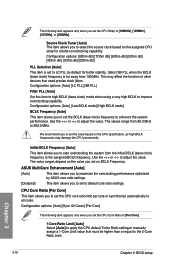
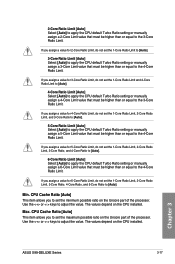
...item allows you to set to maximize the oveclocking performance optimized by default for a better overclocking capability. Use the or to adjust the value. ASUS MultiCore Enhancement [Auto] [Auto] This item allows you to default core ratio settings. CPU Core Ratio [Per Core] This item allows you ...set the CPU Core Ratio to [Per Core]. 1-Core Ratio Limit [Auto] Select [Auto] to apply the CPU default Turbo Ratio setting or manually assign a 1-Core Limit value that need precise clock jitters. Use the or to adjust the value. The values range from 100 MHz. Configuration ...
...item allows you to set to maximize the oveclocking performance optimized by default for a better overclocking capability. Use the or to adjust the value. ASUS MultiCore Enhancement [Auto] [Auto] This item allows you to default core ratio settings. CPU Core Ratio [Per Core] This item allows you ...set the CPU Core Ratio to [Per Core]. 1-Core Ratio Limit [Auto] Select [Auto] to apply the CPU default Turbo Ratio setting or manually assign a 1-Core Limit value that need precise clock jitters. Use the or to adjust the value. The values range from 100 MHz. Configuration ...
User Guide
Page 91
...[Auto] Select [Auto] to apply the CPU default Turbo Ratio setting or manually assign a 5-Core Limit value that must be higher than or equal to set the maximum possible ratio on the Uncore part of the processor. Chapter 3 ASUS X99-DELUXE Series 3-17 If you to the 4-Core Ratio Limit. CPU Cache Ratio... possible ratio on the Uncore part of the processor. 2-Core Ratio Limit [Auto] Select [Auto] to apply the CPU default Turbo Ratio setting or manually assign a 2-Core Limit value that must be higher than or equal to the 3-Core Ratio Limit. If you assign a value for 3-Core Ratio Limit...
...[Auto] Select [Auto] to apply the CPU default Turbo Ratio setting or manually assign a 5-Core Limit value that must be higher than or equal to set the maximum possible ratio on the Uncore part of the processor. Chapter 3 ASUS X99-DELUXE Series 3-17 If you to the 4-Core Ratio Limit. CPU Cache Ratio... possible ratio on the Uncore part of the processor. 2-Core Ratio Limit [Auto] Select [Auto] to apply the CPU default Turbo Ratio setting or manually assign a 2-Core Limit value that must be higher than or equal to the 3-Core Ratio Limit. If you assign a value for 3-Core Ratio Limit...
User Guide
Page 98
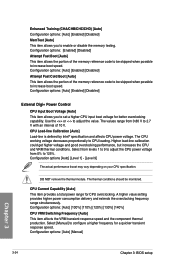
... disable the memory testing. A higher value setting provides higher power consumption delivery and extends the overclocking frequency range simultaneously. Select [Manual] to increase boot speed. Configuration options: [Enabled] [Disabled] Attempt Fast Boot [Auto] This item allows the portion of ... the value. CPU Current Capability [Auto] This item provides a total power range for better overclocking capability. Configuration options: [Auto] [Manual] Chapter 3 3-24 Chapter 3: BIOS setup CPU Load-line Calibration [Auto] Load-line is defined by Intel® specification and affects...
... disable the memory testing. A higher value setting provides higher power consumption delivery and extends the overclocking frequency range simultaneously. Select [Manual] to increase boot speed. Configuration options: [Enabled] [Disabled] Attempt Fast Boot [Auto] This item allows the portion of ... the value. CPU Current Capability [Auto] This item provides a total power range for better overclocking capability. Configuration options: [Auto] [Manual] Chapter 3 3-24 Chapter 3: BIOS setup CPU Load-line Calibration [Auto] Load-line is defined by Intel® specification and affects...
User Guide
Page 99
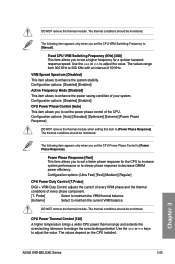
...the current of every VRM phase and the thermal conditions of 50 KHz. Use the or to set the CPU VRM Switching Frequency to [Manual]. DO NOT remove the thermal module. The thermal conditions should be monitored. The values depend on the CPU installed. Configuration options: [Disabled]...Probe] Select to maintain the VRM thermal balance. [Extreme] Select to 500 KHz with an interval of every phase component. [T. Chapter 3 ASUS X99-DELUXE Series 3-25 The values range from 300 KHz to maintain the current VRM balance. The following item appears only when you to adjust the ...
...the current of every VRM phase and the thermal conditions of 50 KHz. Use the or to set the CPU VRM Switching Frequency to [Manual]. DO NOT remove the thermal module. The thermal conditions should be monitored. The values depend on the CPU installed. Configuration options: [Disabled]...Probe] Select to maintain the VRM thermal balance. [Extreme] Select to 500 KHz with an interval of every phase component. [T. Chapter 3 ASUS X99-DELUXE Series 3-25 The values range from 300 KHz to maintain the current VRM balance. The following item appears only when you to adjust the ...
User Guide
Page 100
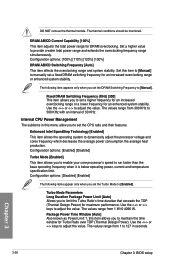
... when it is below operating power, current and temperature specification limit. The values range from 1 to 127 in this menu allow you to [Manual]. Set this item allows you set the DRAM Switching Frequency to set a fixed DRAM switching frequency for an increased overclocking range or enhanced system... to dynamically adjust the processor voltage and cores frequency which decreases the average power consumption the average heat production. Use the or to manually set the CPU ratio and their features. Package Power Time Window [Auto] Also known as Power Limit 1, this item to...
... when it is below operating power, current and temperature specification limit. The values range from 1 to 127 in this menu allow you to [Manual]. Set this item allows you set the DRAM Switching Frequency to set a fixed DRAM switching frequency for an increased overclocking range or enhanced system... to dynamically adjust the processor voltage and cores frequency which decreases the average power consumption the average heat production. Use the or to manually set the CPU ratio and their features. Package Power Time Window [Auto] Also known as Power Limit 1, this item to...
User Guide
Page 101
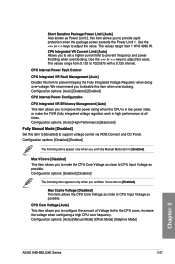
... Regulator when doing over-voltage. Increase the voltage when configuring a high CPU core frequency. Configuration options: [Auto] [Manual Mode] [Offset Mode] [Adaptive Mode] Chapter 3 ASUS X99-DELUXE Series 3-27 Use the or keys to prevent frequency and power throttling when overclocking. CPU Integrated VR Current Limit [Auto.... Short Duration Package Power Limit [Auto] Also known as possible. We recommend you to disable this item allows you set Fully Manual Mode item to improve the power rating when the CPU is in low power state, or make the CPU Core Voltage as close...
... Regulator when doing over-voltage. Increase the voltage when configuring a high CPU core frequency. Configuration options: [Auto] [Manual Mode] [Offset Mode] [Adaptive Mode] Chapter 3 ASUS X99-DELUXE Series 3-27 Use the or keys to prevent frequency and power throttling when overclocking. CPU Integrated VR Current Limit [Auto.... Short Duration Package Power Limit [Auto] Also known as possible. We recommend you to disable this item allows you set Fully Manual Mode item to improve the power rating when the CPU is in low power state, or make the CPU Core Voltage as close...


