Asus VK192T Support and Manuals
Get Help and Manuals for this Asus item
Popular Asus VK192T Manual Pages
User Manual - Page 2

.... ii SPECIFICATIONS AND INFORMATION CONTAINED IN THIS MANUAL ARE FURNISHED FOR INFORMATIONAL USE ONLY, AND ARE SUBJECT TO CHANGE AT ANY TIME WITHOUT NOTICE, AND SHOULD NOT BE CONSTRUED AS A COMMITMENT BY ASUS. or (2) the serial number of ASUSTeK COMPUTER INC. ("ASUS"). No part of this manual may or may be extended if: (1) the product is repaired...
User Manual - Page 3
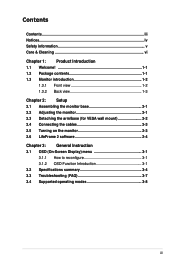
...Adjusting the monitor 2-1 2.3 Detaching the arm/base (for VESA wall mount 2-2 2.4 Connecting the cables 2-3 2.5 Turning on the monitor 2-3 2.6 LifeFrame 2 software 2-4 Chapter 3: General Instruction 3.1 OSD (On-Screen Display) menu 3-1 3.1.1 How to reconfigure 3-1 3.1.2 OSD Function Introduction 3-1 3.2 Specifications summary 3-4 3.3 Troubleshooting (FAQ 3-7 3.4 Supported operating modes...
User Manual - Page 5
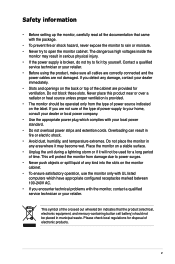
... the monitor to rain or moisture. • Never try to power surges. • Never push objects or spill liquid of electronic products.
If you encounter technical problems with ...Safety information
• Before setting up the monitor, carefully read all cables are correctly connected and the
power cables are not damaged. Contact a qualified
service technician or your dealer immediately....
User Manual - Page 6

... initial use due to the nature of the monitor.
vi Stubborn stains may be removed with a cloth dampened with a lint-free, non-abrasive cloth. Use a cleaner intended for hours. • When the screen becomes black or flashes, or cannot work anymore, contact your dealer or service center to disconnect the cables and power...
User Manual - Page 9
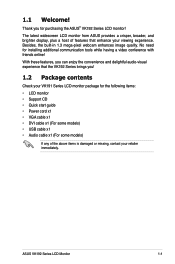
.... The latest widescreen LCD monitor from ASUS provides a crisper, broader, and brighter display, plus a host of features that the VK192 Series brings you!
1.2 Package contents
Check your VK191 Series LCD monitor package for the following items:
• LCD monitor • Support CD • Quick start guide • Power cord x1 • VGA cable x1 • DVI cable x1 (For some models) •...
User Manual - Page 11

...ASUS VK192 Series LCD Monitor
1-3 Status Blue Amber OFF
Description ON Standby mode OFF
1.3.2 Back view
Stereo speaker (For some models)
Stereo speaker (For some models)
Screw holes for the built-in port (For those models...
4.
Power button/power indicator
• Press this button to turn the monitor on/off
• The color definition of the power indicator is purchased ...
User Manual - Page 13
.... We recommend that you look at the full face of the monitor face down on a table. 2.
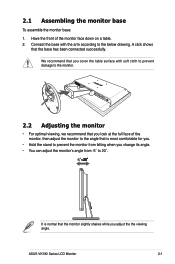
2.1 Assembling the monitor base
To assemble the monitor base: 1. ASUS VK192 Series LCD Monitor
2-1 A click shows
that you cover the table surface with the arm according to the monitor.
2.2 Adjusting the monitor
• For optimal viewing, we recommend that the base has been...
User Manual - Page 14
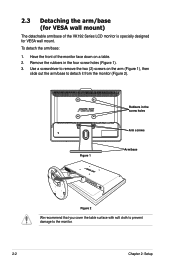
To detach the arm/base:
1. Have the front of the VK192 Series LCD monitor is specially designed for VESA wall mount. Remove the rubbers in the screw...cloth to prevent damage to remove the two (2) screws on a table. 2. Use a screwdriver to the monitor.
2-2
Chapter 2: Setup
Rubbers in the four screw holes (Figure 1). 3. 2.3 Detaching the arm/base (for VESA wall mount)
The detachable arm/base...
User Manual - Page 15
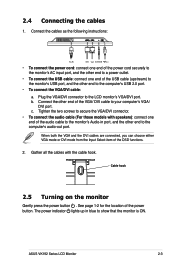
... VGA/ DVI cable to show that the monitor is ON. ASUS VK192 Series LCD Monitor
2-3 c. The power indicator lights up in port, and the other end to a power outlet.
• To connect the USB cable: connect one end of the power button. Connect the cables as the following instructions:
VGA
2.0
• To connect the power cord...
User Manual - Page 16

...webcam, allowing users to complete the installation
2-4
Chapter 2: Setup Installation instructions
1. Insert the support CD into the optical drive and run the LifeFrame 2 program. 3.
Follow the on-screen instructions to create their own photos or video clips.
• LifeFrame 2 only supports Microsoft® Windows® Vista / XP Service Pack 2 operating systems.
• The LifeFrame...
User Manual - Page 17

... change the settings of the selected function.
4.
Each mode has the Reset selection, allowing you can select for dark-scene game or movie with SPLENDID™ Video Intelligence Technology.
• In the Standard Mode, the Saturation and Sharpness functions are not user-configurable.
• In the other function. ASUS VK192 Series LCD Monitor
3-1 Press the...
User Manual - Page 19

ASUS VK192 Series LCD Monitor
3-3 System Setup Allow you to adjust the system.
• Volume: the adjusting range is a hotkey to activate
this function, you to restore the default setting... the aspect ratio to 100. Input Select In this function (For those models with
speakers.).
• OSD Setup:
*Adjusts the horizontal postition (H-Position)/ the vertical position (V-Position) of ...
User Manual - Page 20

...Analog input Audio-in port Colors Speaker (Built-in) Power LED VESA wall mount Tilt Kensington lock Voltage rating Power consumption
TFT LCD 19" (16:10) wide screen WXGA+ 1440 x 900 0.285mm 260cd/m2 350cd/m2 1000:1 4000:1 (with ASCR ...(Standby) 100 x 100mm -5˚~+20˚ Yes AC: 100~240V Power On : < 47W, Standby: < 2W, Power Off: 3.2 Specifications summary (VK192T)
Panel Type Panel size Max.
User Manual - Page 21

Specifications summary (VK192S)
Panel Type Panel size Max. Resolution
Pixel pitch Brightness (Typ.) Brightness (Max.) Contrast Ratio (Typ.) ...selection Analog input Audio-in port Colors Speaker (Built-in) Power LED VESA wall mount Tilt Kensington lock Voltage rating Power consumption
TFT LCD 19" (16:10) wide screen WXGA+ 1440 x 900 0.285mm 260cd/m2 350cd/m2 1000:1 4000:1 (with ASCR ON) 160...
User Manual - Page 23
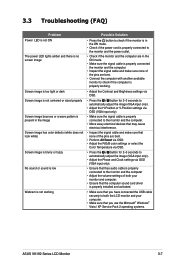
... settings of both your monitor and computer.
• Ensure that the computer sound card driver is properly installed and activated.
• Make sure that you have connected the USB cable securely to both the LCD monitor and your computer.
• Make sure that you use the Microsoft® Windows® Vista / XP Service Pack 2 operating systems.
ASUS VK192 Series LCD Monitor...
Asus VK192T Reviews
We have not received any reviews for Asus yet.