User Manual
Page 9
... are unplugged. • Seek professional assistance before the signal cables are using an adpater or extension cord. Operation safety • Before installing the motherboard and adding devices on a stable surface. • If you detect any area where it by yourself. Contact a qualified service technician or your ...power supply is broken, do not try to fix it may become wet. • Place the product on it, carefully read all the manuals that all cables are correctly connected and the power cables are unplugged before using , contact your local power company. • If the ...
... are unplugged. • Seek professional assistance before the signal cables are using an adpater or extension cord. Operation safety • Before installing the motherboard and adding devices on a stable surface. • If you detect any area where it by yourself. Contact a qualified service technician or your ...power supply is broken, do not try to fix it may become wet. • Place the product on it, carefully read all the manuals that all cables are correctly connected and the power cables are unplugged before using , contact your local power company. • If the ...
User Manual
Page 23
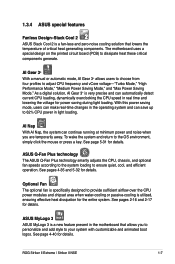
...automatically detect current CPU loading, dynamically overclocking the CPU speed in the motherboard that lowers the temperature of critical heat generating components. See page 5-31 for details. ASUS MyLogo 3 ASUS MyLogo 3 is very precise and can continue running at minimum power ...32 for details. ROG Striker II Extreme / Striker II NSE 1-7 Optional Fan The optional fan is specifically designed to adjust CPU frequency and vCore voltage-"Turbo Mode," "High Performance Mode," "Medium Power Saving Mode," and "Max Power Saving Mode." AI Gear 3+ With a manual or automatic mode, AI...
...automatically detect current CPU loading, dynamically overclocking the CPU speed in the motherboard that lowers the temperature of critical heat generating components. See page 5-31 for details. ASUS MyLogo 3 ASUS MyLogo 3 is very precise and can continue running at minimum power ...32 for details. ROG Striker II Extreme / Striker II NSE 1-7 Optional Fan The optional fan is specifically designed to adjust CPU frequency and vCore voltage-"Turbo Mode," "High Performance Mode," "Medium Power Saving Mode," and "Max Power Saving Mode." AI Gear 3+ With a manual or automatic mode, AI...
User Manual
Page 57
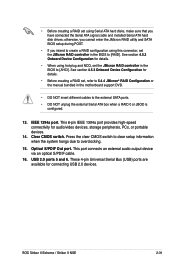
... Configuration or the manual bundled in the motherboard support DVD. • DO NOT insert different cables to the external SATA ports. • DO NOT unplug the external Serial ATA box when a RAID 0 or JBOD is configured. 13. Clear CMOS switch. USB 2.0 ports 5 and 6. Optical S/PDIF Out port. ROG Striker II Extreme / Striker II NSE 2-31 • Before...
... Configuration or the manual bundled in the motherboard support DVD. • DO NOT insert different cables to the external SATA ports. • DO NOT unplug the external Serial ATA box when a RAID 0 or JBOD is configured. 13. Clear CMOS switch. USB 2.0 ports 5 and 6. Optical S/PDIF Out port. ROG Striker II Extreme / Striker II NSE 2-31 • Before...
User Manual
Page 59
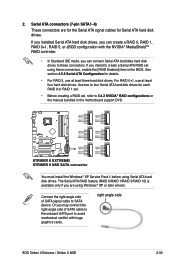
.... Or you may connect the right-angle side of SATA signal cable to 5.4.2 NVIDIA® RAID configurations or the manual bundled in the BIOS. right angle side ROG Striker II Extreme / Striker II NSE 2-33 See section 4.5.6 Serial-ATA Configuration for details. • For RAID 5, use at least three hard disk ...8226; Before creating a RAID set using Serial ATA hard disk drives. Use two to these connectors, enable the [RAID Enabled] item in the motherboard support DVD. Serial ATA connectors (7-pin SATA1-6) These connectors are using Windows® XP or later version. 2.
.... Or you may connect the right-angle side of SATA signal cable to 5.4.2 NVIDIA® RAID configurations or the manual bundled in the BIOS. right angle side ROG Striker II Extreme / Striker II NSE 2-33 See section 4.5.6 Serial-ATA Configuration for details. • For RAID 5, use at least three hard disk ...8226; Before creating a RAID set using Serial ATA hard disk drives. Use two to these connectors, enable the [RAID Enabled] item in the motherboard support DVD. Serial ATA connectors (7-pin SATA1-6) These connectors are using Windows® XP or later version. 2.

User Manual
Page 132
Install the Adobe® Acrobat® Reader from the Utilities menu before opening a user manual file. 5.2.6 Video menu Click the Video tab to display a list of the user manual. Click the Extreme OC Clip item to open the folder of video clips. Click an item to watch how an overclocking guru breaks 3DMark world record with an ROG motherboard. 5-6 Chapter 5: Software support 5.2.5 Manual menu The Manuals menu contains a list of supplementary user manuals. Most user manual files are in Portable Document Format (PDF).
Install the Adobe® Acrobat® Reader from the Utilities menu before opening a user manual file. 5.2.6 Video menu Click the Video tab to display a list of the user manual. Click the Extreme OC Clip item to open the folder of video clips. Click an item to watch how an overclocking guru breaks 3DMark world record with an ROG motherboard. 5-6 Chapter 5: Software support 5.2.5 Manual menu The Manuals menu contains a list of supplementary user manuals. Most user manual files are in Portable Document Format (PDF).
User Manual
Page 162
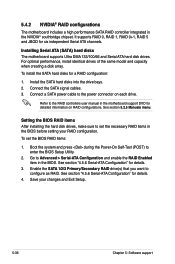
... drive bays. 2. Refer to the power connector on RAID configurations. To set the necessary RAID items in the motherboard support DVD for detailed information on each drive. See section "4.5.6 Serial-ATA Configuration" for a RAID configuration: 1. 5.4.2 NVIDIA® ...RAID configurations The motherboard includes a high performance SATA RAID controller integrated in the BIOS. It supports RAID 0, RAID 1, RAID 0+1, RAID 5 and JBOD for details. 4. Connect a SATA power cable to the RAID controllers user manual in the BIOS before setting your changes and ...
... drive bays. 2. Refer to the power connector on RAID configurations. To set the necessary RAID items in the motherboard support DVD for detailed information on each drive. See section "4.5.6 Serial-ATA Configuration" for a RAID configuration: 1. 5.4.2 NVIDIA® ...RAID configurations The motherboard includes a high performance SATA RAID controller integrated in the BIOS. It supports RAID 0, RAID 1, RAID 0+1, RAID 5 and JBOD for details. 4. Connect a SATA power cable to the RAID controllers user manual in the BIOS before setting your changes and ...


