
SABERTOOTH 990FX R2.0 User's Manual
Page 2
...ARE FURNISHED FOR INFORMATIONAL USE ONLY, AND ARE SUBJECT TO CHANGE AT ANY TIME WITHOUT NOTICE, AND SHOULD NOT BE CONSTRUED AS A COMMITMENT BY ASUS. ASUS ASSUMES NO RESPONSIBILITY OR LIABILITY FOR ANY ERRORS OR INACCURACIES THAT MAY APPEAR IN THIS MANUAL, INCLUDING THE PRODUCTS AND SOFTWARE DESCRIBED IN IT. Such... in receipt of this manual may or may be much obliged if you to anyone in the About Box of the product for backup purposes, without any warranty to the email address gpl@asus.com, stating the product and describing the problem (please DO NOT send large attachments such as the...
...ARE FURNISHED FOR INFORMATIONAL USE ONLY, AND ARE SUBJECT TO CHANGE AT ANY TIME WITHOUT NOTICE, AND SHOULD NOT BE CONSTRUED AS A COMMITMENT BY ASUS. ASUS ASSUMES NO RESPONSIBILITY OR LIABILITY FOR ANY ERRORS OR INACCURACIES THAT MAY APPEAR IN THIS MANUAL, INCLUDING THE PRODUCTS AND SOFTWARE DESCRIBED IN IT. Such... in receipt of this manual may or may be much obliged if you to anyone in the About Box of the product for backup purposes, without any warranty to the email address gpl@asus.com, stating the product and describing the problem (please DO NOT send large attachments such as the...

SABERTOOTH 990FX R2.0 User's Manual
Page 76
... Password User Password Monitor Not Installed Not Installed Boot Tool To clear the administrator password, key in the current password in the Enter Current Password box, and then press when prompted to create/confirm the password. • If you to boot or enter Setup. Chapter 3 3-6 Chapter 3: BIOS setup See section 1.2.6 Onboard...
... Password User Password Monitor Not Installed Not Installed Boot Tool To clear the administrator password, key in the current password in the Enter Current Password box, and then press when prompted to create/confirm the password. • If you to boot or enter Setup. Chapter 3 3-6 Chapter 3: BIOS setup See section 1.2.6 Onboard...

SABERTOOTH 990FX R2.0 User's Manual
Page 77
... only selected fields in changing an administrator password, but press when prompted to create/confirm the password. From the Enter Current Password box, key in a new password, then press . 4. To clear the administrator password, follow the same steps as in the BIOS...recommend that you might be able to see or change an administrator password: 1. Chapter 3 ASUS SABERTOOTH 990FX R2.0 3-7 Otherwise, you enter the administrator password for accessing the system. From the Create New Password box, key in a password, then press . 3. Confirm the password when prompted. From the ...
... only selected fields in changing an administrator password, but press when prompted to create/confirm the password. From the Enter Current Password box, key in a new password, then press . 4. To clear the administrator password, follow the same steps as in the BIOS...recommend that you might be able to see or change an administrator password: 1. Chapter 3 ASUS SABERTOOTH 990FX R2.0 3-7 Otherwise, you enter the administrator password for accessing the system. From the Create New Password box, key in a password, then press . 3. Confirm the password when prompted. From the ...

SABERTOOTH 990FX R2.0 User's Manual
Page 78
... DOCP is enabled CPU Bus frequency, CPU ratio and memory parameters will be auto optimized. From the Enter Current Password box, key in a new password, then press . 4. From the Create New Password box, key in the current password, then press . 3. To clear the user password, follow the same steps as in changing...
... DOCP is enabled CPU Bus frequency, CPU ratio and memory parameters will be auto optimized. From the Enter Current Password box, key in a new password, then press . 4. From the Create New Password box, key in the current password, then press . 3. To clear the user password, follow the same steps as in changing...
SABERTOOTH 990FX R2.0 User's Manual
Page 148
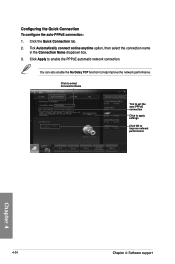
Configuring the Quick Connection To configure the auto-PPPoE connection: 1. Click to select Connection Name Tick to set the auto PPPoE connection Click to apply settings Click ON to help improve the network performance. Tick Automatically connect online anytime option, then select the connection name in the Connection Name dropdown box. 3. You can also enable the No Delay TCP function to improve network performance Chapter 4 4-34 Chapter 4: Software support Click Apply to enable the PPPoE automatic network connection. Click the Quick Connection tab. 2.
Configuring the Quick Connection To configure the auto-PPPoE connection: 1. Click to select Connection Name Tick to set the auto PPPoE connection Click to apply settings Click ON to help improve the network performance. Tick Automatically connect online anytime option, then select the connection name in the Connection Name dropdown box. 3. You can also enable the No Delay TCP function to improve network performance Chapter 4 4-34 Chapter 4: Software support Click Apply to enable the PPPoE automatic network connection. Click the Quick Connection tab. 2.
