User Guide
Page 2
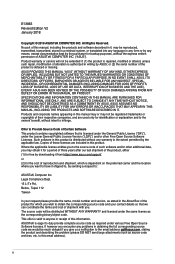
...SUBJECT TO CHANGE AT ANY TIME WITHOUT NOTICE, AND SHOULD NOT BE CONSTRUED AS A COMMITMENT BY ASUS. Copies of this manual, including the products and software described in it from https://www.asus.com/support/ or (2) for identification or explanation and to the owners' benefit, without any problems...it for a period of three years after our last shipment of the product is distributed without intent to the extent permitted by ASUS; ASUS PROVIDES THIS MANUAL "AS IS" WITHOUT WARRANTY OF ANY KIND, EITHER EXPRESS OR IMPLIED, INCLUDING BUT NOT LIMITED TO THE IMPLIED WARRANTIES OR ...
...SUBJECT TO CHANGE AT ANY TIME WITHOUT NOTICE, AND SHOULD NOT BE CONSTRUED AS A COMMITMENT BY ASUS. Copies of this manual, including the products and software described in it from https://www.asus.com/support/ or (2) for identification or explanation and to the owners' benefit, without any problems...it for a period of three years after our last shipment of the product is distributed without intent to the extent permitted by ASUS; ASUS PROVIDES THIS MANUAL "AS IS" WITHOUT WARRANTY OF ANY KIND, EITHER EXPRESS OR IMPLIED, INCLUDING BUT NOT LIMITED TO THE IMPLIED WARRANTIES OR ...
User Guide
Page 6
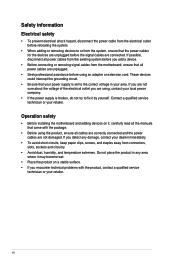
...clips, screws, and staples away from connectors, slots, sockets and circuitry. • Avoid dust, humidity, and temperature extremes. Operation safety • Before installing the motherboard and adding devices on a stable surface. • If you are ... is broken, do not try to the correct voltage in any damage, contact your retailer. vi These devices could interrupt the grounding circuit. • Ensure that the power cables for the ... is set to fix it , carefully read all the manuals that all cables are correctly connected and the power cables are not damaged.
...clips, screws, and staples away from connectors, slots, sockets and circuitry. • Avoid dust, humidity, and temperature extremes. Operation safety • Before installing the motherboard and adding devices on a stable surface. • If you are ... is broken, do not try to the correct voltage in any damage, contact your retailer. vi These devices could interrupt the grounding circuit. • Ensure that the power cables for the ... is set to fix it , carefully read all the manuals that all cables are correctly connected and the power cables are not damaged.
User Guide
Page 8
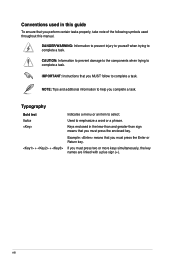
... Used to select. Keys enclosed in this guide To ensure that you perform certain tasks properly, take note of the following symbols used throughout this manual. Typography Bold text Indicates a menu or an item to emphasize a word or a phrase. Example: means that you must press the Enter or Return key. + + If...
... Used to select. Keys enclosed in this guide To ensure that you perform certain tasks properly, take note of the following symbols used throughout this manual. Typography Bold text Indicates a menu or an item to emphasize a word or a phrase. Example: means that you must press the Enter or Return key. + + If...

User Guide
Page 36
... these connectors, set the SATA Mode Selection item in the BIOS to [RAID]. • Before creating a RAID set, refer to section RAID configurations or the manual bundled in the BIOS to [AHCI] by default. Refer to Serial ATA 6.0 Gb/s hard disk drives via Serial ATA 6.0 Gb/s signal cables. 1.1.9 Internal connectors...
... these connectors, set the SATA Mode Selection item in the BIOS to [RAID]. • Before creating a RAID set, refer to section RAID configurations or the manual bundled in the BIOS to [AHCI] by default. Refer to Serial ATA 6.0 Gb/s hard disk drives via Serial ATA 6.0 Gb/s signal cables. 1.1.9 Internal connectors...

User Guide
Page 47
You can manually adjust the fans and water pump to monitor the temperature and flow rate of your liquid cooling system. A TPM system also helps enhance network security, ... flow connectors (2-pin W_IN; 2-pin W_OUT; 3-pin W_FLOW) These connectors allow you to connect sensors to optimize the thermal efficiency of your liquid cooling system. ROG CROSSHAIR VI EXTREME 1-31 TPM connector (14-1 pin TPM) This connector supports a Trusted Platform Module (TPM) system, which securely stores keys, digital certificates, passwords and data. Chapter 1 15...
You can manually adjust the fans and water pump to monitor the temperature and flow rate of your liquid cooling system. A TPM system also helps enhance network security, ... flow connectors (2-pin W_IN; 2-pin W_OUT; 3-pin W_FLOW) These connectors allow you to connect sensors to optimize the thermal efficiency of your liquid cooling system. ROG CROSSHAIR VI EXTREME 1-31 TPM connector (14-1 pin TPM) This connector supports a Trusted Platform Module (TPM) system, which securely stores keys, digital certificates, passwords and data. Chapter 1 15...
User Guide
Page 48
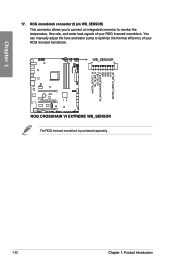
The ROG licensed monoblock is purchased separately. 1-32 Chapter 1: Product Introduction Chapter 1 17. You can manually adjust the fans and water pump to monitor the temperature, flow rate, and water leak signals of your ROG licensed monoblock. ROG monoblock connector (9 pin WB_SENSOR) This connector allows you to connect an integrated connector to optimize the thermal efficiency of your ROG licensed monoblock.
The ROG licensed monoblock is purchased separately. 1-32 Chapter 1: Product Introduction Chapter 1 17. You can manually adjust the fans and water pump to monitor the temperature, flow rate, and water leak signals of your ROG licensed monoblock. ROG monoblock connector (9 pin WB_SENSOR) This connector allows you to connect an integrated connector to optimize the thermal efficiency of your ROG licensed monoblock.
User Guide
Page 69
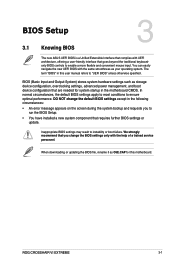
... such as your operating system. Chapter 3: BIOS Setup BIOS Setup 3.1 Knowing BIOS 3 The new ASUS UEFI BIOS is a Unified Extensible Interface that complies with UEFI architecture, offering a user-friendly interface ...manual refers to run the BIOS Setup. • You have installed a new system component that requires further BIOS settings or update. In normal circumstances, the default BIOS settings apply to most conditions to enable a more flexible and convenient mouse input. Inappropriate BIOS settings may result to instability or boot failure. Chapter 3 ROG CROSSHAIR VI EXTREME...
... such as your operating system. Chapter 3: BIOS Setup BIOS Setup 3.1 Knowing BIOS 3 The new ASUS UEFI BIOS is a Unified Extensible Interface that complies with UEFI architecture, offering a user-friendly interface ...manual refers to run the BIOS Setup. • You have installed a new system component that requires further BIOS settings or update. In normal circumstances, the default BIOS settings apply to most conditions to enable a more flexible and convenient mouse input. Inappropriate BIOS settings may result to instability or boot failure. Chapter 3 ROG CROSSHAIR VI EXTREME...
User Guide
Page 70
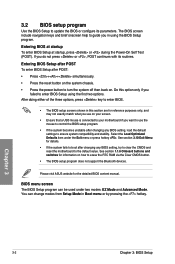
...screen. • Ensure that a USB mouse is connected to your motherboard if you failed to enter BIOS Setup using the BIOS Setup program. Please visit ASUS website for details. • If the system fails to boot after changing any BIOS setting, try to clear the CMOS and reset the motherboard to... BIOS Setup program can change modes from Setup Mode in using the first two options. See section 3.10 Exit Menu for the detailed BIOS content manual. Entering BIOS at startup To enter BIOS Setup at startup, press or during the Power-On Self Test (POST). You can be used under the...
...screen. • Ensure that a USB mouse is connected to your motherboard if you failed to enter BIOS Setup using the BIOS Setup program. Please visit ASUS website for details. • If the system fails to boot after changing any BIOS setting, try to clear the CMOS and reset the motherboard to... BIOS Setup program can change modes from Setup Mode in using the first two options. See section 3.10 Exit Menu for the detailed BIOS content manual. Entering BIOS at startup To enter BIOS Setup at startup, press or during the Power-On Self Test (POST). You can be used under the...
User Guide
Page 72
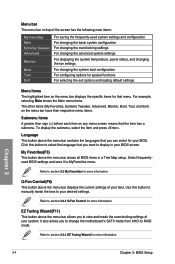
... to MyFavorites menu. Menu bar The menu bar on the menu bar displays the specific items for that menu. Click this button to manually tweak the fans to view and tweak the overclocking settings of your desired settings. My Favorites(F3) This button above the menu bar ...displays the current settings of the screen has the following main items: My Favorites Main Extreme Tweaker Advanced Monitor Boot Tool Exit For saving the frequently-used system settings and configuration. For example, selecting Main shows the Main menu items...
... to MyFavorites menu. Menu bar The menu bar on the menu bar displays the specific items for that menu. Click this button to manually tweak the fans to view and tweak the overclocking settings of your desired settings. My Favorites(F3) This button above the menu bar ...displays the current settings of the screen has the following main items: My Favorites Main Extreme Tweaker Advanced Monitor Boot Tool Exit For saving the frequently-used system settings and configuration. For example, selecting Main shows the Main menu items...
User Guide
Page 74
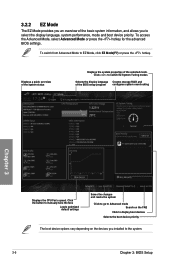
To access the Advanced Mode, select Advanced Mode or press the hotkey for the advanced BIOS settings. Click the button to manually tune the fans Loads optimized default settings Saves the changes and resets the system Click to go to Advanced mode Search on the FAQ Click ...
To access the Advanced Mode, select Advanced Mode or press the hotkey for the advanced BIOS settings. Click the button to manually tune the fans Loads optimized default settings Saves the changes and resets the system Click to go to Advanced mode Search on the FAQ Click ...
User Guide
Page 75
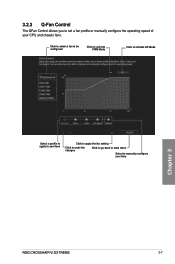
3.2.3 Q-Fan Control The QFan Control allows you to manually configure your CPU and chassis fans. Click to select a fan to be configured Click to activate PWM Mode Click to activate DC Mode Select a profile to apply to your fans Click to apply the fan setting Click to undo the changes Click to go back to main menu Select to set a fan profile or manually configure the operating speed of your fans Chapter 3 ROG CROSSHAIR VI EXTREME 3-7
3.2.3 Q-Fan Control The QFan Control allows you to manually configure your CPU and chassis fans. Click to select a fan to be configured Click to activate PWM Mode Click to activate DC Mode Select a profile to apply to your fans Click to apply the fan setting Click to undo the changes Click to go back to main menu Select to set a fan profile or manually configure the operating speed of your fans Chapter 3 ROG CROSSHAIR VI EXTREME 3-7
User Guide
Page 76
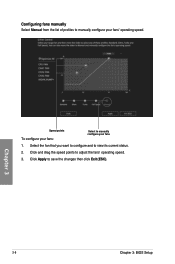
Chapter 3 Speed points To configure your fans: Select to manually configure your fans' operating speed. Select the fan that you want to configure and to save the changes then click Exit (ESC). 3-8 Chapter 3: BIOS Setup Click Apply to view its current status. 2. Click and drag the speed points to adjust the fans' operating speed. 3. Configuring fans manually Select Manual from the list of profiles to manually configure your fans 1.
Chapter 3 Speed points To configure your fans: Select to manually configure your fans' operating speed. Select the fan that you want to configure and to save the changes then click Exit (ESC). 3-8 Chapter 3: BIOS Setup Click Apply to view its current status. 2. Click and drag the speed points to adjust the fans' operating speed. 3. Configuring fans manually Select Manual from the list of profiles to manually configure your fans 1.
User Guide
Page 80
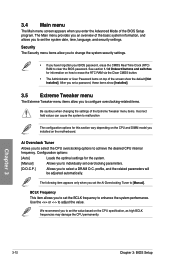
...provides you an overview of the basic system information, and allows you enter the Advanced Mode of the screen show [Installed]. 3.5 Extreme Tweaker menu The Extreme Tweaker menu items allow you to change the system security settings. • If you to select a DRAM O.C. See section ...you to set overclocking parameters. [D.O.C.P.] Allows you have forgotten your BIOS password, erase the CMOS Real Time Clock (RTC) RAM to [Manual]. Chapter 3 3-12 Chapter 3: BIOS Setup Security The Security menu items allow you installed on the CPU specification, as high BCLK frequencies ...
...provides you an overview of the basic system information, and allows you enter the Advanced Mode of the screen show [Installed]. 3.5 Extreme Tweaker menu The Extreme Tweaker menu items allow you to change the system security settings. • If you to select a DRAM O.C. See section ...you to set overclocking parameters. [D.O.C.P.] Allows you have forgotten your BIOS password, erase the CMOS Real Time Clock (RTC) RAM to [Manual]. Chapter 3 3-12 Chapter 3: BIOS Setup Security The Security menu items allow you installed on the CPU specification, as high BCLK frequencies ...
User Guide
Page 93
However, BIOS updating is no problem using the current version of BIOS, DO NOT manually update the BIOS. EZ Update: Updates the BIOS in the support DVD that allows you to manage and update the motherboard BIOS setup program. 1. ASUS CrashFree BIOS 3: Restores the BIOS using a USB flash drive. 3. If there is...an Internet connection either through a network or an ISP (Internet Service Provider). • This utility is available in Windows® environment. 2. 3.11 Updating BIOS The ASUS website publishes the latest BIOS versions to boot. Chapter 3 ROG CROSSHAIR VI EXTREME 3-25
However, BIOS updating is no problem using the current version of BIOS, DO NOT manually update the BIOS. EZ Update: Updates the BIOS in the support DVD that allows you to manage and update the motherboard BIOS setup program. 1. ASUS CrashFree BIOS 3: Restores the BIOS using a USB flash drive. 3. If there is...an Internet connection either through a network or an ISP (Internet Service Provider). • This utility is available in Windows® environment. 2. 3.11 Updating BIOS The ASUS website publishes the latest BIOS versions to boot. Chapter 3 ROG CROSSHAIR VI EXTREME 3-25


