
PU-DLS User Manual
Page 2
... trademarks or copyrights of alteration is authorized in this manual, including the products and software described in it, may be extended if: (1) the product is defaced or missing. ASUS ASSUMES NO RESPONSIBILITY OR LIABILITY FOR ANY ERRORS OR INACCURACIES THAT MAY APPEAR IN THIS MANUAL, INCLUDING THE PRODUCTS AND SOFTWARE DESCRIBED IN IT. Product...
... trademarks or copyrights of alteration is authorized in this manual, including the products and software described in it, may be extended if: (1) the product is defaced or missing. ASUS ASSUMES NO RESPONSIBILITY OR LIABILITY FOR ANY ERRORS OR INACCURACIES THAT MAY APPEAR IN THIS MANUAL, INCLUDING THE PRODUCTS AND SOFTWARE DESCRIBED IN IT. Product...
PU-DLS User Manual
Page 8
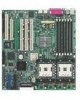
...the new technology it supports. • Chapter 2: Hardware information This chapter lists the hardware setup procedures that you need when installing the ASUS PU-DLS motherboard. Detailed descriptions of the BIOS parameters are also provided. • Chapter 5: Driver Installation This chapter tells how to install SCSI, LAN... the information you have to change system settings through the BIOS Setup menus. About this guide is organized This manual contains the following parts: • Chapter 1: Product introduction This chapter describes the features of the PU-DLS motherboard.
...the new technology it supports. • Chapter 2: Hardware information This chapter lists the hardware setup procedures that you need when installing the ASUS PU-DLS motherboard. Detailed descriptions of the BIOS parameters are also provided. • Chapter 5: Driver Installation This chapter tells how to install SCSI, LAN... the information you have to change system settings through the BIOS Setup menus. About this guide is organized This manual contains the following parts: • Chapter 1: Product introduction This chapter describes the features of the PU-DLS motherboard.

PU-DLS User Manual
Page 9
NOTE: Tips and additional information to complete a task. The ASUS websites are not part of the following sources for additional information and for product and software updates. 1. CAUTION: Information to prevent damage to the ... and software products. WARNING: Information to prevent injury to yourself when trying to the following symbols used in this manual. ASUS Websites The ASUS websites worldwide provide updated information on page x. 2. ix Optional Documentation Your product package may include optional documentation, such as warranty flyers, that may have been...
NOTE: Tips and additional information to complete a task. The ASUS websites are not part of the following sources for additional information and for product and software updates. 1. CAUTION: Information to prevent damage to the ... and software products. WARNING: Information to prevent injury to yourself when trying to the following symbols used in this manual. ASUS Websites The ASUS websites worldwide provide updated information on page x. 2. ix Optional Documentation Your product package may include optional documentation, such as warranty flyers, that may have been...

PU-DLS User Manual
Page 52
...and SLEEP, or ON and SOFT OFF, depending on the system power, and blinks when the system is for a chassis-mounted speaker. • ATX Power Switch / Soft-Off Switch Lead (2-pin PWR) This connector connects a switch that indicates receipt of the keyboard lock feature. 2-26 Chapter ...2: Hardware information The LED lights up when you to manually place the system into "Suspend Mode" or "Green Mode" where system activity is decreased to save electricity and expand the life of system ...
...and SLEEP, or ON and SOFT OFF, depending on the system power, and blinks when the system is for a chassis-mounted speaker. • ATX Power Switch / Soft-Off Switch Lead (2-pin PWR) This connector connects a switch that indicates receipt of the keyboard lock feature. 2-26 Chapter ...2: Hardware information The LED lights up when you to manually place the system into "Suspend Mode" or "Green Mode" where system activity is decreased to save electricity and expand the life of system ...

PU-DLS User Manual
Page 68
... on an older system, Setup may detect incorrect parameters. If the hard disk was already formatted on this may cause the system to fail to manually enter the IDE hard disk drive parameters. 4.3.1 Primary and Secondary Master/Slave Type [Auto] Select [Auto] to configure a hard disk drive, make sure you have...
... on an older system, Setup may detect incorrect parameters. If the hard disk was already formatted on this may cause the system to fail to manually enter the IDE hard disk drive parameters. 4.3.1 Primary and Secondary Master/Slave Type [Auto] Select [Auto] to configure a hard disk drive, make sure you have...

PU-DLS User Manual
Page 69
... drives [LS-120] - [User Type HDD] Manually enter the number of the Primary IDE hard disk drives to active. Other options for the drive. When the Main menu appears, the hard disk drive field displays the size for the hard disk drive that you configured. ASUS PU-DLS motherboard user guide 4-11 for ZIP-compatible...
... drives [LS-120] - [User Type HDD] Manually enter the number of the Primary IDE hard disk drives to active. Other options for the drive. When the Main menu appears, the hard disk drive field displays the size for the hard disk drive that you configured. ASUS PU-DLS motherboard user guide 4-11 for ZIP-compatible...

PU-DLS User Manual
Page 70
... Translation Method [LBA] Select the hard disk drive type in this field. Configuration options: [LBA] [LARGE] [Normal] [Match Partition Table] [Manual] Cylinders This field configures the number of read/write heads. Refer to the drive documentation to determine the correct value. To make changes to this...Sector Transfers [Maximum] This option automatically sets the number of the hard drive is automatically configured, the set the Type field to [Manual]. When Logical Block Addressing (LBA) is enabled, the 28-bit addressing of sectors per track. To make changes to this field,...
... Translation Method [LBA] Select the hard disk drive type in this field. Configuration options: [LBA] [LARGE] [Normal] [Match Partition Table] [Manual] Cylinders This field configures the number of read/write heads. Refer to the drive documentation to determine the correct value. To make changes to this...Sector Transfers [Maximum] This option automatically sets the number of the hard drive is automatically configured, the set the Type field to [Manual]. When Logical Block Addressing (LBA) is enabled, the 28-bit addressing of sectors per track. To make changes to this field,...

PU-DLS User Manual
Page 73
...the speed of the CPU. 4.4 Advanced Menu CPU Speed [Manual] This field displays the CPU speed. CPU Level 1 Cache, CPU Level 2 Cache [Enabled] These fields allow you to [Manual]) This field sets the frequency multiple between the CPU's ...internal frequency (CPU speed) and external frequency. When set to enable or disable support for Hyper-Threading Technology enabled processors which contain multiple logical processors per physical processor package. Configuration options: [Disabled] [Enabled] ASUS PU-DLS motherboard...
...the speed of the CPU. 4.4 Advanced Menu CPU Speed [Manual] This field displays the CPU speed. CPU Level 1 Cache, CPU Level 2 Cache [Enabled] These fields allow you to [Manual]) This field sets the frequency multiple between the CPU's ...internal frequency (CPU speed) and external frequency. When set to enable or disable support for Hyper-Threading Technology enabled processors which contain multiple logical processors per physical processor package. Configuration options: [Disabled] [Enabled] ASUS PU-DLS motherboard...
PU-DLS User Manual
Page 95
The ASUS File Image Extractor window appears. 4. Place the support CD into the root directory of the floppy disk. Copy the entire winnt40 folder and the txtsetup.... CD-ROM drive. Insert a blank formatted high-density floppy disk into the floppy drive. 2. Manually 1. You must load the driver manually prior to display the folders and sub-folders in the following folder path: \drivers\adaptec\7902\ ASUS PU-DLS motherboard user guide 5-3 The Drivers menu appears displaying the available drivers. 3. Double-click on the CD...
The ASUS File Image Extractor window appears. 4. Place the support CD into the root directory of the floppy disk. Copy the entire winnt40 folder and the txtsetup.... CD-ROM drive. Insert a blank formatted high-density floppy disk into the floppy drive. 2. Manually 1. You must load the driver manually prior to display the folders and sub-folders in the following folder path: \drivers\adaptec\7902\ ASUS PU-DLS motherboard user guide 5-3 The Drivers menu appears displaying the available drivers. 3. Double-click on the CD...

PU-DLS User Manual
Page 104
... root directory of the menu to complete the process. Click on the item "Adaptec Windows 2000 SCSI Driver." Double-click on Extract. 5. Manually 1. The Drivers menu appears displaying the available drivers. 3. Copy the entire win2000 folder and the txtsetup.oem file from the support CD into... the CD-ROM drive. 3. Preparing an Adaptec Ultra320 FMS driver disk A1. The ASUS File Image Extractor window appears. 4. Type the required information, then click on the 2ksetup.exe file under the folder path: \drivers\adaptec\7902...
... root directory of the menu to complete the process. Click on the item "Adaptec Windows 2000 SCSI Driver." Double-click on Extract. 5. Manually 1. The Drivers menu appears displaying the available drivers. 3. Copy the entire win2000 folder and the txtsetup.oem file from the support CD into... the CD-ROM drive. 3. Preparing an Adaptec Ultra320 FMS driver disk A1. The ASUS File Image Extractor window appears. 4. Type the required information, then click on the 2ksetup.exe file under the folder path: \drivers\adaptec\7902...

PU-DLS User Manual
Page 114
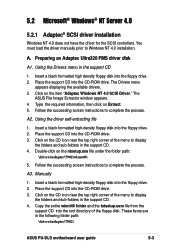
... blank formatted high-density floppy disk into the root directory of the floppy disk. Double-click on the item "Adaptec Windows XP SCSI Driver." Manually 1. Copy the entire Winxp folder and the txtsetup.oem file from the support CD into the floppy drive. 2. Insert a blank formatted high ...® Windows® XP Professional 5.4.1 Adaptec® SCSI driver installation Windows XP does not have the driver for the SCSI controller. The ASUS File Image Extractor window appears. 4. A2. Click on Extract. 5. A. Insert a blank formatted high-density floppy disk into the floppy drive. 2.
... blank formatted high-density floppy disk into the root directory of the floppy disk. Double-click on the item "Adaptec Windows XP SCSI Driver." Manually 1. Copy the entire Winxp folder and the txtsetup.oem file from the support CD into the floppy drive. 2. Insert a blank formatted high ...® Windows® XP Professional 5.4.1 Adaptec® SCSI driver installation Windows XP does not have the driver for the SCSI controller. The ASUS File Image Extractor window appears. 4. A2. Click on Extract. 5. A. Insert a blank formatted high-density floppy disk into the floppy drive. 2.


