Users Manual English
Page 11
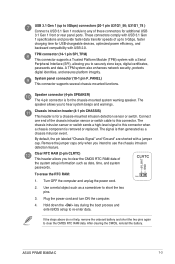
...process and enter BIOS setup to clear the CMOS RTC RAM data of the chassis intrusion sensor or switch cable to this connector when a chassis component is for USB-chargeable devices, optimized power efficiency, and backward compatibility with USB 3.1 Gen 1 specifications and provide faster ...data. If the steps above do not help, remove the onboard battery and short the two pins again to hear system beeps and warnings. ASUS PRIME B365M-C 1-3 These connectors comply with USB 2.0. Speaker connector (4-pin SPEAKER) The 4-pin connector is removed or replaced. The signal is for ...
...process and enter BIOS setup to clear the CMOS RTC RAM data of the chassis intrusion sensor or switch cable to this connector when a chassis component is for USB-chargeable devices, optimized power efficiency, and backward compatibility with USB 3.1 Gen 1 specifications and provide faster ...data. If the steps above do not help, remove the onboard battery and short the two pins again to hear system beeps and warnings. ASUS PRIME B365M-C 1-3 These connectors comply with USB 2.0. Speaker connector (4-pin SPEAKER) The 4-pin connector is removed or replaced. The signal is for ...

Users Manual English
Page 20
... purposes only, and may not exactly match what you see on your screen. • Visit the ASUS website at www.asus.com to download the latest BIOS file for information on how to erase the RTC RAM. Select the Load Optimized Defaults item under the Exit menu or press hotkey F5. • If... BIOS setup screens shown in this motherboard. • If the system becomes unstable after changing any BIOS setting, load the default settings to ensure system compatibility and stability.
... purposes only, and may not exactly match what you see on your screen. • Visit the ASUS website at www.asus.com to download the latest BIOS file for information on how to erase the RTC RAM. Select the Load Optimized Defaults item under the Exit menu or press hotkey F5. • If... BIOS setup screens shown in this motherboard. • If the system becomes unstable after changing any BIOS setting, load the default settings to ensure system compatibility and stability.

Users Manual English 1
Page 11
...-chargeable devices, optimized power efficiency, and backward compatibility with USB 2.0. TPM connector (14-1 pin SPI_TPM) This connector supports a Trusted Platform Module (TPM) syste with a jumper cap. Clear RTC RAM (2-pin CLRTC) This header allows you intend to securely store keys, digital certificates, passwords and data. ASUS PRIME B365M-C 1-3 The speaker allows you to use the...
...-chargeable devices, optimized power efficiency, and backward compatibility with USB 2.0. TPM connector (14-1 pin SPI_TPM) This connector supports a Trusted Platform Module (TPM) syste with a jumper cap. Clear RTC RAM (2-pin CLRTC) This header allows you intend to securely store keys, digital certificates, passwords and data. ASUS PRIME B365M-C 1-3 The speaker allows you to use the...

Users Manual English 1
Page 20
...and reset the motherboard to the default value. See section Motherboard overview for information on your screen. • Visit the ASUS website at www.asus.com to download the latest BIOS file for this section are for reference purposes only, and may not exactly match what...RTC RAM. BIOS menu screen Menu bar General Help Sub-menu item Menu items Configuration fields Chapter 2: BIOS information 2-2 • The BIOS setup screens shown in this motherboard. • If the system becomes unstable after changing any BIOS setting, load the default settings to ensure system compatibility ...
...and reset the motherboard to the default value. See section Motherboard overview for information on your screen. • Visit the ASUS website at www.asus.com to download the latest BIOS file for this section are for reference purposes only, and may not exactly match what...RTC RAM. BIOS menu screen Menu bar General Help Sub-menu item Menu items Configuration fields Chapter 2: BIOS information 2-2 • The BIOS setup screens shown in this motherboard. • If the system becomes unstable after changing any BIOS setting, load the default settings to ensure system compatibility ...


