
P8Z77-V DELUXE User's Manual
Page 42
.... • If your system fail to boot due to boot after using the MemOK! ASUS P8Z77-V DELUXE 2-17 Press and hold the MemOK! MemOK! switch lights continuously. switch until the DRAM_LED starts blinking to boot and load BIOS default settings. Replace the DIMMs with the motherboard may cause system boot failure, and the DRAM_LED near...
.... • If your system fail to boot due to boot after using the MemOK! ASUS P8Z77-V DELUXE 2-17 Press and hold the MemOK! MemOK! switch lights continuously. switch until the DRAM_LED starts blinking to boot and load BIOS default settings. Replace the DIMMs with the motherboard may cause system boot failure, and the DRAM_LED near...

P8Z77-V DELUXE User's Manual
Page 52
ASUS P8Z77-V DELUXE 2-27 Refer to ... details. • Before creating a RAID set, refer to section 4.4 RAID configurations or the manual bundled in the motherboard support DVD. •... When using these connectors, set the SATA Mode item in the BIOS to Serial ATA 6.0 ... If you installed Serial ATA hard disk drives, you intend to create a Serial ATA RAID set using NCQ, set to [RAID Mode]. 2.2.7 Internal connectors 1. Chapter 2 • These connectors are using Serial... if you are set the SATA Mode in the BIOS to [AHCI Mode] by...
ASUS P8Z77-V DELUXE 2-27 Refer to ... details. • Before creating a RAID set, refer to section 4.4 RAID configurations or the manual bundled in the motherboard support DVD. •... When using these connectors, set the SATA Mode item in the BIOS to Serial ATA 6.0 ... If you installed Serial ATA hard disk drives, you intend to create a Serial ATA RAID set using NCQ, set to [RAID Mode]. 2.2.7 Internal connectors 1. Chapter 2 • These connectors are using Serial... if you are set the SATA Mode in the BIOS to [AHCI Mode] by...

P8Z77-V DELUXE User's Manual
Page 53
... connectors connect to section 4.4 RAID configurations or the manual bundled in the BIOS to [AHCI Mode] by default. If you installed Serial ATA hard disk drives, you are set the SATA Mode in the BIOS to create a Serial ATA RAID set using Windows® XP SP3 or later versions. 2-28 Chapter 2: Hardware information
... connectors connect to section 4.4 RAID configurations or the manual bundled in the BIOS to [AHCI Mode] by default. If you installed Serial ATA hard disk drives, you are set the SATA Mode in the BIOS to create a Serial ATA RAID set using Windows® XP SP3 or later versions. 2-28 Chapter 2: Hardware information

P8Z77-V DELUXE User's Manual
Page 58
... front panel audio module to this connector to this connector is for ATX power supply plugs. ASUS P8Z77-V DELUXE 2-33 By default, this connector, set to [AC97]. Connect one orientation. Front panel audio connector (10-1 pin AAFP) This connector is set the item to [HD]. 9. If��y�o�u��w��a�n�...
... front panel audio module to this connector to this connector is for ATX power supply plugs. ASUS P8Z77-V DELUXE 2-33 By default, this connector, set to [AC97]. Connect one orientation. Front panel audio connector (10-1 pin AAFP) This connector is set the item to [HD]. 9. If��y�o�u��w��a�n�...
P8Z77-V DELUXE User's Manual
Page 82
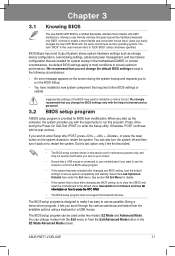
... test routines. The BIOS setup program can also turn the system off and then turn it back on to restart the system. Chapter 3 ASUS P8Z77-V DELUXE 3-1 We recommend that are for reference purposes only, and may result to instability or failure to boot. BIOS setup program A BIOS setup ...as their operating system. See section 3.9 Exit Menu for details. • If the system fails to boot after changing any BIOS setting, load the default settings to ensure system compatibility and stability. The term "BIOS" in this section are needed for system startup in the EZ Mode/Advanced...
... test routines. The BIOS setup program can also turn the system off and then turn it back on to restart the system. Chapter 3 ASUS P8Z77-V DELUXE 3-1 We recommend that are for reference purposes only, and may result to instability or failure to boot. BIOS setup program A BIOS setup ...as their operating system. See section 3.9 Exit Menu for details. • If the system fails to boot after changing any BIOS setting, load the default settings to ensure system compatibility and stability. The term "BIOS" in this section are needed for system startup in the EZ Mode/Advanced...

P8Z77-V DELUXE User's Manual
Page 83
The default screen for the advanced BIOS settings�. Selects the display language of the BIOS setup program...resets the system, or enters the Advanced Mode UEFI BIOS Utility - EZ Mode Exit/Advanced Mode Monday [12/01/2012] P8Z77-V Deluxe BIOS Version : 0306 CPU Type : Genuine Intel(R) CPU 0 @ 3.10GHz Total Memory : 1024 MB (DDR3 1333MHz) Build...(F3) Advanced Mode (F7) Boot Menu(F8) Default(F5) Displays the Advanced mode menus Selects the boot device priority Power Saving mode Normal mode Loads optimized default ASUS Optimal mode Displays the system properties of the basic ...
The default screen for the advanced BIOS settings�. Selects the display language of the BIOS setup program...resets the system, or enters the Advanced Mode UEFI BIOS Utility - EZ Mode Exit/Advanced Mode Monday [12/01/2012] P8Z77-V Deluxe BIOS Version : 0306 CPU Type : Genuine Intel(R) CPU 0 @ 3.10GHz Total Memory : 1024 MB (DDR3 1333MHz) Build...(F3) Advanced Mode (F7) Boot Menu(F8) Default(F5) Displays the Advanced mode menus Selects the boot device priority Power Saving mode Normal mode Loads optimized default ASUS Optimal mode Displays the system properties of the basic ...
P8Z77-V DELUXE User's Manual
Page 84
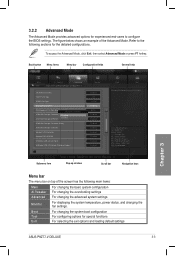
...below shows an example of the screen has the following sections for special functions For selecting the exit options and loading default settings Chapter 3 ASUS P8Z77-V DELUXE 3-3 Advanced Mode General help Exit Main Back Ai Tweaker Advanced Advanced\ Onboard Devices Configuration > HD Audio Controller Front ...Pop-up window Scroll bar Navigation keys Menu bar The menu bar on top of the Advanced Mode. Refer to configure the BIOS settings. To access the Advanced Mode, click Exit, then select Advanced Mode or press F7 hotkey. Copyright (C) 2012 American Megatrends, Inc...
...below shows an example of the screen has the following sections for special functions For selecting the exit options and loading default settings Chapter 3 ASUS P8Z77-V DELUXE 3-3 Advanced Mode General help Exit Main Back Ai Tweaker Advanced Advanced\ Onboard Devices Configuration > HD Audio Controller Front ...Pop-up window Scroll bar Navigation keys Menu bar The menu bar on top of the Advanced Mode. Refer to configure the BIOS settings. To access the Advanced Mode, click Exit, then select Advanced Mode or press F7 hotkey. Copyright (C) 2012 American Megatrends, Inc...

P8Z77-V DELUXE User's Manual
Page 86
...Setup If ONLY the User's password is set, then this is only asked for information on how to erase the RTC RAM. • The Administrator or User Password items on password and must be entered to clear the BIOS password. Chapter 3 ASUS P8Z77-V DELUXE 3-5 UEFI BIOS Utility - In Setup ...Access Level [Fri 11/08/2012] [16:46:15] Administrator > Security Boot Tool Choose the system default language Security The Security menu items allow you to change the system security settings. UEFI BIOS Utility - The Main menu provides you an overview of the basic system information, and ...
...Setup If ONLY the User's password is set, then this is only asked for information on how to erase the RTC RAM. • The Administrator or User Password items on password and must be entered to clear the BIOS password. Chapter 3 ASUS P8Z77-V DELUXE 3-5 UEFI BIOS Utility - In Setup ...Access Level [Fri 11/08/2012] [16:46:15] Administrator > Security Boot Tool Choose the system default language Security The Security menu items allow you to change the system security settings. UEFI BIOS Utility - The Main menu provides you an overview of the basic system information, and ...

P8Z77-V DELUXE User's Manual
Page 87
...the password. From the Enter Current Password box, key in the current password, then press . 3. Select the Administrator Password item and press . 2. To set an administrator password: 1. Chapter 3 3-6 Chapter 3: BIOS setup From the Create New Password box, key in a new password, then press . 4. Confirm...box, key in a password, then press . 3. Confirm the password when prompted. The User Password item on top of the screen shows the default Not Installed. From the Create New Password box, key in a new password, then press . 4. From the Create New Password box, key ...
...the password. From the Enter Current Password box, key in the current password, then press . 3. Select the Administrator Password item and press . 2. To set an administrator password: 1. Chapter 3 3-6 Chapter 3: BIOS setup From the Create New Password box, key in a new password, then press . 4. Confirm...box, key in a password, then press . 3. Confirm the password when prompted. The User Password item on top of the screen shows the default Not Installed. From the Create New Password box, key in a new password, then press . 4. From the Create New Password box, key ...
P8Z77-V DELUXE User's Manual
Page 88
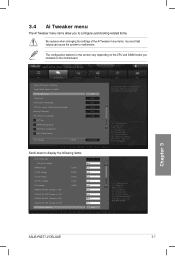
Chapter 3 ASUS P8Z77-V DELUXE 3-7 UEFI BIOS Utility - Advanced Mode Exit Main Ai Tweaker Advanced Monitor...Select Screen ↑↓: Select Item Enter: Select +/-: Change Opt. F1: General Help F2: Previous Values F5: Optimized Defaults F10: Save ESC: Exit F12: Print Screen Version 2.10.1208. Copyright (C) 2012 American Megatrends, Inc. Scroll down ...depending on the CPU and DIMM model you to configure overclocking-related items. Be cautious when changing the settings of the Ai Tweaker menu items. Incorrect field values can cause the system to display the following items...
Chapter 3 ASUS P8Z77-V DELUXE 3-7 UEFI BIOS Utility - Advanced Mode Exit Main Ai Tweaker Advanced Monitor...Select Screen ↑↓: Select Item Enter: Select +/-: Change Opt. F1: General Help F2: Previous Values F5: Optimized Defaults F10: Save ESC: Exit F12: Print Screen Version 2.10.1208. Copyright (C) 2012 American Megatrends, Inc. Scroll down ...depending on the CPU and DIMM model you to configure overclocking-related items. Be cautious when changing the settings of the Ai Tweaker menu items. Incorrect field values can cause the system to display the following items...

P8Z77-V DELUXE User's Manual
Page 89
... 300.0MHz. mode supported by your memory module. eXtreme Memory Profile This item appears only when you to set one single Turbo Ratio for all Turbo Ratio to Intel® CPU default settings automatically. [Manual] Sets the Turbo Ratio for every core-activation condition of these preset overclocking configuration options: [Auto] [Manual] [X.M.P.] Loads the...
... 300.0MHz. mode supported by your memory module. eXtreme Memory Profile This item appears only when you to set one single Turbo Ratio for all Turbo Ratio to Intel® CPU default settings automatically. [Manual] Sets the Turbo Ratio for every core-activation condition of these preset overclocking configuration options: [Auto] [Manual] [X.M.P.] Loads the...
P8Z77-V DELUXE User's Manual
Page 90
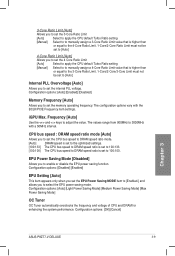
... of CPU and DRAM for enhancing the system performance. 3-Core Ratio Limit [Auto] Allows you to set the 3-Core Ratio Limit [Auto] Select to apply the CPU default Turbo Ratio setting [Manual] Select to to manually assign a 3-Core Ratio Limit value that is higher than or equal...to the 3-Core Ratio Limit. 1-Core/2-Core/3-Core Limit must not be set to [Auto] Internal PLL Overvoltage [Auto] Allows you to enable or disable the EPU power saving function. Configuration options: [OK] [Cancel] Chapter 3 ASUS P8Z77-V DELUXE 3-9 CPU bus speed : DRAM speed ratio mode [Auto] Allows you...
... of CPU and DRAM for enhancing the system performance. 3-Core Ratio Limit [Auto] Allows you to set the 3-Core Ratio Limit [Auto] Select to apply the CPU default Turbo Ratio setting [Manual] Select to to manually assign a 3-Core Ratio Limit value that is higher than or equal...to the 3-Core Ratio Limit. 1-Core/2-Core/3-Core Limit must not be set to [Auto] Internal PLL Overvoltage [Auto] Allows you to enable or disable the EPU power saving function. Configuration options: [OK] [Cancel] Chapter 3 ASUS P8Z77-V DELUXE 3-9 CPU bus speed : DRAM speed ratio mode [Auto] Allows you...

P8Z77-V DELUXE User's Manual
Page 91
...FOUR ACT WIN Time DRAM WRITE to adjust the value. F1: General Help F2: Previous Values F5: Optimized Defaults F10: Save ESC: Exit F12: Print Screen Version 2.00.1208. To restore the default setting, type [auto] using the keyboard and press the key. Copyright (C) 2012 American Megatrends, Inc. If this... menu may cause the system to the default settings. Use the and keys to READ Time DRAM CKE Minimum pulse width DRAM CAS# Write Latency CHA: CHA: CHA: CHA: CHA: 9 Auto 9 Auto ...
...FOUR ACT WIN Time DRAM WRITE to adjust the value. F1: General Help F2: Previous Values F5: Optimized Defaults F10: Save ESC: Exit F12: Print Screen Version 2.00.1208. To restore the default setting, type [auto] using the keyboard and press the key. Copyright (C) 2012 American Megatrends, Inc. If this... menu may cause the system to the default settings. Use the and keys to READ Time DRAM CKE Minimum pulse width DRAM CAS# Write Latency CHA: CHA: CHA: CHA: CHA: 9 Auto 9 Auto ...

P8Z77-V DELUXE User's Manual
Page 96
... thermal conditions must be monitored. CPU Voltage [Offset Mode] [Manual Mode] Allows you to set a fixed CPU voltage. [Offset Mode] Allows you to set the ASUS optimized phase tuning profile. Chapter 3 ASUS P8Z77-V DELUXE 3-15 DRAM Current Capability [Auto] A higher value brings a wider total power range, and...adjust the value. potential. The values range from 0.005V to set the Offset voltage. DO NOT remove the thermal module. Some of the following items are adjusted by a negative value. To restore the default setting, type [auto] using the numeric keypad and press the ...
... thermal conditions must be monitored. CPU Voltage [Offset Mode] [Manual Mode] Allows you to set a fixed CPU voltage. [Offset Mode] Allows you to set the ASUS optimized phase tuning profile. Chapter 3 ASUS P8Z77-V DELUXE 3-15 DRAM Current Capability [Auto] A higher value brings a wider total power range, and...adjust the value. potential. The values range from 0.005V to set the Offset voltage. DO NOT remove the thermal module. Some of the following items are adjusted by a negative value. To restore the default setting, type [auto] using the numeric keypad and press the ...

P8Z77-V DELUXE User's Manual
Page 99
... the Advanced menu items. Incorrect field values can cause the system to change the settings for the CPU and other system devices. Copyright (C) 2012 American Megatrends, Inc. Chapter 3 3-18 Chapter 3: BIOS setup Advanced Mode Main Ai Tweaker Advanced > CPU Configuration > ... Enter: Select +/-: Change Opt. 3.5 Advanced menu The Advanced menu items allow you to malfunction. UEFI BIOS Utility - F1: General Help F2: Previous Values F5: Optimized Defaults F10: Save ESC: Exit F12: Print Screen Version 2.00.1208.
... the Advanced menu items. Incorrect field values can cause the system to change the settings for the CPU and other system devices. Copyright (C) 2012 American Megatrends, Inc. Chapter 3 3-18 Chapter 3: BIOS setup Advanced Mode Main Ai Tweaker Advanced > CPU Configuration > ... Enter: Select +/-: Change Opt. 3.5 Advanced menu The Advanced menu items allow you to malfunction. UEFI BIOS Utility - F1: General Help F2: Previous Values F5: Optimized Defaults F10: Save ESC: Exit F12: Print Screen Version 2.00.1208.
P8Z77-V DELUXE User's Manual
Page 101
...] Allows a hardware platform to run multiple operating systems separately and simultaneously, enabling one system to OS. CPU C6 Report [Auto] Allows you to set the ratio between the CPU Core Clock and the BCLK Frequency. CPU Power Management Configuration This item allows you to enable or disable the Intel...enable the CPU C3 report to enable or disable the Enhanced Intel® SpeedStep Technology (EIST). [Disabled] The CPU runs at its default speed. [Enabled} The operating system controls the CPU speed. CPU C3 Report [Auto] Allows you to OS. CPU Ratio [Auto] Allows you...
...] Allows a hardware platform to run multiple operating systems separately and simultaneously, enabling one system to OS. CPU C6 Report [Auto] Allows you to set the ratio between the CPU Core Clock and the BCLK Frequency. CPU Power Management Configuration This item allows you to enable or disable the Intel...enable the CPU C3 report to enable or disable the Enhanced Intel® SpeedStep Technology (EIST). [Disabled] The CPU runs at its default speed. [Enabled} The operating system controls the CPU speed. CPU C3 Report [Auto] Allows you to OS. CPU Ratio [Auto] Allows you...

P8Z77-V DELUXE User's Manual
Page 126
... the system. 2. To ensure system compatibility and stability, we recommend that allows you want to recover BIOS setting. The utility automatically checks the devices for details. 3.10.3 ASUS CrashFree BIOS 3 utility The ASUS CrashFree BIOS 3 utility is an auto recovery tool that you to enter BIOS Setup to use the newer ...FAT 32/16 format and single partition only. • DO NOT shut down or reset the system while updating the BIOS! Turn on the ASUS official website. Chapter 3 ASUS P8Z77-V DELUXE 3-45 Ensure to load the BIOS default settings to the USB port. 3.
... the system. 2. To ensure system compatibility and stability, we recommend that allows you want to recover BIOS setting. The utility automatically checks the devices for details. 3.10.3 ASUS CrashFree BIOS 3 utility The ASUS CrashFree BIOS 3 utility is an auto recovery tool that you to enter BIOS Setup to use the newer ...FAT 32/16 format and single partition only. • DO NOT shut down or reset the system while updating the BIOS! Turn on the ASUS official website. Chapter 3 ASUS P8Z77-V DELUXE 3-45 Ensure to load the BIOS default settings to the USB port. 3.

P8Z77-V DELUXE User's Manual
Page 128
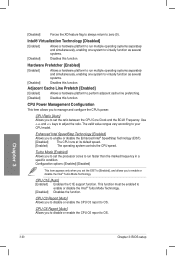
...1. Yes No 4. ASUS P8Z77-V DELUXE 3-47 Press to switch between screen fields and use the keys to exit BIOS Updater. ASUSTek BIOS Updater for details. • Ensure to connect all SATA hard disk drives after updating BIOS. • Ensure to load the BIOS default settings to confirm BIOS update...exits to update BIOS? Restart your motherboard user manual for DOS V1.30 [2012/12/22] FLASH TYPE: MX1C 25L1065A Current ROM BOARD: P8Z77-V Deluxe VER: 0204 DATE: 01/01/2012 Update ROM BOARD: Unknown VER: Unknown DATE: Unknown PATH: A:\ A: P8Z77VD.CAP 2097152 2012-01...
...1. Yes No 4. ASUS P8Z77-V DELUXE 3-47 Press to switch between screen fields and use the keys to exit BIOS Updater. ASUSTek BIOS Updater for details. • Ensure to connect all SATA hard disk drives after updating BIOS. • Ensure to load the BIOS default settings to confirm BIOS update...exits to update BIOS? Restart your motherboard user manual for DOS V1.30 [2012/12/22] FLASH TYPE: MX1C 25L1065A Current ROM BOARD: P8Z77-V Deluxe VER: 0204 DATE: 01/01/2012 Update ROM BOARD: Unknown VER: Unknown DATE: Unknown PATH: A:\ A: P8Z77VD.CAP 2097152 2012-01...

P8Z77-V DELUXE User's Manual
Page 137
... achieve the best digital power saving mode. Default (Smart DIGI+ Setting) Sets your power consumption to CPU default setting. • Enabling the Smart CPU Power Level may decrease the total power delivery to default settings. Default (Smart CPU Power Level) Sets your CPU/iGPU/DRAM power to the CPU..., and affect the CPU performance under a heavy system load. It also provides profile settings to achieve the highest power efficiency, generating ...
... achieve the best digital power saving mode. Default (Smart DIGI+ Setting) Sets your power consumption to CPU default setting. • Enabling the Smart CPU Power Level may decrease the total power delivery to default settings. Default (Smart CPU Power Level) Sets your CPU/iGPU/DRAM power to the CPU..., and affect the CPU performance under a heavy system load. It also provides profile settings to achieve the highest power efficiency, generating ...
P8Z77-V DELUXE User's Manual
Page 187
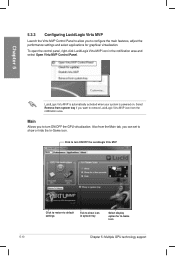
Main Allows you to configure the main features, adjust the performance settings and select applications for In-Game icon 5-10 Chapter 5: Multiple GPU technology support LucidLogix Virtu MVP is automatically activated when your system is powered on. ... Control Panel to allow you to turn ON/OFF the LucidLogix Virtu MVP Click to restore to default settings Tick to show or hide the In-Game icon. Select Remove from system tray if you can set to remove LucidLogix Virtu MVP icon from the Main tab, you want to show icon in...
Main Allows you to configure the main features, adjust the performance settings and select applications for In-Game icon 5-10 Chapter 5: Multiple GPU technology support LucidLogix Virtu MVP is automatically activated when your system is powered on. ... Control Panel to allow you to turn ON/OFF the LucidLogix Virtu MVP Click to restore to default settings Tick to show or hide the In-Game icon. Select Remove from system tray if you can set to remove LucidLogix Virtu MVP icon from the Main tab, you want to show icon in...


