
User Manual
Page 43
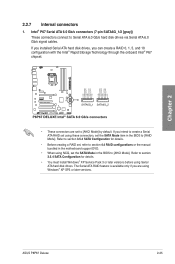
...XP SP3 or later versions. Intel® P67 Serial ATA 6.0 Gb/s connectors (7-pin SATA6G_1/2 [gray]) These connectors connect to [AHCI Mode]. The Serial ATA RAID feature is available only if you can create a RAID 0, 1, 5, and 10 configuration with the... [RAID Mode]. If you installed Serial ATA hard disk drives, you are set the SATA Mode in the BIOS to [AHCI Mode] by default. Refer to section 3.5.4 SATA Configuration for details. • Before creating a RAID set, refer to ...to Serial ATA 6.0 Gb/s hard disk drives via Serial ATA 6.0 Gb/s signal cables. ASUS P8P67 Deluxe 2-25
...XP SP3 or later versions. Intel® P67 Serial ATA 6.0 Gb/s connectors (7-pin SATA6G_1/2 [gray]) These connectors connect to [AHCI Mode]. The Serial ATA RAID feature is available only if you can create a RAID 0, 1, 5, and 10 configuration with the... [RAID Mode]. If you installed Serial ATA hard disk drives, you are set the SATA Mode in the BIOS to [AHCI Mode] by default. Refer to section 3.5.4 SATA Configuration for details. • Before creating a RAID set, refer to ...to Serial ATA 6.0 Gb/s hard disk drives via Serial ATA 6.0 Gb/s signal cables. ASUS P8P67 Deluxe 2-25
User Manual
Page 44
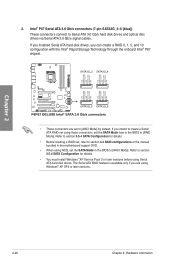
...; Rapid Storage Technology through the onboard Intel® P67 chipset. • These connectors are using NCQ, set the SATA Mode item in the BIOS to [AHCI Mode] by default. If you installed Serial ATA hard disk drives, you intend to create a Serial ATA RAID set to... [AHCI Mode]. Refer to section 3.5.4 SATA Configuration for details. • Before creating a RAID set, refer to section 4.4 RAID configurations or the manual bundled in the motherboard ...
...; Rapid Storage Technology through the onboard Intel® P67 chipset. • These connectors are using NCQ, set the SATA Mode item in the BIOS to [AHCI Mode] by default. If you installed Serial ATA hard disk drives, you intend to create a Serial ATA RAID set to... [AHCI Mode]. Refer to section 3.5.4 SATA Configuration for details. • Before creating a RAID set, refer to section 4.4 RAID configurations or the manual bundled in the motherboard ...

User Manual
Page 71
...Exit Main Back Ai Tweaker Advanced Advanced\ Onboard Devices Configuration > Monitor VIA 1394 Enabled Marvell Storage Controller AHCI Mode Marvell Storage OPROM Enabled JMB Storage Controller Enabled JMB Storage OPROM JMB Storage OPROM Display OptionRom in POST...changing the system boot configuration For configuring options for special functions For selecting the exit options and loading default settings Chapter 3 ASUS P8P67 Deluxe 3-3 Copyright (C) 2010 American Megatrends, Inc. The figure below shows an example of the screen has the following sections for ...
...Exit Main Back Ai Tweaker Advanced Advanced\ Onboard Devices Configuration > Monitor VIA 1394 Enabled Marvell Storage Controller AHCI Mode Marvell Storage OPROM Enabled JMB Storage Controller Enabled JMB Storage OPROM JMB Storage OPROM Display OptionRom in POST...changing the system boot configuration For configuring options for special functions For selecting the exit options and loading default settings Chapter 3 ASUS P8P67 Deluxe 3-3 Copyright (C) 2010 American Megatrends, Inc. The figure below shows an example of the screen has the following sections for ...

User Manual
Page 84
...Precision Event Timer. Status Check Enabled SATA 6G 1 (Gray) Not Present SATA 6G 2 (Gray) Not Present SATA 3G 3 (Blue) ASUS CB-521 ATAPI SATA 3G 4 (Blue) Not Present SATA 3G 5 (Blue) Not Present SATA 3G 6 (Blue) Not Present Boot Tool (1) IDE ...Allows you to the corresponding SATA port. Advanced Mode Exit Main Back Ai Tweaker Advanced Advanced\ SATA Configuration > Monitor SATA Configuration SATA Mode AHCI Mode S.M.A.R.T. Chapter 3 3-16 Chapter 3: BIOS setup The SATA Port items show Not Present if no SATA device is installed to enable or...
...Precision Event Timer. Status Check Enabled SATA 6G 1 (Gray) Not Present SATA 6G 2 (Gray) Not Present SATA 3G 3 (Blue) ASUS CB-521 ATAPI SATA 3G 4 (Blue) Not Present SATA 3G 5 (Blue) Not Present SATA 3G 6 (Blue) Not Present Boot Tool (1) IDE ...Allows you to the corresponding SATA port. Advanced Mode Exit Main Back Ai Tweaker Advanced Advanced\ SATA Configuration > Monitor SATA Configuration SATA Mode AHCI Mode S.M.A.R.T. Chapter 3 3-16 Chapter 3: BIOS setup The SATA Port items show Not Present if no SATA device is installed to enable or...

User Manual
Page 85
...as Parallel ATA physical storage devices. S.M.A.R.T. Serial-ATA Controller 0 [Enhanced] This item appear only when you want to use the AHCI (Advanced Host Controller Interface). Status Check [Enabled] S.M.A.R.T. (Self-Monitoring, Analysis and Reporting Technology) is a monitor system. When read.... Configuration options: [Enabled] [Disabled] Chapter 3 ASUS P8P67 Deluxe 3-17 Set to [RAID Mode] when you to set the previous item to [IDE Mode] [Disabled] [Enhanced] [Compatible] Disables the SATA function. SATA Mode [AHCI Mode] Allows you want to create a RAID configuration...
...as Parallel ATA physical storage devices. S.M.A.R.T. Serial-ATA Controller 0 [Enhanced] This item appear only when you want to use the AHCI (Advanced Host Controller Interface). Status Check [Enabled] S.M.A.R.T. (Self-Monitoring, Analysis and Reporting Technology) is a monitor system. When read.... Configuration options: [Enabled] [Disabled] Chapter 3 ASUS P8P67 Deluxe 3-17 Set to [RAID Mode] when you to set the previous item to [IDE Mode] [Disabled] [Enhanced] [Compatible] Disables the SATA function. SATA Mode [AHCI Mode] Allows you want to create a RAID configuration...

User Manual
Page 88
... and allows you to [HDMI] for SPDIF audio output. [HDMI] Sets to enable or disable the JMB storage controller. The AHCI allows the onboard storage driver to enable advanced Serial ATA features that you to enable or disable the OptionRom of the JMB storage ...Marvell Storage Controller [Enabled] Allows you to select the Marvell storage controller operating mode. [Disabled] Disables the controller. [Enabled] Set to [AHCI Mode] when you want the SATA hard disk drives to [Enabled] and install the JMicron JMB36X Controller Driver from the motherboard support DVD. Configuration...
... and allows you to [HDMI] for SPDIF audio output. [HDMI] Sets to enable or disable the JMB storage controller. The AHCI allows the onboard storage driver to enable advanced Serial ATA features that you to enable or disable the OptionRom of the JMB storage ...Marvell Storage Controller [Enabled] Allows you to select the Marvell storage controller operating mode. [Disabled] Disables the controller. [Enabled] Set to [AHCI Mode] when you want the SATA hard disk drives to [Enabled] and install the JMicron JMB36X Controller Driver from the motherboard support DVD. Configuration...
User Manual
Page 107
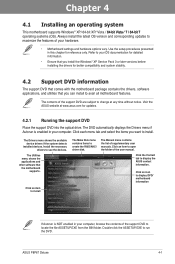
... systems (OS). The Utilities menu shows the applications and other software that the motherboard supports. Click an item to change at www.asus.com for updates. 4.2.1 Running the support DVD Place the support DVD into the optical drive. Refer to avail all motherboard features. Use... the drivers for reference only. ASUS P8P67 Deluxe 4-1 Click an item to install The Make Disk menu contains items to run the DVD. Double-click the ASSETUP.EXE to create the RAID/AHCI driver disk. Install the necessary drivers to display the ASUS contact information. Click the Contact ...
... systems (OS). The Utilities menu shows the applications and other software that the motherboard supports. Click an item to change at www.asus.com for updates. 4.2.1 Running the support DVD Place the support DVD into the optical drive. Refer to avail all motherboard features. Use... the drivers for reference only. ASUS P8P67 Deluxe 4-1 Click an item to install The Make Disk menu contains items to run the DVD. Double-click the ASSETUP.EXE to create the RAID/AHCI driver disk. Install the necessary drivers to display the ASUS contact information. Click the Contact ...
User Manual
Page 125
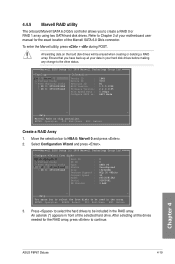
... : BIOS Version : Firmware Version: PCIe Speed Rate : Configure SATA as: 1B4B 9130 B1 1.0.0.1028 2.2.0.1105 5.0Gbps AHCI Mode ▶ ▶ Help Marvell RAID on the hard disk drives will be included in the array. Chapter 4 ASUS P8P67 Deluxe 4-19 To enter the Marvell utility, press + during POST. Refer to be erased when creating or...
... : BIOS Version : Firmware Version: PCIe Speed Rate : Configure SATA as: 1B4B 9130 B1 1.0.0.1028 2.2.0.1105 5.0Gbps AHCI Mode ▶ ▶ Help Marvell RAID on the hard disk drives will be included in the array. Chapter 4 ASUS P8P67 Deluxe 4-19 To enter the Marvell utility, press + during POST. Refer to be erased when creating or...

User Manual
Page 127
...Yes No Press to delete and press . Marvell BIOS Setup (c) 2009 Marvell Technology Group Ltd. ENTER: Operation F10: Exit/Save ESC: Return Chapter 4 ASUS P8P67 Deluxe 4-21 Press . Delete an existing RAID Array 1. Topology Information HBA 0: Marvell 0 ID ├ Virtual Disks Name │ └ VD 0: New_VD...: Revision ID : BIOS Version : Firmware Version: PCIe Speed Rate : Configure SATA as: 1B4B 9130 B1 1.0.0.1028 2.2.0.1105 5.0Gbps AHCI Mode ▶ ▶ Help Marvell RAID on chip controller. The following warning message appears: Exit Do you want to exit from ...
...Yes No Press to delete and press . Marvell BIOS Setup (c) 2009 Marvell Technology Group Ltd. ENTER: Operation F10: Exit/Save ESC: Return Chapter 4 ASUS P8P67 Deluxe 4-21 Press . Delete an existing RAID Array 1. Topology Information HBA 0: Marvell 0 ID ├ Virtual Disks Name │ └ VD 0: New_VD...: Revision ID : BIOS Version : Firmware Version: PCIe Speed Rate : Configure SATA as: 1B4B 9130 B1 1.0.0.1028 2.2.0.1105 5.0Gbps AHCI Mode ▶ ▶ Help Marvell RAID on chip controller. The following warning message appears: Exit Do you want to exit from ...
User Manual
Page 129
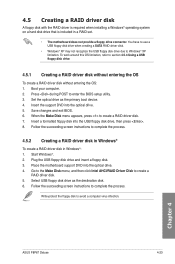
...press . 8. Write-protect the floppy disk to complete the process. Follow the succeeding screen instructions to create a RAID driver disk. 5. Chapter 4 ASUS P8P67 Deluxe 4-23 Follow the succeeding screen instructions to avoid a computer virus infection. Plug the USB floppy disk drive and insert a floppy disk. 3. 4.5 ... Windows® XP limitation. Insert the support DVD into the optical drive. 5. Go to the Make Disk menu, and then click Intel AHCI/RAID Driver Disk to complete the process. 4.5.2 Creating a RAID driver disk in Windows® To create a RAID driver disk in a ...
...press . 8. Write-protect the floppy disk to complete the process. Follow the succeeding screen instructions to create a RAID driver disk. 5. Chapter 4 ASUS P8P67 Deluxe 4-23 Follow the succeeding screen instructions to avoid a computer virus infection. Plug the USB floppy disk drive and insert a floppy disk. 3. 4.5 ... Windows® XP limitation. Insert the support DVD into the optical drive. 5. Go to the Make Disk menu, and then click Intel AHCI/RAID Driver Disk to complete the process. 4.5.2 Creating a RAID driver disk in Windows® To create a RAID driver disk in a ...


