User Manual
Page 5
... drive 4-25 Chapter 5: Multiple GPU technology support 5.1 ATI® CrossFireX™ technology 5-1 5.1.1 Requirements 5-1 5.1.2 Before you begin 5-1 5.1.3 Installing two CrossFireX™ graphics cards 5-2 5.1.4 Installing the device drivers 5-3 5.1.5 Enabling the ATI® CrossFireX™ technology 5-3 5.2 NVIDIA® SLI™ technology 5-4 5.2.1 Requirements 5-4 5.2.2 Installing two SLI-ready graphics cards 5-4 5.2.3 Installing the device...
... drive 4-25 Chapter 5: Multiple GPU technology support 5.1 ATI® CrossFireX™ technology 5-1 5.1.1 Requirements 5-1 5.1.2 Before you begin 5-1 5.1.3 Installing two CrossFireX™ graphics cards 5-2 5.1.4 Installing the device drivers 5-3 5.1.5 Enabling the ATI® CrossFireX™ technology 5-3 5.2 NVIDIA® SLI™ technology 5-4 5.2.1 Requirements 5-4 5.2.2 Installing two SLI-ready graphics cards 5-4 5.2.3 Installing the device...
User Manual
Page 12
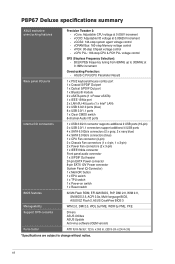
...PLL: 160-step CPU & PCH PLL voltage control SFS (Stepless Frequency Selection): - P8P67 Deluxe specifications summary ASUS exclusive overclocking features Precision Tweaker 2: - vCCSA: 144-step system agent voltage control - ASUS C.P.R.(CPU Parameter Recall) Back panel I/O ports 1 x PS/2 keyboard/mouse combo port ...WfM 2.0, SM BIOS 2.5, ACPI 2.0a, Multi-language BIOS, ASUS EZ Flash 2, ASUS CrashFree BIOS 3 Manageability WfM 2.0, DMI 2.0, WOL by PME, WOR by PME, PXE Support DVD contents Drivers ASUS Utilities ASUS Update Anti-virus software (OEM version) Form factor ATX form factor...
...PLL: 160-step CPU & PCH PLL voltage control SFS (Stepless Frequency Selection): - P8P67 Deluxe specifications summary ASUS exclusive overclocking features Precision Tweaker 2: - vCCSA: 144-step system agent voltage control - ASUS C.P.R.(CPU Parameter Recall) Back panel I/O ports 1 x PS/2 keyboard/mouse combo port ...WfM 2.0, SM BIOS 2.5, ACPI 2.0a, Multi-language BIOS, ASUS EZ Flash 2, ASUS CrashFree BIOS 3 Manageability WfM 2.0, DMI 2.0, WOL by PME, WOR by PME, PXE Support DVD contents Drivers ASUS Utilities ASUS Update Anti-virus software (OEM version) Form factor ATX form factor...
User Manual
Page 41
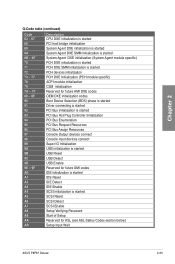
... (PCH module specific) ACPI module initialization CSM initialization Reserved for future AMI DXE codes OEM DXE initialization codes Boot Device Selection (BDS) phase is started Driver connecting is started PCI Bus initialization is started PCI Bus Hot Plug Controller Initialization PCI Bus Enumeration PCI Bus Request Resources PCI Bus Assign Resources... started SCSI Reset SCSI Detect SCSI Enable Setup Verifying Password Start of Setup Reserved for ASL (see ASL Status Codes section below) Setup Input Wait ASUS P8P67 Deluxe 2-23
... (PCH module specific) ACPI module initialization CSM initialization Reserved for future AMI DXE codes OEM DXE initialization codes Boot Device Selection (BDS) phase is started Driver connecting is started PCI Bus initialization is started PCI Bus Hot Plug Controller Initialization PCI Bus Enumeration PCI Bus Request Resources PCI Bus Assign Resources... started SCSI Reset SCSI Detect SCSI Enable Setup Verifying Password Start of Setup Reserved for ASL (see ASL Status Codes section below) Setup Input Wait ASUS P8P67 Deluxe 2-23
User Manual
Page 45
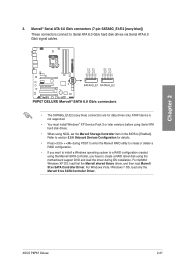
...3. Marvell® Serial ATA 6.0 Gb/s connectors (7-pin SATA6G_E1/E2 [navy blue]) These connectors connect to create a RAID driver disk using the motherboard support DVD and load the driver during POST to enter the Marvell RAID utility to create or delete a RAID configuration. • If you want to install... Controller item in the BIOS to [Enabled]. For 32/64bit Windows XP OS, load first the Marvell shared library driver, and then load Marvell 91xx SATA Controller Driver. ASUS P8P67 Deluxe 2-27 ATAPI device is not supported. • You must install Windows® XP Service Pack 3 or later ...
...3. Marvell® Serial ATA 6.0 Gb/s connectors (7-pin SATA6G_E1/E2 [navy blue]) These connectors connect to create a RAID driver disk using the motherboard support DVD and load the driver during POST to enter the Marvell RAID utility to create or delete a RAID configuration. • If you want to install... Controller item in the BIOS to [Enabled]. For 32/64bit Windows XP OS, load first the Marvell shared library driver, and then load Marvell 91xx SATA Controller Driver. ASUS P8P67 Deluxe 2-27 ATAPI device is not supported. • You must install Windows® XP Service Pack 3 or later ...
User Manual
Page 65
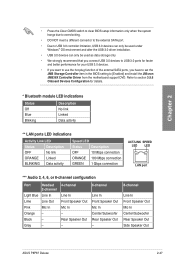
... Out Mic In Center/Subwoofer Rear Speaker Out - 8-channel Line In Front Speaker Out Mic In Center/Subwoofer Rear Speaker Out Side Speaker Out ASUS P8P67 Deluxe 2-47 Chapter 2 • Press the Clear CMOS switch to clear BIOS setup information only when the system hangs due to overclocking. •... port. • Due to USB 3.0 controller limitation, USB 3.0 devices can only be used under Windows® OS environment and after the USB 3.0 driver installation. • USB 3.0 devices can only be used as data storage only. • We strongly recommend that you have to set the JMB Storage...
... Out Mic In Center/Subwoofer Rear Speaker Out - 8-channel Line In Front Speaker Out Mic In Center/Subwoofer Rear Speaker Out Side Speaker Out ASUS P8P67 Deluxe 2-47 Chapter 2 • Press the Clear CMOS switch to clear BIOS setup information only when the system hangs due to overclocking. •... port. • Due to USB 3.0 controller limitation, USB 3.0 devices can only be used under Windows® OS environment and after the USB 3.0 driver installation. • USB 3.0 devices can only be used as data storage only. • We strongly recommend that you have to set the JMB Storage...

User Manual
Page 85
...set the SATA configuration. [Disabled] [IDE Mode] [AHCI Mode] [RAID Mode] Disables the SATA function. S.M.A.R.T. Configuration options: [Enabled] [Disabled] Chapter 3 ASUS P8P67 Deluxe 3-17 Set to [Enhanced] to support two SATA 6.0 Gb/s and two SATA 3.0 Gb/s devices. Set to [AHCI Mode] when you want to use...[IDE Mode] when you set the previous item to report warning messages during the POST. The AHCI allows the onboard storage driver to enable advanced Serial ATA features that increases storage performance on random workloads by allowing the drive to internally optimize the order ...
...set the SATA configuration. [Disabled] [IDE Mode] [AHCI Mode] [RAID Mode] Disables the SATA function. S.M.A.R.T. Configuration options: [Enabled] [Disabled] Chapter 3 ASUS P8P67 Deluxe 3-17 Set to [Enhanced] to support two SATA 6.0 Gb/s and two SATA 3.0 Gb/s devices. Set to [AHCI Mode] when you want to use...[IDE Mode] when you set the previous item to report warning messages during the POST. The AHCI allows the onboard storage driver to enable advanced Serial ATA features that increases storage performance on random workloads by allowing the drive to internally optimize the order ...

User Manual
Page 88
...the JMB storage contorller (ex. Configuration options: [Enabled] [Disabled] Chapter 3 3-20 Chapter 3: BIOS setup The AHCI allows the onboard storage driver to enable advanced Serial ATA features that you to use the full functin of commands. Configuration options: [Enabled] [Disabled] Display OptionRom in POST... set the previous item to [Enabled] and allows you to [Enabled] and install the JMicron JMB36X Controller Driver from the motherboard support DVD. Renesas Electronics USB 3.0 [Enabled] [Enabled] Enables the USB 3.0 controller. [Disabled] Disables the controller.
...the JMB storage contorller (ex. Configuration options: [Enabled] [Disabled] Chapter 3 3-20 Chapter 3: BIOS setup The AHCI allows the onboard storage driver to enable advanced Serial ATA features that you to use the full functin of commands. Configuration options: [Enabled] [Disabled] Display OptionRom in POST... set the previous item to [Enabled] and allows you to [Enabled] and install the JMicron JMB36X Controller Driver from the motherboard support DVD. Renesas Electronics USB 3.0 [Enabled] [Enabled] Enables the USB 3.0 controller. [Disabled] Disables the controller.
User Manual
Page 107
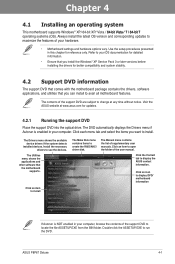
.... 4.2.1 Running the support DVD Place the support DVD into the optical drive. Install the necessary drivers to run the DVD. ASUS P8P67 Deluxe 4-1 The DVD automatically displays the Drivers menu if Autorun is enabled in your computer, browse the contents of your OS documentation for detailed... information The support DVD that comes with the motherboard package contains the drivers, software applications, and utilities that you want to open the folder of supplementary user manuals. Visit the ASUS website at any time without notice. The Utilities menu shows the applications...
.... 4.2.1 Running the support DVD Place the support DVD into the optical drive. Install the necessary drivers to run the DVD. ASUS P8P67 Deluxe 4-1 The DVD automatically displays the Drivers menu if Autorun is enabled in your computer, browse the contents of your OS documentation for detailed... information The support DVD that comes with the motherboard package contains the drivers, software applications, and utilities that you want to open the folder of supplementary user manuals. Visit the ASUS website at any time without notice. The Utilities menu shows the applications...
User Manual
Page 109
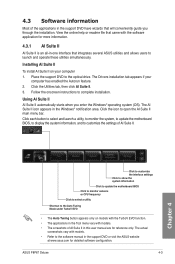
... of AI Suite II in this user manual are for reference only. Place the support DVD to complete installation. The Drivers installation tab appears if your computer 1. Chapter 4 Click to customize the interface settings Click to show the system information Click... 3. The actual screenshots vary with the software application for detailed software configuration. ASUS P8P67 Deluxe 4-3 4.3 Software information Most of the applications in the support DVD have wizards that integrates several ASUS utilities and allows users to launch and operate these utilities simultaneously. View the...
... of AI Suite II in this user manual are for reference only. Place the support DVD to complete installation. The Drivers installation tab appears if your computer 1. Chapter 4 Click to customize the interface settings Click to show the system information Click... 3. The actual screenshots vary with the software application for detailed software configuration. ASUS P8P67 Deluxe 4-3 4.3 Software information Most of the applications in the support DVD have wizards that integrates several ASUS utilities and allows users to launch and operate these utilities simultaneously. View the...
User Manual
Page 119
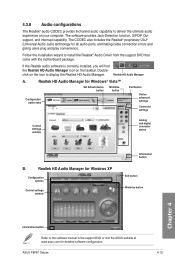
... settings window Information button Exit button Minimize button Chapter 4 Information button Refer to install the Realtek® Audio Driver from the support DVD that came with the motherboard package. click on your computer. ASUS P8P67 Deluxe 4-13 The software provides Jack-Detection function, S/PDIF Out support, and interrupt capability. Double- If the Realtek audio...
... settings window Information button Exit button Minimize button Chapter 4 Information button Refer to install the Realtek® Audio Driver from the support DVD that came with the motherboard package. click on your computer. ASUS P8P67 Deluxe 4-13 The software provides Jack-Detection function, S/PDIF Out support, and interrupt capability. Double- If the Realtek audio...

User Manual
Page 120
... transfer rate, double that of RAID 5 configuration include better HDD performance, fault tolerance, and higher storage capacity. Refer to section 4.5 Creating a RAID driver disk for this setup. Two hard disks perform the same work as a data disk only. • If you have to create a RAID... driver disk and load the RAID driver during OS installation. Use two new drives or use an existing drive and three new drives for this setup. Chapter 4 4-14 Chapter...
... transfer rate, double that of RAID 5 configuration include better HDD performance, fault tolerance, and higher storage capacity. Refer to section 4.5 Creating a RAID driver disk for this setup. Two hard disks perform the same work as a data disk only. • If you have to create a RAID... driver disk and load the RAID driver during OS installation. Use two new drives or use an existing drive and three new drives for this setup. Chapter 4 4-14 Chapter...
User Manual
Page 129
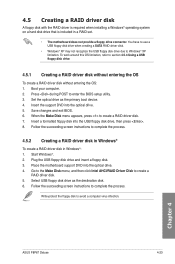
... provide a floppy drive connector. Follow the succeeding screen instructions to section 4.5.4 Using a USB floppy disk drive. 4.5.1 Creating a RAID driver disk without entering the OS To create a RAID driver disk without entering the OS: 1. Chapter 4 ASUS P8P67 Deluxe 4-23 Boot your computer. 2. Save changes and exit BIOS. 6. Go to the Make Disk menu, and then click...
... provide a floppy drive connector. Follow the succeeding screen instructions to section 4.5.4 Using a USB floppy disk drive. 4.5.1 Creating a RAID driver disk without entering the OS To create a RAID driver disk without entering the OS: 1. Chapter 4 ASUS P8P67 Deluxe 4-23 Boot your computer. 2. Save changes and exit BIOS. 6. Go to the Make Disk menu, and then click...
User Manual
Page 130
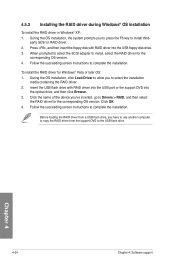
... version. Click the name of the device you have to use another computer to copy the RAID driver from a USB flash drive, you 've inserted, go to install, select the RAID driver for Windows® Vista or later OS: 1. Chapter 4 4-24 Chapter 4: Software support Follow...the succeeding screen instructions to select the installation media containing the RAID driver. 2. 4.5.3 Installing the RAID driver during Windows® OS installation To install the RAID driver in Windows® XP: 1. During the OS installation, click Load Driver to allow you to press the F6 key to install third- ...
... version. Click the name of the device you have to use another computer to copy the RAID driver from a USB flash drive, you 've inserted, go to install, select the RAID driver for Windows® Vista or later OS: 1. Chapter 4 4-24 Chapter 4: Software support Follow...the succeeding screen instructions to select the installation media containing the RAID driver. 2. 4.5.3 Installing the RAID driver during Windows® OS installation To install the RAID driver in Windows® XP: 1. During the OS installation, click Load Driver to allow you to press the F6 key to install third- ...

User Manual
Page 131
...5. Using another computer, plug the USB floppy disk drive, and insert the floppy disk containing the RAID driver. 2. Double-click the file. Chapter 4 ASUS P8P67 Deluxe 4-25 The name of the RAID driver disk to the steps below: 1. To solve this issue, add the USB floppy disk drive's Vendor.... Click Details tab. 4.5.4 Using a USB floppy disk drive Due to the floppy disk containing the RAID driver. A window appears, allowing you install the RAID driver from a floppy disk during the OS installation. From the Universal Serial Bus controllers, right-click xxxxxx USB Floppy...
...5. Using another computer, plug the USB floppy disk drive, and insert the floppy disk containing the RAID driver. 2. Double-click the file. Chapter 4 ASUS P8P67 Deluxe 4-25 The name of the RAID driver disk to the steps below: 1. To solve this issue, add the USB floppy disk drive's Vendor.... Click Details tab. 4.5.4 Using a USB floppy disk drive Due to the floppy disk containing the RAID driver. A window appears, allowing you install the RAID driver from a floppy disk during the OS installation. From the Universal Serial Bus controllers, right-click xxxxxx USB Floppy...

User Manual
Page 133
... ATI® CrossFireX™ technology The motherboard supports the ATI® CrossFireX™ technology that your current graphics card driver/s. 4. Download the latest driver from the AMD website (www.amd.com). • Ensure that your power supply unit (PSU) can provide at ... > Add/Remove Programs. For Windows Vista, go to install multi-graphics processing units (GPU) graphics cards. ASUS P8P67 Deluxe 5-1 Close all existing graphics card drivers before installing ATI CrossFireX graphics cards to your computer. Turn off your system. To uninstall existing graphics card...
... ATI® CrossFireX™ technology The motherboard supports the ATI® CrossFireX™ technology that your current graphics card driver/s. 4. Download the latest driver from the AMD website (www.amd.com). • Ensure that your power supply unit (PSU) can provide at ... > Add/Remove Programs. For Windows Vista, go to install multi-graphics processing units (GPU) graphics cards. ASUS P8P67 Deluxe 5-1 Close all existing graphics card drivers before installing ATI CrossFireX graphics cards to your computer. Turn off your system. To uninstall existing graphics card...
User Manual
Page 135
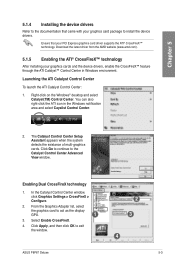
...; CrossFireX™ technology After installing your graphics card package to exit the window. 2 3 4 ASUS P8P67 Deluxe 5-3 Click Apply, and then click OK to install the device drivers. Select Enable CrossFireX. 4. Ensure that came with your graphics cards and the device drivers, enable the CrossFireX™ feature through the ATI Catalyst™ Control Center in the...
...; CrossFireX™ technology After installing your graphics card package to exit the window. 2 3 4 ASUS P8P67 Deluxe 5-3 Click Apply, and then click OK to install the device drivers. Select Enable CrossFireX. 4. Ensure that came with your graphics cards and the device drivers, enable the CrossFireX™ feature through the ATI Catalyst™ Control Center in the...

User Manual
Page 136
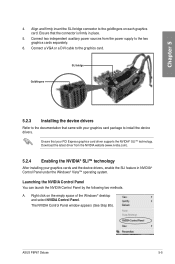
...models, but the installation steps remain the same. 1. Ensure that the cards are NVIDIA® certified. • Ensure that your graphics card driver supports the NVIDIA SLI technology. See Chapter 2 for details. • We recommend that you to Chapter 2 in this user manual for ...following pictures are for multi-graphics card installation. 3. If your system. Insert the two graphics card into the PCIEX16 slots. Download the latest driver from the NVIDIA website (www.nvidia.com). • Ensure that are properly seated on the slots. 5-4 Chapter 5: Multiple GPU technology ...
...models, but the installation steps remain the same. 1. Ensure that the cards are NVIDIA® certified. • Ensure that your graphics card driver supports the NVIDIA SLI technology. See Chapter 2 for details. • We recommend that you to Chapter 2 in this user manual for ...following pictures are for multi-graphics card installation. 3. If your system. Insert the two graphics card into the PCIEX16 slots. Download the latest driver from the NVIDIA website (www.nvidia.com). • Ensure that are properly seated on the slots. 5-4 Chapter 5: Multiple GPU technology ...
User Manual
Page 137
....nvidia.com). 5.2.4 Enabling the NVIDIA® SLI™ technology After installing your graphics cards and the device drivers, enable the SLI feature in place. 5. ASUS P8P67 Deluxe 5-5 Ensure that came with your PCI Express graphics card driver supports the NVIDIA® SLI™ technology. Launching the NVIDIA Control Panel You can launch the NVIDIA Control...
....nvidia.com). 5.2.4 Enabling the NVIDIA® SLI™ technology After installing your graphics cards and the device drivers, enable the SLI feature in place. 5. ASUS P8P67 Deluxe 5-5 Ensure that came with your PCI Express graphics card driver supports the NVIDIA® SLI™ technology. Launching the NVIDIA Control Panel You can launch the NVIDIA Control...


