P8H61-MX R2.0 User's Manual
Page 37
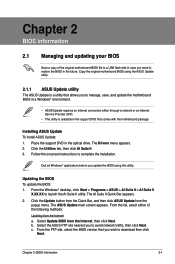
... BIOS To update the BIOS: 1. The AI Suite II Quick Bar appears. 2. Select the ASUS FTP site nearest you to complete the installation. The Drivers menu appears. 2. The ASUS Update main screen appears. b. From the FTP site, select the BIOS version that you wish to launch ...the AI Suite II utility. Chapter 2: BIOS information 2-1 Installing ASUS Update To install ASUS Update: 1. From the Windows® desktop, click Start > Programs > ASUS > AI Suite II >...
... BIOS To update the BIOS: 1. The AI Suite II Quick Bar appears. 2. Select the ASUS FTP site nearest you to complete the installation. The Drivers menu appears. 2. The ASUS Update main screen appears. b. From the FTP site, select the BIOS version that you wish to launch ...the AI Suite II utility. Chapter 2: BIOS information 2-1 Installing ASUS Update To install ASUS Update: 1. From the Windows® desktop, click Start > Programs > ASUS > AI Suite II >...
P8H61-MX R2.0 User's Manual
Page 43
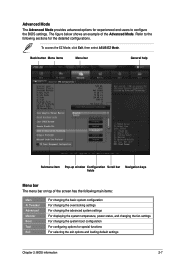
... For selecting the exit options and loading default settings Chapter 2: BIOS information 2-7 To access the EZ Mode, click Exit, then select ASUS EZ Mode. The figure below shows an example of the screen has the following sections for the detailed configurations. Back button Menu items...window Configuration Scroll bar Navigation keys fields Menu bar The menu bar on top of the Advanced Mode. Refer to the following main items: Main Ai Tweaker Advanced Monitor Boot Tool Exit For changing the basic system configuration For changing the overclocking settings For changing the advanced...
... For selecting the exit options and loading default settings Chapter 2: BIOS information 2-7 To access the EZ Mode, click Exit, then select ASUS EZ Mode. The figure below shows an example of the screen has the following sections for the detailed configurations. Back button Menu items...window Configuration Scroll bar Navigation keys fields Menu bar The menu bar on top of the Advanced Mode. Refer to the following main items: Main Ai Tweaker Advanced Monitor Boot Tool Exit For changing the basic system configuration For changing the overclocking settings For changing the advanced...

P8H61-MX R2.0 User's Manual
Page 44
... that menu. For example, selecting Main shows the Main menu items. The other items on the screen. General help At the top right corner of the menu screen is user-configurable, you can change the value of the selected item. To change the value of options. 2-8 ASUS P8H61-MX Series Menu items The highlighted item...
... that menu. For example, selecting Main shows the Main menu items. The other items on the screen. General help At the top right corner of the menu screen is user-configurable, you can change the value of the selected item. To change the value of options. 2-8 ASUS P8H61-MX Series Menu items The highlighted item...

P8H61-MX R2.0 User's Manual
Page 45
... Installed. After you have forgotten your BIOS password, erase the CMOS Real Time Clock (RTC) RAM to clear the BIOS password. Chapter 2: BIOS information 2-9 The Main menu provides you an overview of the basic system information, and allows you to set a password, these items show the default Not Installed. See section... 1.6 Jumpers for information on how to erase the RTC RAM. • The Administrator or User Password items on top of the BIOS Setup program. 2.3 Main menu The Main menu screen appears when you to choose the BIOS language version from the options.
... Installed. After you have forgotten your BIOS password, erase the CMOS Real Time Clock (RTC) RAM to clear the BIOS password. Chapter 2: BIOS information 2-9 The Main menu provides you an overview of the basic system information, and allows you to set a password, these items show the default Not Installed. See section... 1.6 Jumpers for information on how to erase the RTC RAM. • The Administrator or User Password items on top of the BIOS Setup program. 2.3 Main menu The Main menu screen appears when you to choose the BIOS language version from the options.
