User Manual
Page 6
... the software manuals 4-2 4.3 Software information 4-3 4.3.1 ASUS PC Probe II 4-3 4.3.2 ASUS AI Suite 4-4 4.3.3 ASUS Fan Xpert 4-5 4.3.4 ASUS EPU-6 Engine 4-6 4.3.5 ASUS Express Gate 4-7 4.3.6 VIA® High Definition Audio utility 4-8 4.3.7 ASUS Drive Xpert 4-9 4.4 ASUS Unique Overclocking Utility-TurboV EVO 4-10 4.4.1 Using ASUS TurboV 4-10 4.4.2 Using ASUS TurboV Auto Tuning Mode 4-11 4.4.3 Using ASUS Turbo Key 4-12 4.5 RAID configurations 4-13 4.5.1 RAID definitions 4-13 4.5.2 Installing Serial ATA...
... the software manuals 4-2 4.3 Software information 4-3 4.3.1 ASUS PC Probe II 4-3 4.3.2 ASUS AI Suite 4-4 4.3.3 ASUS Fan Xpert 4-5 4.3.4 ASUS EPU-6 Engine 4-6 4.3.5 ASUS Express Gate 4-7 4.3.6 VIA® High Definition Audio utility 4-8 4.3.7 ASUS Drive Xpert 4-9 4.4 ASUS Unique Overclocking Utility-TurboV EVO 4-10 4.4.1 Using ASUS TurboV 4-10 4.4.2 Using ASUS TurboV Auto Tuning Mode 4-11 4.4.3 Using ASUS Turbo Key 4-12 4.5 RAID configurations 4-13 4.5.1 RAID definitions 4-13 4.5.2 Installing Serial ATA...
User Manual
Page 12
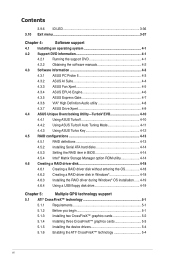
P7P55D Deluxe specifications summary CPU Chipset Memory Expansion Slots Multi-GPU Support Storage LAN USB IEEE 1394 Audio LGA1156 socket for Intel® Core™ i7/ Core™ i5 Processors/ Supports Intel® Turbo Boost Technology * Refer to www.asus.com for Intel CPU support list Intel&#...Supports NVIDIA® Quad-GPU SLI™ Technology Intel® P55 Express Chipset: - 6 x SATA 3.0 Gb/s ports - Intel® Matrix Storage supporting SATA RAID 0,1, 5, and 10 JMicron® JMB363 SATA & PATA controller: - 1 x Ultra DMA 133/100/66 for the Memory QVL (Qualified Vendors Lists) 2 x...
P7P55D Deluxe specifications summary CPU Chipset Memory Expansion Slots Multi-GPU Support Storage LAN USB IEEE 1394 Audio LGA1156 socket for Intel® Core™ i7/ Core™ i5 Processors/ Supports Intel® Turbo Boost Technology * Refer to www.asus.com for Intel CPU support list Intel&#...Supports NVIDIA® Quad-GPU SLI™ Technology Intel® P55 Express Chipset: - 6 x SATA 3.0 Gb/s ports - Intel® Matrix Storage supporting SATA RAID 0,1, 5, and 10 JMicron® JMB363 SATA & PATA controller: - 1 x Ultra DMA 133/100/66 for the Memory QVL (Qualified Vendors Lists) 2 x...

User Manual
Page 52
... hot-plug and NCQ, set to section 3.4.2 Storage Configuration for Serial ATA hard disk drives and optical disc drives. The Serial ATA RAID feature is available only if you intend to these connectors, set using Serial ATA hard disk drives. Intel® P55 Serial ATA connectors...2: Hardware information 2. In Standard IDE mode, you can connect Serial ATA boot/data hard disk drives to create a Serial ATA RAID set the Configure SATA as in the motherboard support DVD. • You must install Windows® XP Service Pack 2 or later versions before using these connectors.
... hot-plug and NCQ, set to section 3.4.2 Storage Configuration for Serial ATA hard disk drives and optical disc drives. The Serial ATA RAID feature is available only if you intend to these connectors, set using Serial ATA hard disk drives. Intel® P55 Serial ATA connectors...2: Hardware information 2. In Standard IDE mode, you can connect Serial ATA boot/data hard disk drives to create a Serial ATA RAID set the Configure SATA as in the motherboard support DVD. • You must install Windows® XP Service Pack 2 or later versions before using these connectors.
User Manual
Page 74
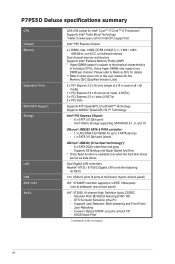
...Serial ATA connectors supported by allowing the drive to internally optimize the order of commands. • If you want to create a RAID 0, RAID 1, RAID 5, RAID 10, or the Intel® Matrix Storage Technology configuration from the sub-menu of SATA Configuration to [AHCI]. This will be ...[Compatible] [Enhanced] Configure SATA as Parallel ATA physical storage devices, keep the default setting [IDE]. • If you want to [RAID]. The AHCI allows the onboard storage driver to enable advanced Serial ATA features that increases storage performance on random workloads by the PCH chip. ...
...Serial ATA connectors supported by allowing the drive to internally optimize the order of commands. • If you want to create a RAID 0, RAID 1, RAID 5, RAID 10, or the Intel® Matrix Storage Technology configuration from the sub-menu of SATA Configuration to [AHCI]. This will be ...[Compatible] [Enhanced] Configure SATA as Parallel ATA physical storage devices, keep the default setting [IDE]. • If you want to [RAID]. The AHCI allows the onboard storage driver to enable advanced Serial ATA features that increases storage performance on random workloads by the PCH chip. ...
User Manual
Page 103
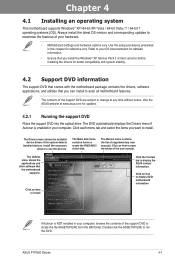
... at any time without notice. ASUS P7P55D Deluxe 4-1 Chapter 4 Chapter 4: Software support 4.1 Installing an operating system This motherboard supports Windows® XP/ 64-bit XP/ Vista / 64-bit Vista / 7 / 64-bit 7 operating systems (OS). The DVD automatically displays the Drivers menu if Autorun ... and hardware options vary. The Make disk menu contains items to run the DVD. Double-click the ASSETUP.EXE to create the RAID/AHCI driver disk. The contents of the support DVD are subject to use the devices. The Drivers menu shows the available device drivers if the ...
... at any time without notice. ASUS P7P55D Deluxe 4-1 Chapter 4 Chapter 4: Software support 4.1 Installing an operating system This motherboard supports Windows® XP/ 64-bit XP/ Vista / 64-bit Vista / 7 / 64-bit 7 operating systems (OS). The DVD automatically displays the Drivers menu if Autorun ... and hardware options vary. The Make disk menu contains items to run the DVD. Double-click the ASSETUP.EXE to create the RAID/AHCI driver disk. The contents of the support DVD are subject to use the devices. The Drivers menu shows the available device drivers if the ...
User Manual
Page 115
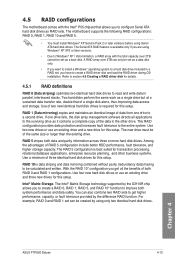
... using only two identical hard disk drives. The motherboard supports the following RAID configurations: RAID 0, RAID 1, RAID 10 and RAID 5. • You must be created by the ICH10R chip allows you to create a RAID 0, RAID 1, RAID 5, and RAID 10* function to improve both data and parity ... RAID function. RAID 10 is available only if you have to the surviving drive as a boot disk. Use of three identical hard disk drives for details. 4.5.1 RAID definitions RAID 0 (Data striping) optimizes two identical hard disk drives to the entire system. Chapter 4 ASUS P7P55D Deluxe ...
... using only two identical hard disk drives. The motherboard supports the following RAID configurations: RAID 0, RAID 1, RAID 10 and RAID 5. • You must be created by the ICH10R chip allows you to create a RAID 0, RAID 1, RAID 5, and RAID 10* function to improve both data and parity ... RAID function. RAID 10 is available only if you have to the surviving drive as a boot disk. Use of three identical hard disk drives for details. 4.5.1 RAID definitions RAID 0 (Data striping) optimizes two identical hard disk drives to the entire system. Chapter 4 ASUS P7P55D Deluxe ...
User Manual
Page 116
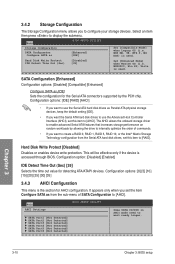
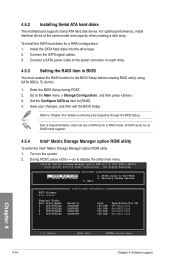
...Serial # 9LS0HJA4 9LS0F4HL 3LS0JYL8 9LS0BJ5H Size 149.0GB 149.0GB 149.0GB 149.0GB Type/Status(Vol ID) Non-RAID Disk Non-RAID Disk Non-RAID Disk Non-RAID Disk Chapter 4 [↑↓]-Select [ESC]-Exit [ENTER]-Select Menu 4-14 Chapter 4: Software support For optimal performance...Rights Reserved. [ MAIN MENU ] 1. Install the SATA hard disks into the drive bays. 2. To do this: 1. Exit RAID Volumes: None defined. 4.5.2 Installing Serial ATA hard disks The motherboard supports Serial ATA hard disk drives. Go to [RAID]. 4. Turn on the system. 2. Recovery Volume Options 5.
...Serial # 9LS0HJA4 9LS0F4HL 3LS0JYL8 9LS0BJ5H Size 149.0GB 149.0GB 149.0GB 149.0GB Type/Status(Vol ID) Non-RAID Disk Non-RAID Disk Non-RAID Disk Non-RAID Disk Chapter 4 [↑↓]-Select [ESC]-Exit [ENTER]-Select Menu 4-14 Chapter 4: Software support For optimal performance...Rights Reserved. [ MAIN MENU ] 1. Install the SATA hard disks into the drive bays. 2. To do this: 1. Exit RAID Volumes: None defined. 4.5.2 Installing Serial ATA hard disks The motherboard supports Serial ATA hard disk drives. Go to [RAID]. 4. Turn on the system. 2. Recovery Volume Options 5.

User Manual
Page 117
..., press to select the hard disk drives you to move through the menus and select the menu options. The RAID BIOS setup screens shown in the RAID set 1. Intel(R) Matrix Storage Manager option ROM v8.9.0.1014 PCH-D wRAID5 Copyright(C) 2003-09 Intel Corporation. The... 3 ST3160812AS [ SELECT DISKS ] Serial # 9LS0HJA4 9LS0F4HL 3LS0JYL8 9LS0BJ5H Size 149.0GB 149.0GB 149.0GB 149.0GB Status Non-RAID Disk Non-RAID Disk Non-RAID Disk Non-RAID Disk Select 2 to 6 disks to use in creating the volume. [↑↓]-Prev/Next [SPACE]-SelectDisk [ENTER]-Done Chapter 4 ASUS P7P55D Deluxe 4-15
..., press to select the hard disk drives you to move through the menus and select the menu options. The RAID BIOS setup screens shown in the RAID set 1. Intel(R) Matrix Storage Manager option ROM v8.9.0.1014 PCH-D wRAID5 Copyright(C) 2003-09 Intel Corporation. The... 3 ST3160812AS [ SELECT DISKS ] Serial # 9LS0HJA4 9LS0F4HL 3LS0JYL8 9LS0BJ5H Size 149.0GB 149.0GB 149.0GB 149.0GB Status Non-RAID Disk Non-RAID Disk Non-RAID Disk Non-RAID Disk Select 2 to 6 disks to use in creating the volume. [↑↓]-Prev/Next [SPACE]-SelectDisk [ENTER]-Done Chapter 4 ASUS P7P55D Deluxe 4-15

User Manual
Page 118
.... 8. Use the up /down arrow key to the CREATE VOLUME menu. Press to create the RAID volume and return to the main menu, or to go back to select the stripe size for the RAID array (for audio and video editing. 7. Use the up /down arrow key to select a drive..., and then press to select. When the Create Volume item is selected, enter the RAID volume capacity that you want and press . Chapter 4 4-16 Chapter 4: Software support When the Capacity item is selected, press . The following are typical values...
.... 8. Use the up /down arrow key to the CREATE VOLUME menu. Press to create the RAID volume and return to the main menu, or to go back to select the stripe size for the RAID array (for audio and video editing. 7. Use the up /down arrow key to select a drive..., and then press to select. When the Create Volume item is selected, enter the RAID volume capacity that you want and press . Chapter 4 4-16 Chapter 4: Software support When the Capacity item is selected, press . The following are typical values...

User Manual
Page 119
... PCH-D wRAID5 Copyright(C) 2003-09 Intel Corporation. Use the up/down arrow key to delete volume "Volume0"? (Y/N): 3. ASUS P7P55D Deluxe 4-17 Chapter 4 Deleting a RAID set Take caution when deleting a RAID set 1. To delete a RAID set . Press to delete the RAID set and return to the utility main menu, or press to return to Recovery volumes) [↑↓...
... PCH-D wRAID5 Copyright(C) 2003-09 Intel Corporation. Use the up/down arrow key to delete volume "Volume0"? (Y/N): 3. ASUS P7P55D Deluxe 4-17 Chapter 4 Deleting a RAID set Take caution when deleting a RAID set 1. To delete a RAID set . Press to delete the RAID set and return to the utility main menu, or press to return to Recovery volumes) [↑↓...

User Manual
Page 120
...drive due to create a 32/64bit Intel AHCI/RAID driver disk. 7. Press during POST to avoid a computer virus infection. Set the optical drive as the destination disk. 6. Insert a formatted floppy disk into the optical drive. 4. Place the motherboard support DVD into the USB floppy disk drive, ... disk drive as the primary boot device. 4. Insert the support DVD into the optical drive. 5. 4.6 Creating a RAID driver disk A floppy disk with the RAID driver. • The motherboard does not provide a floppy drive connector. You have to use either a floppy disk or a USB flash drive with...
...drive due to create a 32/64bit Intel AHCI/RAID driver disk. 7. Press during POST to avoid a computer virus infection. Set the optical drive as the destination disk. 6. Insert a formatted floppy disk into the optical drive. 4. Place the motherboard support DVD into the USB floppy disk drive, ... disk drive as the primary boot device. 4. Insert the support DVD into the optical drive. 5. 4.6 Creating a RAID driver disk A floppy disk with the RAID driver. • The motherboard does not provide a floppy drive connector. You have to use either a floppy disk or a USB flash drive with...

User Manual
Page 121
...controllers, right-click xxxxxx USB Floppy, and then select Properties from a floppy disk during Windows® OS installation To install the RAID driver for Windows® Vista or later OS 1. Follow the succeeding screen instructions to complete the installation. 4.6.4 Using a USB floppy... disk drive when you select Intel(R) ICH8R/ICH9R/ICH10R/DO/PCH SATA RAID Controller. 4. Chapter 4 ASUS P7P55D Deluxe 4-19 The name of the USB floppy disk drive varies with different vendors. 4.6.3 Installing the RAID driver during the OS installation. During the OS installation, select Intel(R) ...
...controllers, right-click xxxxxx USB Floppy, and then select Properties from a floppy disk during Windows® OS installation To install the RAID driver for Windows® Vista or later OS 1. Follow the succeeding screen instructions to complete the installation. 4.6.4 Using a USB floppy... disk drive when you select Intel(R) ICH8R/ICH9R/ICH10R/DO/PCH SATA RAID Controller. 4. Chapter 4 ASUS P7P55D Deluxe 4-19 The name of the USB floppy disk drive varies with different vendors. 4.6.3 Installing the RAID driver during the OS installation. During the OS installation, select Intel(R) ...

User Manual
Page 122
Use Notepad to locate the file txtsetup.oem. 6. Browse the contents of the RAID driver disk to open the file. A window appears, allowing you to select the program for opening the oem file. 7. Chapter 4 4-20 Chapter 4: Software support 4. Click Details tab. The Vendor ID (VID) and Product ID (PID) are displayed. 5. Double-click the file.
Use Notepad to locate the file txtsetup.oem. 6. Browse the contents of the RAID driver disk to open the file. A window appears, allowing you to select the program for opening the oem file. 7. Chapter 4 4-20 Chapter 4: Software support 4. Click Details tab. The Vendor ID (VID) and Product ID (PID) are displayed. 5. Double-click the file.


