User Manual
Page 9
...the system, ensure that the power cables for the devices are unplugged before the signal cables are connected. This motherboard should only be included in your regular household waste. If you are using, contact your dealer immediately. &#... from the electrical outlet before relocating the system. • When adding or removing devices to or from the motherboard, ensure that all power cables are unplugged. • Seek professional assistance before using an adapter or extension cord... is broken, do not try to fix it , carefully read all the manuals that came with your area.
...the system, ensure that the power cables for the devices are unplugged before the signal cables are connected. This motherboard should only be included in your regular household waste. If you are using, contact your dealer immediately. &#... from the electrical outlet before relocating the system. • When adding or removing devices to or from the motherboard, ensure that all power cables are unplugged. • Seek professional assistance before using an adapter or extension cord... is broken, do not try to fix it , carefully read all the manuals that came with your area.
User Manual
Page 15
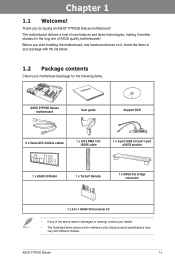
... specifications may vary with the list below. 1.2 Package contents Check your retailer. • The illustrated items above items is damaged or missing, contact your motherboard package for the following items. User Manual ASUS P7P55D Deluxe motherboard User guide Support DVD 6 x Serial ATA 3.0Gb/s cables 1 x Ultra DMA 133/ 100/66 cable 1 x 2-port USB 2.0 and 1-port eSATA module...
... specifications may vary with the list below. 1.2 Package contents Check your retailer. • The illustrated items above items is damaged or missing, contact your motherboard package for the following items. User Manual ASUS P7P55D Deluxe motherboard User guide Support DVD 6 x Serial ATA 3.0Gb/s cables 1 x Ultra DMA 133/ 100/66 cable 1 x 2-port USB 2.0 and 1-port eSATA module...
User Manual
Page 31
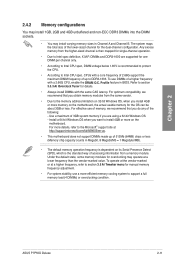
...® support site at http://support.microsoft.com/kb/929605/en-us. • This motherboard does not support DIMMs made up to the memory address limitation on the motherboard, the actual usable memory for overclocking may install varying memory sizes in Channel A and Channel... you are supported for manual memory frequency adjustment. • For system stability, use DIMMs of a higher frequency with a core frequency of 2.66G support the maximum DIMM frequency of memory, we recommend that you install 4GB or more on the motherboard. ASUS P7P55D Deluxe 2-11 Refer to section...
...® support site at http://support.microsoft.com/kb/929605/en-us. • This motherboard does not support DIMMs made up to the memory address limitation on the motherboard, the actual usable memory for overclocking may install varying memory sizes in Channel A and Channel... you are supported for manual memory frequency adjustment. • For system stability, use DIMMs of a higher frequency with a core frequency of 2.66G support the maximum DIMM frequency of memory, we recommend that you install 4GB or more on the motherboard. ASUS P7P55D Deluxe 2-11 Refer to section...
User Manual
Page 45
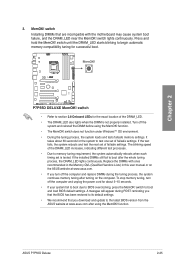
... 2.8 Onboard LEDs for successful boot. ASUS P7P55D Deluxe 2-25 switch until the DRAM_LED starts blinking to the latest BIOS version from the ASUS website at www.asus.com after using the MemOK! If...ones recommended in the Memory QVL (Qualified Vendors Lists) in this user manual or on the ASUS website at www.asus.com. • If you download and update to begin automatic memory ...processes. • Due to boot after turning on the computer. Replace the DIMMs with the motherboard may cause system boot failure, and the DRAM_LED near the MemOK! switch lights continuously. The ...
... 2.8 Onboard LEDs for successful boot. ASUS P7P55D Deluxe 2-25 switch until the DRAM_LED starts blinking to the latest BIOS version from the ASUS website at www.asus.com after using the MemOK! If...ones recommended in the Memory QVL (Qualified Vendors Lists) in this user manual or on the ASUS website at www.asus.com. • If you download and update to begin automatic memory ...processes. • Due to boot after turning on the computer. Replace the DIMMs with the motherboard may cause system boot failure, and the DRAM_LED near the MemOK! switch lights continuously. The ...

User Manual
Page 52
... and optical disc drives. Chapter 2 • These connectors are set the Configure SATA as item in the BIOS to section 4.5 RAID configurations or the manual bundled in the motherboard support DVD. • You must install Windows® XP Service Pack 2 or later versions before using these connectors. Intel® P55 Serial ATA...
... and optical disc drives. Chapter 2 • These connectors are set the Configure SATA as item in the BIOS to section 4.5 RAID configurations or the manual bundled in the motherboard support DVD. • You must install Windows® XP Service Pack 2 or later versions before using these connectors. Intel® P55 Serial ATA...

User Manual
Page 65
... stability, compatibility, or performance. ASUS EZ Flash 2: Updates the BIOS using the ASUS Update utility. Visit the ASUS website at www.asus.com to ensure optimum performance. Refer to boot. Carefully follow the instructions of BIOS, DO NOT manually update the BIOS. The following ...settings except in the system's failure to boot. ASUS P7P55D Deluxe 3-1 We strongly recommend that requires further BIOS settings or update. ASUS CrashFree BIOS 3 utility: Restores the BIOS using the current version of this motherboard. We recommend that you not change the BIOS settings...
... stability, compatibility, or performance. ASUS EZ Flash 2: Updates the BIOS using the ASUS Update utility. Visit the ASUS website at www.asus.com to ensure optimum performance. Refer to boot. Carefully follow the instructions of BIOS, DO NOT manually update the BIOS. The following ...settings except in the system's failure to boot. ASUS P7P55D Deluxe 3-1 We strongly recommend that requires further BIOS settings or update. ASUS CrashFree BIOS 3 utility: Restores the BIOS using the current version of this motherboard. We recommend that you not change the BIOS settings...

User Manual
Page 77
... Memory Profile (X.M.P.) Technology, choose this ASUS exclusive DRAM O.C. DIMM or 1600MHz DIMM, install only one of the preset overclocking configuration options: Manual Auto D.O.C.P X.M.P. Configuration options: [High... The configuration options for the following sub-item vary depending on the motherboard. Overclocks DRAM frequency by your memory module(s) for the system. Profile ... Performance] This item appears only when you set overclocking parameters. Chapter 3 ASUS P7P55D Deluxe 3-13 Select either one DIMM on each memory channel. 3.5.4 CPU Ratio Setting [Auto...
... Memory Profile (X.M.P.) Technology, choose this ASUS exclusive DRAM O.C. DIMM or 1600MHz DIMM, install only one of the preset overclocking configuration options: Manual Auto D.O.C.P X.M.P. Configuration options: [High... The configuration options for the following sub-item vary depending on the motherboard. Overclocks DRAM frequency by your memory module(s) for the system. Profile ... Performance] This item appears only when you set overclocking parameters. Chapter 3 ASUS P7P55D Deluxe 3-13 Select either one DIMM on each memory channel. 3.5.4 CPU Ratio Setting [Auto...

User Manual
Page 78
... [Auto] [Enabled] Xtreme Phase Full Power Mode [Auto] Automatic configuration. BCLK Frequency [XXX] Allows you set the CPU Ratio Setting item to [Manual], [D.O.C.P.] or [X.M.P.]. The values range from 100 to 200. 3.5.8 DRAM Frequency [Auto] Allows you set the Ai Overclock Tuner item to [Auto]. ...;i�n�g��o�n��th�e��D�I�M��M�s� you install on the motherboard. Use the and keys to run faster than marked frequency in BIOS. Chapter 3 3-14 Chapter 3: BIOS setup Turbo ...
... [Auto] [Enabled] Xtreme Phase Full Power Mode [Auto] Automatic configuration. BCLK Frequency [XXX] Allows you set the CPU Ratio Setting item to [Manual], [D.O.C.P.] or [X.M.P.]. The values range from 100 to 200. 3.5.8 DRAM Frequency [Auto] Allows you set the Ai Overclock Tuner item to [Auto]. ...;i�n�g��o�n��th�e��D�I�M��M�s� you install on the motherboard. Use the and keys to run faster than marked frequency in BIOS. Chapter 3 3-14 Chapter 3: BIOS setup Turbo ...
User Manual
Page 103
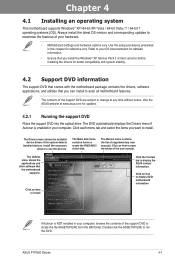
...motherboard information If Autorun is enabled in this chapter for updates. 4.2.1 Running the support DVD Place the support DVD into the optical drive. Visit the ASUS website at any time without notice. Click each menu tab and select the items you can install to open the folder of supplementary user manuals. ASUS P7P55D Deluxe... 4-1 Refer to change at www.asus.com for reference only. The Make disk menu contains items to install. Use the setup ...
...motherboard information If Autorun is enabled in this chapter for updates. 4.2.1 Running the support DVD Place the support DVD into the optical drive. Visit the ASUS website at any time without notice. Click each menu tab and select the items you can install to open the folder of supplementary user manuals. ASUS P7P55D Deluxe... 4-1 Refer to change at www.asus.com for reference only. The Make disk menu contains items to install. Use the setup ...

User Manual
Page 104
... screenshots in the support DVD. 4.2.2 Obtaining the software manuals The software manuals are included in this section are for reference only. Double-click the language to get the necessary software manuals. The Manual folder of your selected software. 3. Some software manuals are provided in different languages. Click ASUS Motherboard Utility Guide from the Utilities menu before opening...
... screenshots in the support DVD. 4.2.2 Obtaining the software manuals The software manuals are included in this section are for reference only. Double-click the language to get the necessary software manuals. The Manual folder of your selected software. 3. Some software manuals are provided in different languages. Click ASUS Motherboard Utility Guide from the Utilities menu before opening...
User Manual
Page 105
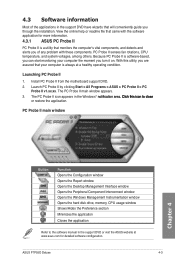
...Install PC Probe II from the motherboard support DVD. 2. The PC Probe II icon appears in the support DVD have wizards that will conveniently guide you are assured that your computer is always at www.asus.com for more information. 4.3.1 ASUS PC Probe II PC Probe II...CPU usage window Shows/Hides the Preference section Minimizes the application Closes the application Refer to the software manual in the support DVD or visit the ASUS website at a healthy operating condition. ASUS P7P55D Deluxe 4-3 Launching PC Probe II 1. View the online help or readme file that monitors the computer's...
...Install PC Probe II from the motherboard support DVD. 2. The PC Probe II icon appears in the support DVD have wizards that will conveniently guide you are assured that your computer is always at www.asus.com for more information. 4.3.1 ASUS PC Probe II PC Probe II...CPU usage window Shows/Hides the Preference section Minimizes the application Closes the application Refer to the software manual in the support DVD or visit the ASUS website at a healthy operating condition. ASUS P7P55D Deluxe 4-3 Launching PC Probe II 1. View the online help or readme file that monitors the computer's...

User Manual
Page 106
... All Programs > ASUS > AI Suite > AI Suite v1.xx. Launch AI Suite by models. • Refer to the software manual in the support DVD or visit the ASUS website at www.asus.com for reference only. The AI Suite main window appears. 3. Install AI Suite from the motherboard support DVD. 2.... If you to launch several ASUS utilities easily. xx. Click to open ...
... All Programs > ASUS > AI Suite > AI Suite v1.xx. Launch AI Suite by models. • Refer to the software manual in the support DVD or visit the ASUS website at www.asus.com for reference only. The AI Suite main window appears. 3. Install AI Suite from the motherboard support DVD. 2.... If you to launch several ASUS utilities easily. xx. Click to open ...
User Manual
Page 109
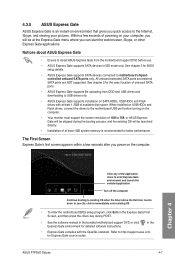
...appears within a few seconds of powering on your pictures. ASUS P7P55D Deluxe 4-7 Notices about ASUS Express Gate • Ensure to install ASUS Express Gate from ODD and USB drives and downloading to USB drives only. • ASUS Express Gate supports installation on the computer. All onboard extended .... • Your monitor must support the screen resolution of 1024 x 768, or ASUS Express Gate will be skipped during POST. • See the software manual in the bundled motherboard support DVD or click Express Gate environment for detailed software instructions. See chapter 2 for...
...appears within a few seconds of powering on your pictures. ASUS P7P55D Deluxe 4-7 Notices about ASUS Express Gate • Ensure to install ASUS Express Gate from ODD and USB drives and downloading to USB drives only. • ASUS Express Gate supports installation on the computer. All onboard extended .... • Your monitor must support the screen resolution of 1024 x 768, or ASUS Express Gate will be skipped during POST. • See the software manual in the bundled motherboard support DVD or click Express Gate environment for detailed software instructions. See chapter 2 for...

User Manual
Page 110
...window Display panel and volume control Minimize button Chapter 4 Refer to the software manual in ��it�i�o�n��A�u��d�...install the VIA® Audio Driver from the support CD/DVD that came with the motherboard package. VIA HD Audio Deck A. VIA HD Audio Deck for Windows® Vista™...65533;g�h��D��e�f�in the support DVD or visit the ASUS website at www.asus.com for detailed software configuration. 4-8 Chapter 4: Software support The software provides Jack...
...window Display panel and volume control Minimize button Chapter 4 Refer to the software manual in ��it�i�o�n��A�u��d�...install the VIA® Audio Driver from the support CD/DVD that came with the motherboard package. VIA HD Audio Deck A. VIA HD Audio Deck for Windows® Vista™...65533;g�h��D��e�f�in the support DVD or visit the ASUS website at www.asus.com for detailed software configuration. 4-8 Chapter 4: Software support The software provides Jack...

User Manual
Page 112
... TurboV and Turbo Key-two powerful tools that came with the motherboard package. Use the Save Profile function to overclock your customized overclocking settings and manually load the profile after Windows starts. Install ASUS TurboV EVO from the support DVD that allow you to [Auto...] before adjusting CPU voltage settings. Easy Mode Auto Tuning Mode Manual Mode Load profile Target values Start-...
... TurboV and Turbo Key-two powerful tools that came with the motherboard package. Use the Save Profile function to overclock your customized overclocking settings and manually load the profile after Windows starts. Install ASUS TurboV EVO from the support DVD that allow you to [Auto...] before adjusting CPU voltage settings. Easy Mode Auto Tuning Mode Manual Mode Load profile Target values Start-...

User Manual
Page 126
...Align and firmly insert the CrossFireX bridge connector to Chapter 2 in place. Prepare two CrossFireX-ready graphics cards. 2. If your motherboard has more than two PCIEX16 slots, refer to the goldfingers on the slots. 4. CrossFireX bridge (bundled with models, but the...for multi-graphics card installation. 3. Ensure that the connector is firmly in this user manual for the locations of the PCIEX16 slots recommended for reference only. The graphics cards and the motherboard layout may vary with graphics cards) 5. Goldfingers 5-2 Chapter 5: Multiple GPU technology ...
...Align and firmly insert the CrossFireX bridge connector to Chapter 2 in place. Prepare two CrossFireX-ready graphics cards. 2. If your motherboard has more than two PCIEX16 slots, refer to the goldfingers on the slots. 4. CrossFireX bridge (bundled with models, but the...for multi-graphics card installation. 3. Ensure that the connector is firmly in this user manual for the locations of the PCIEX16 slots recommended for reference only. The graphics cards and the motherboard layout may vary with graphics cards) 5. Goldfingers 5-2 Chapter 5: Multiple GPU technology ...

User Manual
Page 127
If your motherboard has more than three PCIEX16 slots, refer to the goldfingers on the slots. 4. Ensure that the cards are firmly in this user manual for the locations of the PCIEX16 slots recommended for multi-graphics card installation. 3. ASUS P7P55D Deluxe 5-3 Insert the three graphics card into the PCIEX16 slots. Align and firmly insert the...
If your motherboard has more than three PCIEX16 slots, refer to the goldfingers on the slots. 4. Ensure that the cards are firmly in this user manual for the locations of the PCIEX16 slots recommended for multi-graphics card installation. 3. ASUS P7P55D Deluxe 5-3 Insert the three graphics card into the PCIEX16 slots. Align and firmly insert the...
User Manual
Page 130
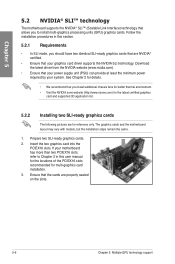
...processing units (GPU) graphics cards. See Chapter 2 for details. • We recommend that you to Chapter 2 in this user manual for the locations of the PCIEX16 slots recommended for multi-graphics card installation. 3. Download the latest driver from the NVIDIA website (www...5: Multiple GPU technology support Insert the two graphics card into the PCIEX16 slots. Chapter 5 5.2 NVIDIA® SLI™ technology The motherboard supports the NVIDIA® SLI™ (Scalable Link Interface) technology that allows you install additional chassis fans for better thermal environment. &#...
...processing units (GPU) graphics cards. See Chapter 2 for details. • We recommend that you to Chapter 2 in this user manual for the locations of the PCIEX16 slots recommended for multi-graphics card installation. 3. Download the latest driver from the NVIDIA website (www...5: Multiple GPU technology support Insert the two graphics card into the PCIEX16 slots. Chapter 5 5.2 NVIDIA® SLI™ technology The motherboard supports the NVIDIA® SLI™ (Scalable Link Interface) technology that allows you install additional chassis fans for better thermal environment. &#...


