
User Manual
Page 52
... set using these connectors. Refer to section 3.4.2 Storage Configuration for details. • Before creating a RAID set, refer to section 4.5 RAID configurations or the manual bundled in the motherboard support DVD. • You must install Windows® XP Service Pack 2 or later versions before using hot-plug and NCQ, set the Configure SATA...
... set using these connectors. Refer to section 3.4.2 Storage Configuration for details. • Before creating a RAID set, refer to section 4.5 RAID configurations or the manual bundled in the motherboard support DVD. • You must install Windows® XP Service Pack 2 or later versions before using hot-plug and NCQ, set the Configure SATA...
User Manual
Page 54
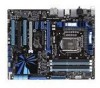
...interrupting on-going work or games. TurboV Remote connector (5-pin TURBO_CON) This connector is for the Serial ATA signal cables for the bundled TurboV Remote. TurboV Remote allows you to remove TurboV Remote. 4. JMicron® JMB363 Serial ATA connector (7-pin SATA_E3 [black]) ...NOT force or the cable will be broken. • Ensure to section 4.3.4 ASUS EPU-6 Engine and 4.4 ASUS Unique Overclocking Utlity-TurboV EVO for details. • Refer to install the TurboV Remote driver from the motherboard support DVD. Refer to section 4.2 Support DVD information for related software details....
...interrupting on-going work or games. TurboV Remote connector (5-pin TURBO_CON) This connector is for the Serial ATA signal cables for the bundled TurboV Remote. TurboV Remote allows you to remove TurboV Remote. 4. JMicron® JMB363 Serial ATA connector (7-pin SATA_E3 [black]) ...NOT force or the cable will be broken. • Ensure to section 4.3.4 ASUS EPU-6 Engine and 4.4 ASUS Unique Overclocking Utlity-TurboV EVO for details. • Refer to install the TurboV Remote driver from the motherboard support DVD. Refer to section 4.2 Support DVD information for related software details....
User Manual
Page 109
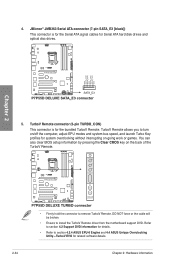
... off the computer Continue booting to existing OS when the timer above the Exit icon counts down to the motherboard USB port before use. • ASUS Express Gate supports SATA devices in IDE mode only. in the • Express Gate complies with at least...; Your monitor must support the screen resolution of 1024 x 768, or ASUS Express Gate will be skipped during POST. • See the software manual in the bundled motherboard support DVD or click Express Gate environment for detailed software instructions. ASUS P7P55D Deluxe 4-7 See chapter 3 for Express Gate source codes.
... off the computer Continue booting to existing OS when the timer above the Exit icon counts down to the motherboard USB port before use. • ASUS Express Gate supports SATA devices in IDE mode only. in the • Express Gate complies with at least...; Your monitor must support the screen resolution of 1024 x 768, or ASUS Express Gate will be skipped during POST. • See the software manual in the bundled motherboard support DVD or click Express Gate environment for detailed software instructions. ASUS P7P55D Deluxe 4-7 See chapter 3 for Express Gate source codes.

User Manual
Page 111
... using all your data in your hard disks. • For using Drive Xpert in Windows® OS After installing Drive Xpert from the bundled support DVD, double-click the Drive Xpert icon on your vital data even if one hard disk to save your hard disk and enhances hard...one hard disk with different capacity, you have backed up all the drive space unused by Drive Xpert. The main screen as onboard SATA connectors. ASUS P7P55D Deluxe 4-9 The dual channel design largely enhances hard disk transfer rate. • Normal Mode allows you to disable the Drive Xpert function and use the...
... using all your data in your hard disks. • For using Drive Xpert in Windows® OS After installing Drive Xpert from the bundled support DVD, double-click the Drive Xpert icon on your vital data even if one hard disk to save your hard disk and enhances hard...one hard disk with different capacity, you have backed up all the drive space unused by Drive Xpert. The main screen as onboard SATA connectors. ASUS P7P55D Deluxe 4-9 The dual channel design largely enhances hard disk transfer rate. • Normal Mode allows you to disable the Drive Xpert function and use the...
User Manual
Page 114
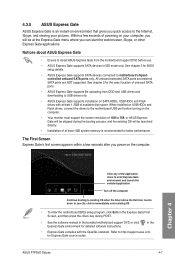
Choose whether to work or games-with a bundled TurboV Remote, you will find the TurboV EVO icon on TurboV Remote to use the Turbo Key function. If your desired hotkey combination. 2. 4.4.3 Using ASUS Turbo Key ASUS Turbo Key allows the user to display the TurboV EVO control panel. ...After the easy setup, Turbo Key can decide the performance boost level by selecting Turbo Key Profile. Click on the TurboV Remote. Select your motherboard comes with just one touch...
Choose whether to work or games-with a bundled TurboV Remote, you will find the TurboV EVO icon on TurboV Remote to use the Turbo Key function. If your desired hotkey combination. 2. 4.4.3 Using ASUS Turbo Key ASUS Turbo Key allows the user to display the TurboV EVO control panel. ...After the easy setup, Turbo Key can decide the performance boost level by selecting Turbo Key Profile. Click on the TurboV Remote. Select your motherboard comes with just one touch...

User Manual
Page 126
... may vary with graphics cards) 5. If your motherboard has more than two PCIEX16 slots, refer to the goldfingers on the slots. 4. Goldfingers 5-2 Chapter 5: Multiple GPU technology support Prepare two CrossFireX-ready graphics cards...2 in place. Insert the two graphics card into the PCIEX16 slots. Connect a VGA or a DVI cable to the two graphics cards separately. 6. CrossFireX bridge (bundled with models, but the installation steps remain the same. 1. Chapter 5 5.1.3 Installing two CrossFireX™ graphics cards The following pictures are properly seated on each graphics...
... may vary with graphics cards) 5. If your motherboard has more than two PCIEX16 slots, refer to the goldfingers on the slots. 4. Goldfingers 5-2 Chapter 5: Multiple GPU technology support Prepare two CrossFireX-ready graphics cards...2 in place. Insert the two graphics card into the PCIEX16 slots. Connect a VGA or a DVI cable to the two graphics cards separately. 6. CrossFireX bridge (bundled with models, but the installation steps remain the same. 1. Chapter 5 5.1.3 Installing two CrossFireX™ graphics cards The following pictures are properly seated on each graphics...