
User Guide
Page 2
All Rights Reserved. ASUS ASSUMES NO RESPONSIBILITY OR LIABILITY FOR ANY ERRORS OR INACCURACIES THAT MAY APPEAR IN THIS MANUAL, INCLUDING THE PRODUCTS AND SOFTWARE DESCRIBED IN IT. SPECIFICATIONS AND INFORMATION CONTAINED IN THIS MANUAL ARE FURNISHED FOR INFORMATIONAL USE ONLY, AND ARE SUBJECT TO ...CHANGE AT ANY TIME WITHOUT NOTICE, AND SHOULD NOT BE CONSTRUED AS A COMMITMENT BY ASUS. Product warranty or service will not be ...
All Rights Reserved. ASUS ASSUMES NO RESPONSIBILITY OR LIABILITY FOR ANY ERRORS OR INACCURACIES THAT MAY APPEAR IN THIS MANUAL, INCLUDING THE PRODUCTS AND SOFTWARE DESCRIBED IN IT. SPECIFICATIONS AND INFORMATION CONTAINED IN THIS MANUAL ARE FURNISHED FOR INFORMATIONAL USE ONLY, AND ARE SUBJECT TO ...CHANGE AT ANY TIME WITHOUT NOTICE, AND SHOULD NOT BE CONSTRUED AS A COMMITMENT BY ASUS. Product warranty or service will not be ...
User Guide
Page 3
Contents Contents...iii Notices...viii Safety information ix About this guide x P6T WS Professional specifications summary xii Chapter 1: Product introduction 1.1 Welcome 1-1 1.2 Package contents 1-1 1.3 Special features 1-2 1.3.1 Product highlights 1-2 1.3.2 ASUS Unique features 1-3 Chapter 2: Hardware information 2.1 Before you proceed 2-1 2.2 Motherboard overview 2-2 2.2.1 Motherboard layout 2-2 2.2.2 Layout contents 2-3 2.2.3 Placement direction 2-4 2.2.4 Screw holes 2-4 2.3 Central Processing Unit (CPU 2-5 2.3.1 Installing the CPU 2-6 2.3.2 Installing ...
Contents Contents...iii Notices...viii Safety information ix About this guide x P6T WS Professional specifications summary xii Chapter 1: Product introduction 1.1 Welcome 1-1 1.2 Package contents 1-1 1.3 Special features 1-2 1.3.1 Product highlights 1-2 1.3.2 ASUS Unique features 1-3 Chapter 2: Hardware information 2.1 Before you proceed 2-1 2.2 Motherboard overview 2-2 2.2.1 Motherboard layout 2-2 2.2.2 Layout contents 2-3 2.2.3 Placement direction 2-4 2.2.4 Screw holes 2-4 2.3 Central Processing Unit (CPU 2-5 2.3.1 Installing the CPU 2-6 2.3.2 Installing ...

User Guide
Page 12
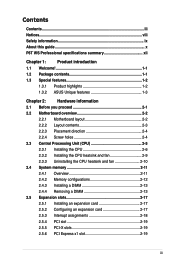
...Profile (XMP) * Due to Intel spec definition, DIMMs of DDR3-1333 or above are supported by specific CPU models only. ** Refer to 6.4GT/s; P6T WS Professional specifications summary CPU Chipset System Bus Memory Expansion Slots Multi-GPU Support Storage LAN USB IEEE 1394 LGA1366 socket ...for Intel® Core™ i7 Processor Extreme Edition / Core™ i7 Processor Supports Intel® Dynamic Speed Technology * Refer to www.asus.com...
...Profile (XMP) * Due to Intel spec definition, DIMMs of DDR3-1333 or above are supported by specific CPU models only. ** Refer to 6.4GT/s; P6T WS Professional specifications summary CPU Chipset System Bus Memory Expansion Slots Multi-GPU Support Storage LAN USB IEEE 1394 LGA1366 socket ...for Intel® Core™ i7 Processor Extreme Edition / Core™ i7 Processor Supports Intel® Dynamic Speed Technology * Refer to www.asus.com...
User Guide
Page 13
... at 1MHz increment - vDRAM Bus: 49-step DRAM bus voltage control - Internal Base Clock tuning from 100MHz up to 180MHz at back I/O - P6T WS Professional specifications summary Audio ASUS Special features ASUS Stylish Features ASUS Exclusive Overclocking Features ADI® AD2000B 8-channel High Definition Audio CODEC - Supports Jack-Detection, Multi-streaming, and Front Panel Jack-Retasking technology...
... at 1MHz increment - vDRAM Bus: 49-step DRAM bus voltage control - Internal Base Clock tuning from 100MHz up to 180MHz at back I/O - P6T WS Professional specifications summary Audio ASUS Special features ASUS Stylish Features ASUS Exclusive Overclocking Features ADI® AD2000B 8-channel High Definition Audio CODEC - Supports Jack-Detection, Multi-streaming, and Front Panel Jack-Retasking technology...

User Guide
Page 14
xiv P6T WS Professional specifications summary Back Panel I/O Ports 1 x PS/2 Keyboard / Mouse combo port 1 x S/PDIF Out (Coaxial + Optical) 2 x External SATA ports 1 x IEEE1394a port 2 x RJ45 ports 6 x USB 2.0/1.1 ports 8-channel Audio I/O ...2.0, WfM 2.0, SM BIOS 2.4, Multi-language BIOS Manageability WOL by PME, WOR by PME, Chassis Intrusion, PXE Support DVD Contents Drivers ASUS PC Probe II ASUS Update ASUS AI Suite Image-Editing Suite Anti-virus software (OEM version) Form Factor ATX Form Factor, 12"x 9.6" (30.5cm x 24.5cm) *Specifications are subject to change without notice.
xiv P6T WS Professional specifications summary Back Panel I/O Ports 1 x PS/2 Keyboard / Mouse combo port 1 x S/PDIF Out (Coaxial + Optical) 2 x External SATA ports 1 x IEEE1394a port 2 x RJ45 ports 6 x USB 2.0/1.1 ports 8-channel Audio I/O ...2.0, WfM 2.0, SM BIOS 2.4, Multi-language BIOS Manageability WOL by PME, WOR by PME, Chassis Intrusion, PXE Support DVD Contents Drivers ASUS PC Probe II ASUS Update ASUS AI Suite Image-Editing Suite Anti-virus software (OEM version) Form Factor ATX Form Factor, 12"x 9.6" (30.5cm x 24.5cm) *Specifications are subject to change without notice.
User Guide
Page 45
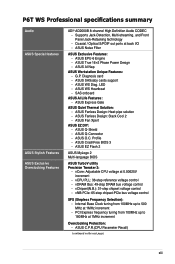
... Express x1 slot This motherboard supports PCI Express x1 network cards, SCSI cards and other cards that comply with PCI-X 1.0 specifications. Refer to the figure below for the location of the slots. PCI slot PCIe 2.0 x16_2 slot PCIX_2 slot PCIX_1 slot PCIe 2.0 x16_1 slot PCI Express x1 slot ASUS P6T WS Professional 2-19 2.5.4 PCI slot The...
... Express x1 slot This motherboard supports PCI Express x1 network cards, SCSI cards and other cards that comply with PCI-X 1.0 specifications. Refer to the figure below for the location of the slots. PCI slot PCIe 2.0 x16_2 slot PCIX_2 slot PCIX_1 slot PCIe 2.0 x16_1 slot PCI Express x1 slot ASUS P6T WS Professional 2-19 2.5.4 PCI slot The...
User Guide
Page 55
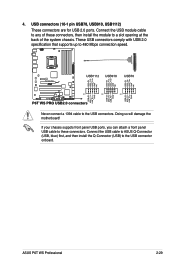
...connectors comply with USB 2.0 specification that supports up to these connectors, then install the module to a slot opening at the back of these connectors. Never connect a 1394 cable to the USB connector onboard. ASUS P6T WS Professional 2-29 Connect the USB cable to ASUS Q-Connector (USB, blue...) first, and then install the Q-Connector (USB) to the USB connectors. Doing so will damage the motherboard! 4. USB connectors (10-1 pin USB78, USB910, ...
...connectors comply with USB 2.0 specification that supports up to these connectors, then install the module to a slot opening at the back of these connectors. Never connect a 1394 cable to the USB connector onboard. ASUS P6T WS Professional 2-29 Connect the USB cable to ASUS Q-Connector (USB, blue...) first, and then install the Q-Connector (USB) to the USB connectors. Doing so will damage the motherboard! 4. USB connectors (10-1 pin USB78, USB910, ...

User Guide
Page 59
... about the minimum power supply requirement for ATX power supply plugs. PSU suggested list PSU suggested list SilverStone ST1000 Seasonic SS-600HT Thermaltake W0083RE Thermaltake PUREPower-600AP Silverstone SST-ST75ZF EnerMAX EG701AX-VE (E)(24P) ASUS P6T WS Professional 2-33 The system may become unstable or... will not boot. • Use of a PSU with a higher power output is inadequate. • If you use a PSU with ATX 12 V Specification 2.0 (or later version) and provides a minimum power of 600 W. • Do not forget to the Recommended Power Supply Wattage Calculator at http...
... about the minimum power supply requirement for ATX power supply plugs. PSU suggested list PSU suggested list SilverStone ST1000 Seasonic SS-600HT Thermaltake W0083RE Thermaltake PUREPower-600AP Silverstone SST-ST75ZF EnerMAX EG701AX-VE (E)(24P) ASUS P6T WS Professional 2-33 The system may become unstable or... will not boot. • Use of a PSU with a higher power output is inadequate. • If you use a PSU with ATX 12 V Specification 2.0 (or later version) and provides a minimum power of 600 W. • Do not forget to the Recommended Power Supply Wattage Calculator at http...

User Guide
Page 79
... side of the field opposite the item. To change the value of a menu screen when there are items that the iteam has a sub-menu. ASUS P6T WS Professional 3-11 You cannot select an item that menu. configurable, you can change the value of a field, select it then press to display a pop-...Select a menu item then press to display a list of the selected item. 3.2.4 Menu items The highlighted item on the menu bar displays the specific items for that is not user-configurable. Pop-up window with the configuration options for the menu items. If an item is highlighted when selected...
... side of the field opposite the item. To change the value of a menu screen when there are items that the iteam has a sub-menu. ASUS P6T WS Professional 3-11 You cannot select an item that menu. configurable, you can change the value of a field, select it then press to display a pop-...Select a menu item then press to display a list of the selected item. 3.2.4 Menu items The highlighted item on the menu bar displays the specific items for that is not user-configurable. Pop-up window with the configuration options for the menu items. If an item is highlighted when selected...

User Guide
Page 81
... drive connected to the system. Configuration options: [Not Installed] [Auto] [CDROM] [ARMD] LBA/Large Mode [Auto] Enables or disables the LBA mode. Configuration options: [Auto] [0] [1] [2] [3] [4] ASUS P6T WS Professional 3-13 Select a device item then press to [Auto] enables the LBA mode if the device supports this mode, and if the device was not previously... occurs multiple sectors at a time. Select [ARMD] (ATAPI Removable Media Device) if your device is either a ZIP, LS-120, or MO drive. These values are specifically configuring a CD-ROM drive.
... drive connected to the system. Configuration options: [Not Installed] [Auto] [CDROM] [ARMD] LBA/Large Mode [Auto] Enables or disables the LBA mode. Configuration options: [Auto] [0] [1] [2] [3] [4] ASUS P6T WS Professional 3-13 Select a device item then press to [Auto] enables the LBA mode if the device supports this mode, and if the device was not previously... occurs multiple sectors at a time. Select [ARMD] (ATAPI Removable Media Device) if your device is either a ZIP, LS-120, or MO drive. These values are specifically configuring a CD-ROM drive.

User Guide
Page 84
..., Inc. System Memory Displays the auto-detected system memory. 3-16 Chapter 3: BIOS setup 3.3.7 System Information This menu gives you an overview of the general system specifications. Processor Displays the auto-detected CPU specification. Bios Information Displays the auto-detected BIOS information. The BIOS automatically detects the items in this menu.
..., Inc. System Memory Displays the auto-detected system memory. 3-16 Chapter 3: BIOS setup 3.3.7 System Information This menu gives you an overview of the general system specifications. Processor Displays the auto-detected CPU specification. Bios Information Displays the auto-detected BIOS information. The BIOS automatically detects the items in this menu.

User Guide
Page 86
... controlled by your memory module. Use the and keys to select the X.M.P. DRAM O.C. profile, which applies different settings to run faster than marked frequency in specific condition. Configuration options: [Disabled] [Enabled] 3.4.4 Intel(R) Turbo Mode Tech [Enabled] Turbo mode allows processor cores to DRAM frequency, DRAM timing and DRAM voltage. Configuration options... set the Ai Overclock Tuner item to [Manual], [D.O.C.P.] or [X.M.P.]. mode supported by the operating system. DIMM or 1600MHz DIMM, install only one DIMM on the motherboard.
... controlled by your memory module. Use the and keys to select the X.M.P. DRAM O.C. profile, which applies different settings to run faster than marked frequency in specific condition. Configuration options: [Disabled] [Enabled] 3.4.4 Intel(R) Turbo Mode Tech [Enabled] Turbo mode allows processor cores to DRAM frequency, DRAM timing and DRAM voltage. Configuration options... set the Ai Overclock Tuner item to [Manual], [D.O.C.P.] or [X.M.P.]. mode supported by the operating system. DIMM or 1600MHz DIMM, install only one DIMM on the motherboard.

User Guide
Page 91
...set the DRAM DATA Reference Voltage on Channel A/B/C. Different ratio might enhance BCLK overclocking ability. Set to [Disabled] to follow Intel specifications, or to [Enabled] to set the DRAM Control Reference Voltage on Channel A/B/C. You may help enhancing BCLK overclocking ability. Configuration... [Auto] Allows you to select the CPU Load-Line mode. Configuration options: [Auto] [Normal] [Delay 100ps]-[Delay 1500ps] ASUS P6T WS Professional 3-23 The values range from 0.395x to 0.630x with a 0.005x interval. Different ratio might enhance DRAM overclocking ability. 3.4.17 ...
...set the DRAM DATA Reference Voltage on Channel A/B/C. Different ratio might enhance BCLK overclocking ability. Set to [Disabled] to follow Intel specifications, or to [Enabled] to set the DRAM Control Reference Voltage on Channel A/B/C. You may help enhancing BCLK overclocking ability. Configuration... [Auto] Allows you to select the CPU Load-Line mode. Configuration options: [Auto] [Normal] [Delay 100ps]-[Delay 1500ps] ASUS P6T WS Professional 3-23 The values range from 0.395x to 0.630x with a 0.005x interval. Different ratio might enhance DRAM overclocking ability. 3.4.17 ...

User Guide
Page 95
...] [C6] [C7] ASUS P6T WS Professional 3-27 A20M [Disabled] Legacy OSes and APs may need A20M enabled. When set this item only when you install a C-State Technology-supported CPU. Configuration options: [Disabled] [Enabled] Intel(R) C-STATE Tech [Disabled] The Intel® C-State Technology allows the CPU to run faster than marked frequency in specific condition. Configuration...
...] [C6] [C7] ASUS P6T WS Professional 3-27 A20M [Disabled] Legacy OSes and APs may need A20M enabled. When set this item only when you install a C-State Technology-supported CPU. Configuration options: [Disabled] [Enabled] Intel(R) C-STATE Tech [Disabled] The Intel® C-State Technology allows the CPU to run faster than marked frequency in specific condition. Configuration...
User Guide
Page 100
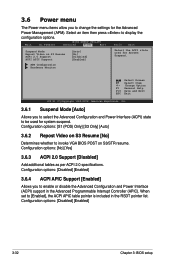
... used for System Suspend. APM Configuration Hardware Monitor Select Screen Select Item +- Configuration options: [No] [Yes] 3.6.3 ACPI 2.0 Support [Disabled] Add additional tables as per ACPI 2.0 specifications. BIOS SETUP UTILITY Main Ai Tweaker Advanced Power Boot Tools Exit Suspend Mode Repost Video on S3/STR resume. When set to be used for...
... used for System Suspend. APM Configuration Hardware Monitor Select Screen Select Item +- Configuration options: [No] [Yes] 3.6.3 ACPI 2.0 Support [Disabled] Add additional tables as per ACPI 2.0 specifications. BIOS SETUP UTILITY Main Ai Tweaker Advanced Power Boot Tools Exit Suspend Mode Repost Video on S3/STR resume. When set to be used for...

User Guide
Page 101
... to [Last State], the system goes into off or on state, whatever the system state was before the AC power loss. This feature requires an ATX power supply that provides at least 1A on the +5VSB lead. Configuration options: [Power Off] [Power On] [Last State] Power On By RTC Alarm [... PME to wake up from S5 by PS/2 keyboard function or set specific keys on the PS/2 keyboard to [Power On], the system goes on after an AC power loss. Configuration options: [Disabled] [Space Bar] [Ctrl-Esc] [Power Key] ASUS P6T WS Professional 3-33 Restore on AC Power Loss [Power Off] When set to turn...
... to [Last State], the system goes into off or on state, whatever the system state was before the AC power loss. This feature requires an ATX power supply that provides at least 1A on the +5VSB lead. Configuration options: [Power Off] [Power On] [Last State] Power On By RTC Alarm [... PME to wake up from S5 by PS/2 keyboard function or set specific keys on the PS/2 keyboard to [Power On], the system goes on after an AC power loss. Configuration options: [Disabled] [Space Bar] [Ctrl-Esc] [Power Key] ASUS P6T WS Professional 3-33 Restore on AC Power Loss [Power Off] When set to turn...

User Guide
Page 122
4.2.7 Other information The icons on the top right corner of the screen give additional information on the motherboard and the contents of the motherboard. Click an icon to display the specified information. Browse this DVD Displays the support DVD contents in graphical format. 4-8 Chapter 4: Software support Motherboard Info Displays the general specifications of the support DVD.
4.2.7 Other information The icons on the top right corner of the screen give additional information on the motherboard and the contents of the motherboard. Click an icon to display the specified information. Browse this DVD Displays the support DVD contents in graphical format. 4-8 Chapter 4: Software support Motherboard Info Displays the general specifications of the support DVD.
