
User Manual
Page 1
Motherboard
Motherboard

User Manual
Page 1
P5Q SE Plus Motherboard
P5Q SE Plus Motherboard

User Manual
Page 3
Contents Contents...iii Notices...vii Safety information viii About this guide ix P5Q SE Plus specifications summary xi Chapter 1: Product introduction 1.1 Welcome 1-2 1.2 Package contents 1-2 1.3 Special features 1-3 1.3.1 Product highlights 1-3 1.3.2 ASUS unique features 1-4 1.3.3 ASUS Stylish features 1-6 1.3.4 ASUS Intelligent Overclocking features 1-6 1.4 Before you proceed 1-7 1.5 Motherboard overview 1-8 1.5.1 Placement direction 1-8 1.5.2 Screw holes 1-8 1.5.3 Motherboard layout 1-9 1.6 Central Processing Unit (CPU 1-10 1.6.1 Installing the CPU 1-11 1.6.2 Installing...
Contents Contents...iii Notices...vii Safety information viii About this guide ix P5Q SE Plus specifications summary xi Chapter 1: Product introduction 1.1 Welcome 1-2 1.2 Package contents 1-2 1.3 Special features 1-3 1.3.1 Product highlights 1-3 1.3.2 ASUS unique features 1-4 1.3.3 ASUS Stylish features 1-6 1.3.4 ASUS Intelligent Overclocking features 1-6 1.4 Before you proceed 1-7 1.5 Motherboard overview 1-8 1.5.1 Placement direction 1-8 1.5.2 Screw holes 1-8 1.5.3 Motherboard layout 1-9 1.6 Central Processing Unit (CPU 1-10 1.6.1 Installing the CPU 1-11 1.6.2 Installing...
User Manual
Page 8
... you detect any area where it may become wet. • Place the product on it by yourself. Operation safety • Before installing the motherboard and adding devices on a stable surface. • If you add a device. • Before connecting or removing signal cables from the... motherboard, ensure that the product (electrical and electronic equipment, Mercury-containing button cell battery) should not be placed in municipal waste. If possible, disconnect ...
... you detect any area where it may become wet. • Place the product on it by yourself. Operation safety • Before installing the motherboard and adding devices on a stable surface. • If you add a device. • Before connecting or removing signal cables from the... motherboard, ensure that the product (electrical and electronic equipment, Mercury-containing button cell battery) should not be placed in municipal waste. If possible, disconnect ...

User Manual
Page 9
... the hardware setup procedures that you need when installing and configuring the motherboard. Detailed descriptions of the BIOS parameters are not part of the jumpers and connectors on ASUS hardware and software products. About this guide is organized This guide contains...are also provided. • Chapter 3: Software support This chapter describes the contents of the motherboard and the new technology it supports. ix ASUS websites The ASUS website provides updated information on the motherboard. • Chapter 2: BIOS setup This chapter tells how to the following parts: &#...
... the hardware setup procedures that you need when installing and configuring the motherboard. Detailed descriptions of the BIOS parameters are not part of the jumpers and connectors on ASUS hardware and software products. About this guide is organized This guide contains...are also provided. • Chapter 3: Software support This chapter describes the contents of the motherboard and the new technology it supports. ix ASUS websites The ASUS website provides updated information on the motherboard. • Chapter 2: BIOS setup This chapter tells how to the following parts: &#...

User Manual
Page 13
Chapter 1: 1Product introduction This chapter describes the motherboard features and the new technologies it supports.
Chapter 1: 1Product introduction This chapter describes the motherboard features and the new technologies it supports.
User Manual
Page 14
... DVD Documentation User guide If any of the above items is damaged or missing, contact your motherboard package for buying an ASUS® P5Q SE Plus motherboard! The motherboard delivers a host of ASUS quality motherboards! Before you for the following items. Motherboard ASUS P5Q SE Plus motherboard Cables 2 x Serial ATA cables 1 x Ultra DMA 133/100/66 cable Accessories 1 x I/O shield 2 in the long line of new...
... DVD Documentation User guide If any of the above items is damaged or missing, contact your motherboard package for buying an ASUS® P5Q SE Plus motherboard! The motherboard delivers a host of ASUS quality motherboards! Before you for the following items. Motherboard ASUS P5Q SE Plus motherboard Cables 2 x Serial ATA cables 1 x Ultra DMA 133/100/66 cable Accessories 1 x I/O shield 2 in the long line of new...

User Manual
Page 15
...® Core™2 is designed to safeguard consumers' health while minimizing the impact on the environment. ASUS P5Q SE Plus 1-3 Serial ATA 3Gb/s technology This motherboard supports the hard drives based on the Serial ATA (SATA) 3Gb/s storage specification, delivering enhanced scalability and...; Core™2 processor. This is in the world. 1.3 Special features 1.3.1 Product highlights Green ASUS This motherboard and its packaging comply with the ASUS vision of creating environment-friendly and recyclable products/packaging to support dual-channel DDR2 1066/800/667MHz ...
...® Core™2 is designed to safeguard consumers' health while minimizing the impact on the environment. ASUS P5Q SE Plus 1-3 Serial ATA 3Gb/s technology This motherboard supports the hard drives based on the Serial ATA (SATA) 3Gb/s storage specification, delivering enhanced scalability and...; Core™2 processor. This is in the world. 1.3 Special features 1.3.1 Product highlights Green ASUS This motherboard and its packaging comply with the ASUS vision of creating environment-friendly and recyclable products/packaging to support dual-channel DDR2 1066/800/667MHz ...

User Manual
Page 16
... like MSN, Skype, Google talk, QQ, and Yahoo! helping save power and money. 1-4 Chapter 1: Product introduction 1.3.2 ASUS unique features ASUS Exclusive features Express Gate Taking only 5 seconds to go online from suffering risk of high power stress, which provides total system ...in OS. What's more stable. It's a unique motherboard built-in real-time. ASUS Power Saving Solution ASUS Power Saving solution intelligently and automatically provides balanced computing power and energy consumption. ASUS EPU-4 Engine The new ASUS EPU - You can utilize the most appropriate power ...
... like MSN, Skype, Google talk, QQ, and Yahoo! helping save power and money. 1-4 Chapter 1: Product introduction 1.3.2 ASUS unique features ASUS Exclusive features Express Gate Taking only 5 seconds to go online from suffering risk of high power stress, which provides total system ...in OS. What's more stable. It's a unique motherboard built-in real-time. ASUS Power Saving Solution ASUS Power Saving solution intelligently and automatically provides balanced computing power and energy consumption. ASUS EPU-4 Engine The new ASUS EPU - You can utilize the most appropriate power ...

User Manual
Page 17
... time and avoiding wrong cable connections. See page 2-39 for details. ASUS P5Q SE Plus 1-5 ASUS EZ DIY ASUS EZ DIY feature collection provides you are temporarily away. Profile The motherboard features the ASUS O.C. ASUS Q-Connector ASUS Q-Connector allows you to easily connect or disconnect the chassis front panel ... favorite settings. To wake the system and return to the motherboard. ASUS Quiet Thermal Solution ASUS Quiet Thermal solution makes system more stable and enhances the overclocking capability. Fan Xpert ASUS Fan Xpert intelligently allows users to adjust both the CPU and...
... time and avoiding wrong cable connections. See page 2-39 for details. ASUS P5Q SE Plus 1-5 ASUS EZ DIY ASUS EZ DIY feature collection provides you are temporarily away. Profile The motherboard features the ASUS O.C. ASUS Q-Connector ASUS Q-Connector allows you to easily connect or disconnect the chassis front panel ... favorite settings. To wake the system and return to the motherboard. ASUS Quiet Thermal Solution ASUS Quiet Thermal solution makes system more stable and enhances the overclocking capability. Fan Xpert ASUS Fan Xpert intelligently allows users to adjust both the CPU and...

User Manual
Page 18
...default setting for a more colorful and vivid image on your BIOS easily without preparing a bootable diskette or using an OS-based flash utility. ASUS EZ Flash 2 EZ Flash 2 is a user-friendly BIOS update utility. Simply press the predefined hotkey to launch the utility and update ...the BIOS without the hassle of the motherboard BIOS allows automatic re-setting to convert your favorite photo into a 256-color boot logo for each parameter. 1-6 Chapter 1: Product introduction See...
...default setting for a more colorful and vivid image on your BIOS easily without preparing a bootable diskette or using an OS-based flash utility. ASUS EZ Flash 2 EZ Flash 2 is a user-friendly BIOS update utility. Simply press the predefined hotkey to launch the utility and update ...the BIOS without the hassle of the motherboard BIOS allows automatic re-setting to convert your favorite photo into a 256-color boot logo for each parameter. 1-6 Chapter 1: Product introduction See...

User Manual
Page 19
...illustration below shows the location of the following precautions before you install motherboard components or change any motherboard settings. • Unplug the power cord from the power supply. ASUS P5Q SE Plus 1-7 This is a reminder that the ATX power supply is detached from the wall socket before touching any component....bag that came with a standby power LED that lights up to the motherboard, peripherals, and/or components. 1.4 Before you proceed Take note of the onboard LED. Onboard LED The motherboard comes with the component. • Before you install or remove any component...
...illustration below shows the location of the following precautions before you install motherboard components or change any motherboard settings. • Unplug the power cord from the power supply. ASUS P5Q SE Plus 1-7 This is a reminder that the ATX power supply is detached from the wall socket before touching any component....bag that came with a standby power LED that lights up to the motherboard, peripherals, and/or components. 1.4 Before you proceed Take note of the onboard LED. Onboard LED The motherboard comes with the component. • Before you install or remove any component...

User Manual
Page 20
... the screws! Failure to do so can damage the motherboard. Place this side towards the rear of the chassis 1-8 Chapter 1: Product introduction 1.5 Motherboard overview Before you install the motherboard, study the configuration of your chassis to ensure that you... physical injury and damage motherboard components. 1.5.1 Placement direction When installing the motherboard, ensure that the motherboard fits into it into the chassis ...
... the screws! Failure to do so can damage the motherboard. Place this side towards the rear of the chassis 1-8 Chapter 1: Product introduction 1.5 Motherboard overview Before you install the motherboard, study the configuration of your chassis to ensure that you... physical injury and damage motherboard components. 1.5.1 Placement direction When installing the motherboard, ensure that the motherboard fits into it into the chassis ...

User Manual
Page 21
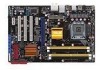
ASUS P5Q SE Plus 1-9 1.5.3 Motherboard layout Refer to 1.10 Connectors for more information about rear panel connectors and internal connectors.
ASUS P5Q SE Plus 1-9 1.5.3 Motherboard layout Refer to 1.10 Connectors for more information about rear panel connectors and internal connectors.

User Manual
Page 22
ASUS will process Return Merchandise Authorization (RMA) requests only if the motherboard comes with a surface mount LGA775 socket designed for the Intel® Core...174; processors. • Ensure that all power cables are not bent. 1.6 Central Processing Unit (CPU) The motherboard comes with the cap on the socket and the socket contacts are unplugged before installing the CPU. • ...socket. • The product warranty does not cover damage to the PnP cap/socket contacts/motherboard components. ASUS will shoulder the cost of repair only if the damage is missing, or if you use...
ASUS will process Return Merchandise Authorization (RMA) requests only if the motherboard comes with a surface mount LGA775 socket designed for the Intel® Core...174; processors. • Ensure that all power cables are not bent. 1.6 Central Processing Unit (CPU) The motherboard comes with the cap on the socket and the socket contacts are unplugged before installing the CPU. • ...socket. • The product warranty does not cover damage to the PnP cap/socket contacts/motherboard components. ASUS will shoulder the cost of repair only if the damage is missing, or if you use...

User Manual
Page 23
To prevent damage to remove (4B). 3 ASUS P5Q SE Plus 1-11 Press the load lever with your thumb 4B and forefinger to a 100º angle (4A), then push the PnP cap from the 4A load ... the arrow to the left . 2. Retention tab A B Load lever PnP cap Load plate 4. Lift the load plate with your left (B) until it is on the motherboard. Locate the CPU socket on your thumb (A), then move it to a 135º angle. 1.6.1 Installing the CPU To install a CPU: 1.
To prevent damage to remove (4B). 3 ASUS P5Q SE Plus 1-11 Press the load lever with your thumb 4B and forefinger to a 100º angle (4A), then push the PnP cap from the 4A load ... the arrow to the left . 2. Retention tab A B Load lever PnP cap Load plate 4. Lift the load plate with your left (B) until it is on the motherboard. Locate the CPU socket on your thumb (A), then move it to a 135º angle. 1.6.1 Installing the CPU To install a CPU: 1.

User Manual
Page 26
If you purchased a separate CPU heatsink and fan assembly, ensure that that you have installed the motherboard to the chassis before you install the CPU fan and heatsink assembly. If you buy a boxed Intel® processor, the package includes the CPU fan... on top of CPU heatsink and fan assembly may differ, but the installation steps and fucntions should remain the same. Place the heatsink on the motherboard. 2. To install the CPU heatsink and fan: 1. 1.6.2 Installing the CPU heatsink and fan The Intel® LGA775 processor requires a specially designed heatsink and fan ...
If you purchased a separate CPU heatsink and fan assembly, ensure that that you have installed the motherboard to the chassis before you install the CPU fan and heatsink assembly. If you buy a boxed Intel® processor, the package includes the CPU fan... on top of CPU heatsink and fan assembly may differ, but the installation steps and fucntions should remain the same. Place the heatsink on the motherboard. 2. To install the CPU heatsink and fan: 1. 1.6.2 Installing the CPU heatsink and fan The Intel® LGA775 processor requires a specially designed heatsink and fan ...

User Manual
Page 27
... plug this connector. 1.6.3 Uninstalling the CPU heatsink and fan To uninstall the CPU heatsink and fan 1. B 3. ASUS P5Q SE Plus 1-15 Hardware monitoring errors can occur if you fail to connect the CPU fan connector! Carefully remove the heatsink and fan assembly from the motherboard. 3. A B A A B B A 4. Disconnect the CPU fan cable from the connector on the...
... plug this connector. 1.6.3 Uninstalling the CPU heatsink and fan To uninstall the CPU heatsink and fan 1. B 3. ASUS P5Q SE Plus 1-15 Hardware monitoring errors can occur if you fail to connect the CPU fan connector! Carefully remove the heatsink and fan assembly from the motherboard. 3. A B A A B B A 4. Disconnect the CPU fan cable from the connector on the...

User Manual
Page 28
The figure illustrates the location of the DDR2 DIMM sockets: Channel Channel A Channel B Sockets DIMM_A1 and DIMM_A2 DIMM_B1 and DIMM_B2 1-16 Chapter 1: Product introduction 1.7 System memory 1.7.1 Overview The motherboard comes with four Double Data Rate 2 (DDR2) Dual Inline Memory Modules (DIMM) sockets. A DDR2 module has the same physical dimensions as a DDR DIMM but has a 240-pin footprint compared to prevent installation on a DDR DIMM socket. DDR2 DIMMs are not notched differently to the 184-pin DDR DIMM.
The figure illustrates the location of the DDR2 DIMM sockets: Channel Channel A Channel B Sockets DIMM_A1 and DIMM_A2 DIMM_B1 and DIMM_B2 1-16 Chapter 1: Product introduction 1.7 System memory 1.7.1 Overview The motherboard comes with four Double Data Rate 2 (DDR2) Dual Inline Memory Modules (DIMM) sockets. A DDR2 module has the same physical dimensions as a DDR DIMM but has a 240-pin footprint compared to prevent installation on a DDR DIMM socket. DDR2 DIMMs are not notched differently to the 184-pin DDR DIMM.

User Manual
Page 29
... install a 64-bit Windows OS when having 4GB or more memory installed on the motherboard. • This motherboard does not support memory modules made up of memory, we recommend that you install 4GB or more memory on the motherboard, the actual usable memory for the OS can be about 3GB or less. ASUS P5Q SE Plus 1-17
... install a 64-bit Windows OS when having 4GB or more memory installed on the motherboard. • This motherboard does not support memory modules made up of memory, we recommend that you install 4GB or more memory on the motherboard, the actual usable memory for the OS can be about 3GB or less. ASUS P5Q SE Plus 1-17


