
User Manual
Page 2
... AND SHOULD NOT BE CONSTRUED AS A COMMITMENT BY ASUS. All Rights Reserved. ASUS ASSUMES NO RESPONSIBILITY OR LIABILITY FOR ANY ERRORS OR INACCURACIES THAT MAY APPEAR IN THIS MANUAL, INCLUDING THE PRODUCTS AND SOFTWARE DESCRIBED IN IT. ASUS PROVIDES THIS MANUAL "AS IS" WITHOUT WARRANTY OF ANY KIND, EITHER... without the express written permission of the product is authorized in any form or by any means, except documentation kept by ASUS; No part of this manual may or may be registered trademarks or copyrights of alteration is defaced or missing. or (2) the serial number of ASUSTeK...
... AND SHOULD NOT BE CONSTRUED AS A COMMITMENT BY ASUS. All Rights Reserved. ASUS ASSUMES NO RESPONSIBILITY OR LIABILITY FOR ANY ERRORS OR INACCURACIES THAT MAY APPEAR IN THIS MANUAL, INCLUDING THE PRODUCTS AND SOFTWARE DESCRIBED IN IT. ASUS PROVIDES THIS MANUAL "AS IS" WITHOUT WARRANTY OF ANY KIND, EITHER... without the express written permission of the product is authorized in any form or by any means, except documentation kept by ASUS; No part of this manual may or may be registered trademarks or copyrights of alteration is defaced or missing. or (2) the serial number of ASUSTeK...

User Manual
Page 6
Contents 4.2.2 Drivers menu 4-2 4.2.3 Utilities menu 4-3 4.2.4 Make disk menu 4-5 4.2.5 Manual menu 4-6 4.2.6 ASUS Contact information 4-6 4.2.7 Other information 4-7 4.3 Software information 4-9 4.3.1 ASUS MyLogo2 4-9 4.3.2 ASUS PC Probe II 4-11 4.3.3 Audio configurations 4-17 4.3.4 ASUS EPU-WS Engine 4-21 4.3.5 ASUS AI Suite 4-25 4.3.6 ASUS AI Nap 4-27 4.3.7 ASUS Fan Xpert 4-28 4.3.8 ASUS AI Booster 4-30 4.3.9 ASUS Express Gate 4-31 4.4 RAID configurations 4-40 4.4.1 RAID definitions 4-40 4.4.2 Installing Serial ATA...
Contents 4.2.2 Drivers menu 4-2 4.2.3 Utilities menu 4-3 4.2.4 Make disk menu 4-5 4.2.5 Manual menu 4-6 4.2.6 ASUS Contact information 4-6 4.2.7 Other information 4-7 4.3 Software information 4-9 4.3.1 ASUS MyLogo2 4-9 4.3.2 ASUS PC Probe II 4-11 4.3.3 Audio configurations 4-17 4.3.4 ASUS EPU-WS Engine 4-21 4.3.5 ASUS AI Suite 4-25 4.3.6 ASUS AI Nap 4-27 4.3.7 ASUS Fan Xpert 4-28 4.3.8 ASUS AI Booster 4-30 4.3.9 ASUS Express Gate 4-31 4.4 RAID configurations 4-40 4.4.1 RAID definitions 4-40 4.4.2 Installing Serial ATA...

User Manual
Page 8
..., do not try to fix it , carefully read all cables are correctly connected and the power cables are using the product, make sure all the manuals that the product (electrical, electronic equipment and mercury-containing button cell battery) should not be placed in municipal waste. viii If you are not damaged...
..., do not try to fix it , carefully read all cables are correctly connected and the power cables are using the product, make sure all the manuals that the product (electrical, electronic equipment and mercury-containing button cell battery) should not be placed in municipal waste. viii If you are not damaged...

User Manual
Page 10
... enclosed in the less-than and greater-than sign means that you perform certain tasks properly, take note of the following symbols used in this manual. NOTE: Tips and additional information to complete a task. Conventions used throughout this guide To make sure that you must type the command exactly as shown...
... enclosed in the less-than and greater-than sign means that you perform certain tasks properly, take note of the following symbols used in this manual. NOTE: Tips and additional information to complete a task. Conventions used throughout this guide To make sure that you must type the command exactly as shown...

User Manual
Page 38
... on each slot. 64-bit Windows® XP Professional x64 Edition Windows® Vista x64 Edition • The default memory operation frequency is reserved for manual memory frequency adjustment. • The memory modules may require a better cooling system to work stably under full loading (4 DIMMs) or overclocking setting. 2-12 Chapter 2: Hardware...
... on each slot. 64-bit Windows® XP Professional x64 Edition Windows® Vista x64 Edition • The default memory operation frequency is reserved for manual memory frequency adjustment. • The memory modules may require a better cooling system to work stably under full loading (4 DIMMs) or overclocking setting. 2-12 Chapter 2: Hardware...

User Manual
Page 52
... RAID set the Configure SATA as item in Standard IDE mode, connect the primary (boot) hard disk drive to 4.4.3 Intel® RAID configurations or the manual bundled in the motherboard support DVD. • When using these connectors. See section 3.3.6 Storage Configuration for details. • Before creating a RAID set, refer to the...
... RAID set the Configure SATA as item in Standard IDE mode, connect the primary (boot) hard disk drive to 4.4.3 Intel® RAID configurations or the manual bundled in the motherboard support DVD. • When using these connectors. See section 3.3.6 Storage Configuration for details. • Before creating a RAID set, refer to the...
User Manual
Page 85
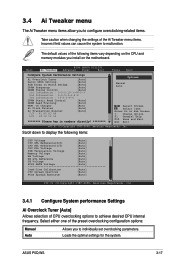
... Ai Transaction Booster [Auto] C/P : A1 A2 A3 A4 LVL : 12 12 12 12 ******** Please key in numbers directly! ******** Options Manual Auto Select Screen Select Item Enter Go to North Bridge [Auto] DRAM Frequency [Auto] DRAM Timing Control [Auto] 1st Information : 5-5-5-15...the system to malfunction. Scroll down to achieve desired CPU internal frequency. Loads the optimal settings for the system. ASUS P5Q WS 3-17 BIOS SETUP UTILITY Main Ai Tweaker Advanced Power Boot Tools Exit Configure System Performance Settings Ai Overclock ...
... Ai Transaction Booster [Auto] C/P : A1 A2 A3 A4 LVL : 12 12 12 12 ******** Please key in numbers directly! ******** Options Manual Auto Select Screen Select Item Enter Go to North Bridge [Auto] DRAM Frequency [Auto] DRAM Timing Control [Auto] 1st Information : 5-5-5-15...the system to malfunction. Scroll down to achieve desired CPU internal frequency. Loads the optimal settings for the system. ASUS P5Q WS 3-17 BIOS SETUP UTILITY Main Ai Tweaker Advanced Power Boot Tools Exit Configure System Performance Settings Ai Overclock ...

User Manual
Page 86
... FSB 800 CPU External Frequency 400 MHz 333 MHz 266 MHz 200 MHz PCIE Frequency [Auto] Allows you set the Ai Overclock Tuner item to [Manual]. If this item is auto-detected by the BIOS. Congifuration options: [Auto] [200 MHz] [266 MHz] [333 MHz] [400 MHz] DRAM Frequency [Auto] Allows you...
... FSB 800 CPU External Frequency 400 MHz 333 MHz 266 MHz 200 MHz PCIE Frequency [Auto] Allows you set the Ai Overclock Tuner item to [Manual]. If this item is auto-detected by the BIOS. Congifuration options: [Auto] [200 MHz] [266 MHz] [333 MHz] [400 MHz] DRAM Frequency [Auto] Allows you...

User Manual
Page 87
...; The following sub-items apprear only when you set the DRAM Timing Control item to [Manual]. • The configuration options for some of the following items vary depending on the DIMMs you install on the motherboard. 1st Information : 5-5-5-15-3-44-5-3 (These ... to READ Delay(S) [Auto] Configuration options: [Auto] [1 DRAM Clocks]-[15 DRAM Clocks] WRITE to READ Delay(D) [Auto] Configuration options: [Auto] [1 DRAM Clocks]-[15 DRAM Clocks] ASUS P5Q WS 3-19
...; The following sub-items apprear only when you set the DRAM Timing Control item to [Manual]. • The configuration options for some of the following items vary depending on the DIMMs you install on the motherboard. 1st Information : 5-5-5-15-3-44-5-3 (These ... to READ Delay(S) [Auto] Configuration options: [Auto] [1 DRAM Clocks]-[15 DRAM Clocks] WRITE to READ Delay(D) [Auto] Configuration options: [Auto] [1 DRAM Clocks]-[15 DRAM Clocks] ASUS P5Q WS 3-19

User Manual
Page 89
... to 4. CPU GTL Voltage Reference(1/3) [Auto] Allows you to the CPU documentation before setting the CPU Vcore voltage. CPU Voltage [Auto] Allows you to [Manual]. ASUS P5Q WS 3-21 Configuration options: [Disabled] [Enabled] The following two sub-items appear only when you set the Ai Transaction Booster item to set the CPU...otherwise the maximum voltage supported is [1.70000V]. You can also use the and keys to ��3��1�. Configuration options: [Auto] [Manual] The following ten (10) items are adjusted by DRAM frequency and FSB strap. See 2.
... to 4. CPU GTL Voltage Reference(1/3) [Auto] Allows you to the CPU documentation before setting the CPU Vcore voltage. CPU Voltage [Auto] Allows you to [Manual]. ASUS P5Q WS 3-21 Configuration options: [Disabled] [Enabled] The following two sub-items appear only when you set the Ai Transaction Booster item to set the CPU...otherwise the maximum voltage supported is [1.70000V]. You can also use the and keys to ��3��1�. Configuration options: [Auto] [Manual] The following ten (10) items are adjusted by DRAM frequency and FSB strap. See 2.

User Manual
Page 120
You can also find this information on the inside front cover of supplementary user manuals. 4.2.5 Manual menu The Manual menu contains a list of this user guide. 4-6 Chapter 4: Software support Install the Adobe® Acrobat® Reader from the Utilities menu before opening a user manual file. 4.2.6 ASUS Contact information Click the Contact tab to open the folder of the user manual. Click an item to display the ASUS contact information. Most user manual files are in Portable Document Format (PDF).
You can also find this information on the inside front cover of supplementary user manuals. 4.2.5 Manual menu The Manual menu contains a list of this user guide. 4-6 Chapter 4: Software support Install the Adobe® Acrobat® Reader from the Utilities menu before opening a user manual file. 4.2.6 ASUS Contact information Click the Contact tab to open the folder of the user manual. Click an item to display the ASUS contact information. Most user manual files are in Portable Document Format (PDF).
User Manual
Page 144
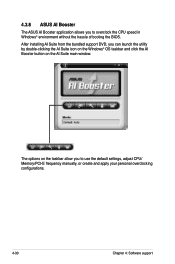
The options on the AI Suite main window. 4.3.8 ASUS AI Booster The ASUS AI Booster application allows you to overclock the CPU speed in WIndows® environment without the hassle of booting the BIOS. After installing AI Suite from the bundled support DVD, you can launch the utility by double-clicking the AI Suite icon on the Windows® OS taskbar and click the AI Booster button on the taskbar allow you to use the default settings, adjust CPU/ Memory/PCI-E frequency manually, or create and apply your personal overclocking configurations. 4-30 Chapter 4: Software support
The options on the AI Suite main window. 4.3.8 ASUS AI Booster The ASUS AI Booster application allows you to overclock the CPU speed in WIndows® environment without the hassle of booting the BIOS. After installing AI Suite from the bundled support DVD, you can launch the utility by double-clicking the AI Suite icon on the Windows® OS taskbar and click the AI Booster button on the taskbar allow you to use the default settings, adjust CPU/ Memory/PCI-E frequency manually, or create and apply your personal overclocking configurations. 4-30 Chapter 4: Software support

User Manual
Page 151
... settings (i.e. If you plug the network cable into a different port while Express Gate is the case, you may need to configure the static IP settings manually. Network 3. If this is for any LAN port. Open Network. move the cable from LAN1 to LAN2), you don't need to press the "Refresh" button... case, click Setup to click Setup for your DSL/cable modem), enable both LAN1 and LAN2. 2. If this is running (e.g. Make the proper network configurations. ASUS P5Q WS 4-37 DHCP).
... settings (i.e. If you plug the network cable into a different port while Express Gate is the case, you may need to configure the static IP settings manually. Network 3. If this is for any LAN port. Open Network. move the cable from LAN1 to LAN2), you don't need to press the "Refresh" button... case, click Setup to click Setup for your DSL/cable modem), enable both LAN1 and LAN2. 2. If this is running (e.g. Make the proper network configurations. ASUS P5Q WS 4-37 DHCP).


