User Manual
Page 9
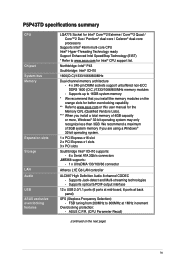
...optical S/PDIF output interface 12 x USB 2.0/1.1 ports (6 ports at mid-board, 6 ports at 1MHz increment Overclocking protection: - P5P43TD specifications summary CPU Chipset System bus Memory Expansion slots Storage LAN Audio USB ASUS exclusive overclocking features LGA775 Socket for Intel® Core™2 Extreme / Core™2 Quad / Core™2 Duo / Pentium&#...Northbridge: Intel® P43 Southbridge: Intel® ICH10 1600(O.C)/1333/1066/800MHz Dual-channel memory architecture - 4 x 240-pin DIMM sockets support unbuffered non-ECC DDR3 1600 (O.C.)/1333/1066/800MHz memory modules -
...optical S/PDIF output interface 12 x USB 2.0/1.1 ports (6 ports at mid-board, 6 ports at 1MHz increment Overclocking protection: - P5P43TD specifications summary CPU Chipset System bus Memory Expansion slots Storage LAN Audio USB ASUS exclusive overclocking features LGA775 Socket for Intel® Core™2 Extreme / Core™2 Quad / Core™2 Duo / Pentium&#...Northbridge: Intel® P43 Southbridge: Intel® ICH10 1600(O.C)/1333/1066/800MHz Dual-channel memory architecture - 4 x 240-pin DIMM sockets support unbuffered non-ECC DDR3 1600 (O.C.)/1333/1066/800MHz memory modules -
User Manual
Page 12
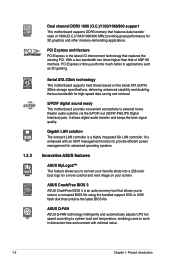
... technology that contains the latest BIOS file. ASUS Q-FAN ASUS Q-FAN technology intelligently and automatically adjusts CPU fan speed according to system load and temperature, enabling users to work in applications such as 3D gaming. 1.3.2 Dual channel DDR3 1600 (O.C.)/1333/1066/800 support This motherboard supports DDR3 memory that of 1600 (O.C.)/1333/1066/800 MHz...
... technology that contains the latest BIOS file. ASUS Q-FAN ASUS Q-FAN technology intelligently and automatically adjusts CPU fan speed according to system load and temperature, enabling users to work in applications such as 3D gaming. 1.3.2 Dual channel DDR3 1600 (O.C.)/1333/1066/800 support This motherboard supports DDR3 memory that of 1600 (O.C.)/1333/1066/800 MHz...
User Manual
Page 16
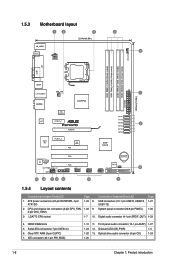
...) 1-4 1-20 13. IDE connector (40-1 pin PRI_EIDE) 1-12 11. USB connectors (10-1 pin USB78, USB910, 1-27 USB1112) 2. DDR3 DIMM slots 5. ATX power connectors (24-pin EATXPWR, 4-pin ATX12V) 1-23 8. CPU and chassis fan connectors (4-pin CPU_FAN, 1-22 9. LGA775 CPU socket 1-7 ...10. Optical drive audio connector (4-pin CD) 1-24 1-25 1-6 Chapter 1: Product introduction Serial ATA connectors (7-pin SATA1-6) 6. 1.5.3 Motherboard ...
...) 1-4 1-20 13. IDE connector (40-1 pin PRI_EIDE) 1-12 11. USB connectors (10-1 pin USB78, USB910, 1-27 USB1112) 2. DDR3 DIMM slots 5. ATX power connectors (24-pin EATXPWR, 4-pin ATX12V) 1-23 8. CPU and chassis fan connectors (4-pin CPU_FAN, 1-22 9. LGA775 CPU socket 1-7 ...10. Optical drive audio connector (4-pin CD) 1-24 1-25 1-6 Chapter 1: Product introduction Serial ATA connectors (7-pin SATA1-6) 6. 1.5.3 Motherboard ...

User Manual
Page 22
4. Rotate each fastener clockwise to ensure correct orientation when reinstalling. 1.7 System memory 1.7.1 Overview The motherboard comes with four Double Data Rate 3 (DDR3) Dual Inline Memory Modules (DIMM) sockets. The figure illustrates the location of the DDR3 DIMM sockets: Channel Channel A Channel B Sockets DIMM_A1 and DIMM_A2 DIMM_B1 and DIMM_B2 1-12 Chapter 1: Product introduction Carefully remove the heatsink and fan assembly from the motherboard. 5.
4. Rotate each fastener clockwise to ensure correct orientation when reinstalling. 1.7 System memory 1.7.1 Overview The motherboard comes with four Double Data Rate 3 (DDR3) Dual Inline Memory Modules (DIMM) sockets. The figure illustrates the location of the DDR3 DIMM sockets: Channel Channel A Channel B Sockets DIMM_A1 and DIMM_A2 DIMM_B1 and DIMM_B2 1-12 Chapter 1: Product introduction Carefully remove the heatsink and fan assembly from the motherboard. 5.
User Manual
Page 23
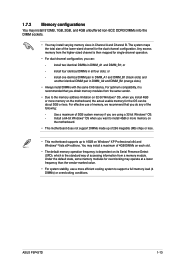
...you do any of the following: - For effective use a more memory on the motherboard. • This motherboard does not support DIMMs made up of 3GB system memory if you can be about 3GB... 1.7.2 Memory configurations You may install 512MB, 1GB, 2GB, and 4GB unbuffered non‑ECC DDR3 DIMMs into the DIMM sockets. • You may install varying memory sizes in all four ...full memory load (4 DIMMs) or overclocking conditions. Any excess memory from a memory module. or - ASUS P5P43TD 1-13 The system maps the total size of 4GB DIMMs on each slot. • The default ...
...you do any of the following: - For effective use a more memory on the motherboard. • This motherboard does not support DIMMs made up of 3GB system memory if you can be about 3GB... 1.7.2 Memory configurations You may install 512MB, 1GB, 2GB, and 4GB unbuffered non‑ECC DDR3 DIMMs into the DIMM sockets. • You may install varying memory sizes in all four ...full memory load (4 DIMMs) or overclocking conditions. Any excess memory from a memory module. or - ASUS P5P43TD 1-13 The system maps the total size of 4GB DIMMs on each slot. • The default ...

User Manual
Page 24
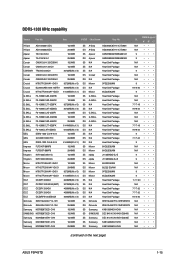
P5P43TD Motherboard Qualified Vendors Lists (QVL) DDR3-1600 (O.C.) MHz capability Vendor Part No. DIMM Support CL A* B* C* A-DATA AD31600E001GMU 3072MB(Kit of 3) SS N/A Heat-Sink Package 8-8-8-24(1333-9-9-9-24) • A-DATA AD31600F002GMU(XMP) ...
P5P43TD Motherboard Qualified Vendors Lists (QVL) DDR3-1600 (O.C.) MHz capability Vendor Part No. DIMM Support CL A* B* C* A-DATA AD31600E001GMU 3072MB(Kit of 3) SS N/A Heat-Sink Package 8-8-8-24(1333-9-9-9-24) • A-DATA AD31600F002GMU(XMP) ...
User Manual
Page 25
...2GBPI G.SKILL F3-10600CL9D-2GBNQ G.SKILL F3-10666CL9D-4GBPK G.SkiLL F3-10666CL7T-6GBPK G.SKILL F3-1066CL9T-6GBNQ GEIL DDR3-1333 CL9-9-9-24 GEIL GV34GB1333C7DC GEIL DDR3-1333 CL9-9-9-24 kingmax FLFD45F-B8MF9 kingmax FLFE85F-B8MF9 Kingston KVR1333D3N9/1G Kingston KVR1333D3N9/2G Micron MT8JTF12864AY-1G4D1 Micron MT16JTF25664AY-...8226; N/A •• N/A •• N/A ••• N/A ••• N/A ••• N/A ••• (continued on the next page) ASUS P5P43TD 1-15 DDR3-1333 MHz capability Vendor Part No.
...2GBPI G.SKILL F3-10600CL9D-2GBNQ G.SKILL F3-10666CL9D-4GBPK G.SkiLL F3-10666CL7T-6GBPK G.SKILL F3-1066CL9T-6GBNQ GEIL DDR3-1333 CL9-9-9-24 GEIL GV34GB1333C7DC GEIL DDR3-1333 CL9-9-9-24 kingmax FLFD45F-B8MF9 kingmax FLFE85F-B8MF9 Kingston KVR1333D3N9/1G Kingston KVR1333D3N9/2G Micron MT8JTF12864AY-1G4D1 Micron MT16JTF25664AY-...8226; N/A •• N/A •• N/A ••• N/A ••• N/A ••• N/A ••• (continued on the next page) ASUS P5P43TD 1-15 DDR3-1333 MHz capability Vendor Part No.

User Manual
Page 26
...; • 7-7-7-20 • • • 8-8-8-24 • • 7-7-7-20 • • 8-8-8-24 • • DDR3-1066 MHz capability Vendor Part No. Samsung M378B5673EH1-CH9 2048MB Samsung M391B5673DZ1-CH9 2048MB Super Talent W1333X2GB8 1024MB Transcend SEC 813HCH9 K4B1G0846D 1024MB Transcend SEC816HCH9K4B1G0846D... 2048MB ASint SLY3128M8-EDJ 1024MB ASint SLY3128M8-EDJ 2048MB CENTURY PC3-10600 DDR3-1333 9-9-9 1024MB CENTURY PC3-10600 DDR3-1333 9-9-9 2048MB Elixir M2CB1G80AN-BE 2048MB Kingtiger 2GB DIMM PC3-10666 2048MB ...
...; • 7-7-7-20 • • • 8-8-8-24 • • 7-7-7-20 • • 8-8-8-24 • • DDR3-1066 MHz capability Vendor Part No. Samsung M378B5673EH1-CH9 2048MB Samsung M391B5673DZ1-CH9 2048MB Super Talent W1333X2GB8 1024MB Transcend SEC 813HCH9 K4B1G0846D 1024MB Transcend SEC816HCH9K4B1G0846D... 2048MB ASint SLY3128M8-EDJ 1024MB ASint SLY3128M8-EDJ 2048MB CENTURY PC3-10600 DDR3-1333 9-9-9 1024MB CENTURY PC3-10600 DDR3-1333 9-9-9 2048MB Elixir M2CB1G80AN-BE 2048MB Kingtiger 2GB DIMM PC3-10666 2048MB ...

User Manual
Page 27
To install a DIMM: 1. Press the retaining clips outward to avoid damaging the DIMM. 3. Locked Retaining Clip ASUS P5P43TD 1-17 Single-sided / DS - Failure to do so can cause severe damage to both the orange and black slots as one direction. Firmly...notch on the DIMM matches the break on the socket. 1 Unlocked retaining clip 2 DDR3 DIMM notch 1 A DDR3 DIMM is properly seated. DO NOT force a DIMM into both the motherboard and the components. Double - Visit the ASUS website at www.asus.com for the latest QVL. 1.7.3 Installing a DIMM Unplug the power supply before adding...
To install a DIMM: 1. Press the retaining clips outward to avoid damaging the DIMM. 3. Locked Retaining Clip ASUS P5P43TD 1-17 Single-sided / DS - Failure to do so can cause severe damage to both the orange and black slots as one direction. Firmly...notch on the DIMM matches the break on the socket. 1 Unlocked retaining clip 2 DDR3 DIMM notch 1 A DDR3 DIMM is properly seated. DO NOT force a DIMM into both the motherboard and the components. Double - Visit the ASUS website at www.asus.com for the latest QVL. 1.7.3 Installing a DIMM Unplug the power supply before adding...

User Manual
Page 28
Support the DIMM lightly with extra force. 1 2. Remove the DIMM from the socket. 2 1 DDR3 DIMM notch 1-18 Chapter 1: Product introduction The DIMM might get damaged when it flips out with your fingers when pressing the retaining clips. Simultaneously press the retaining clips outward to unlock the DIMM. 1.7.4 Removing a DIMM To remove a DIMM: 1.
Support the DIMM lightly with extra force. 1 2. Remove the DIMM from the socket. 2 1 DDR3 DIMM notch 1-18 Chapter 1: Product introduction The DIMM might get damaged when it flips out with your fingers when pressing the retaining clips. Simultaneously press the retaining clips outward to unlock the DIMM. 1.7.4 Removing a DIMM To remove a DIMM: 1.
User Manual
Page 48
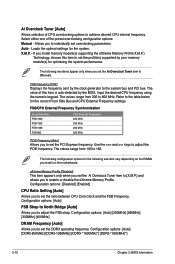
... BIOS. The following two items appear only when you to enable or disable the eXtreme Memory Profile. Configuration options: [Auto] [DDR3-800MHz] [DDR3-1066MHz] [DDR3-*1600MHz*] [DDR3-*1800MHz*] 2-10 Chapter 2: BIOS information Input the desired CPU frequency using the numeric keypad. Configuration options: [Auto] [200MHz] ... item appears only when you to set the Ai Overclock Tuner item to North Bridge [Auto] Allows you install on the motherboard. The values range from 200 to adjust the PCIE frequency. Configuration options: [Auto] FSB Strap to [Manual]. The values...
... BIOS. The following two items appear only when you to enable or disable the eXtreme Memory Profile. Configuration options: [Auto] [DDR3-800MHz] [DDR3-1066MHz] [DDR3-*1600MHz*] [DDR3-*1800MHz*] 2-10 Chapter 2: BIOS information Input the desired CPU frequency using the numeric keypad. Configuration options: [Auto] [200MHz] ... item appears only when you to set the Ai Overclock Tuner item to North Bridge [Auto] Allows you install on the motherboard. The values range from 200 to adjust the PCIE frequency. Configuration options: [Auto] FSB Strap to [Manual]. The values...


