
User Manual
Page 1
Motherboard
Motherboard
User Manual
Page 1
P5N7A-VM Motherboard
P5N7A-VM Motherboard
User Manual
Page 3
Contents Notices...vi Safety information vii About this guide viii P5N7A-VM specifications summary x Chapter 1: Product introduction 1.1 Welcome 1-2 1.2 Package contents 1-2 1.3 Special features 1-2 1.3.1 Product highlights 1-2 1.3.2 ASUS Special Features 1-5 1.3.3 ASUS Stylish Features 1-7 1.3.4 ASUS Intelligent Overclocking features 1-7 1.4 Before you proceed 1-8 1.5 Motherboard overview 1-9 1.5.1 Placement direction 1-9 1.5.2 Screw holes 1-9 1.5.3 Motherboard layout 1-10 1.6 Central Processing Unit (CPU 1-11 1.6.1 Installling the CPU 1-11 1.6.2 Installling the CPU...
Contents Notices...vi Safety information vii About this guide viii P5N7A-VM specifications summary x Chapter 1: Product introduction 1.1 Welcome 1-2 1.2 Package contents 1-2 1.3 Special features 1-2 1.3.1 Product highlights 1-2 1.3.2 ASUS Special Features 1-5 1.3.3 ASUS Stylish Features 1-7 1.3.4 ASUS Intelligent Overclocking features 1-7 1.4 Before you proceed 1-8 1.5 Motherboard overview 1-9 1.5.1 Placement direction 1-9 1.5.2 Screw holes 1-9 1.5.3 Motherboard layout 1-10 1.6 Central Processing Unit (CPU 1-11 1.6.1 Installling the CPU 1-11 1.6.2 Installling the CPU...
User Manual
Page 7
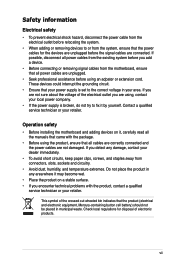
...that all power cables are unplugged. • Seek professional assistance before the signal cables are connected. vii Operation safety • Before installing the motherboard and adding devices on a stable surface. • If you add a device. • Before connecting or removing signal cables from the... motherboard, ensure that your power supply is broken, do not try to the correct voltage in any damage, contact your area. Contact a qualified...
...that all power cables are unplugged. • Seek professional assistance before the signal cables are connected. vii Operation safety • Before installing the motherboard and adding devices on a stable surface. • If you add a device. • Before connecting or removing signal cables from the... motherboard, ensure that your power supply is broken, do not try to the correct voltage in any damage, contact your area. Contact a qualified...
User Manual
Page 8
... system settings through the BIOS Setup menus. Detailed descriptions of the BIOS parameters are not part of the motherboard and the new technology it supports. Where to find more information Refer to the ASUS contact information. 2. These documents are also provided. • Chapter 3: Software support This chapter describes the contents of the...
... system settings through the BIOS Setup menus. Detailed descriptions of the BIOS parameters are not part of the motherboard and the new technology it supports. Where to find more information Refer to the ASUS contact information. 2. These documents are also provided. • Chapter 3: Software support This chapter describes the contents of the...

User Manual
Page 13
Chapter 1: 1Product introduction This chapter describes the motherboard features and the new technologies it supports.
Chapter 1: 1Product introduction This chapter describes the motherboard features and the new technologies it supports.
User Manual
Page 14
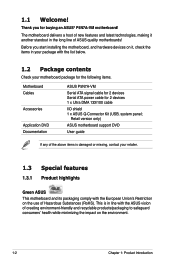
...below. 1.2 Package contents Check your retailer. 1.3 Special features 1.3.1 Product highlights Green ASUS This motherboard and its packaging comply with the ASUS vision of creating environment-friendly and recyclable products/packaging to safeguard consumers' health while ...long line of ASUS quality motherboards! Retail version only) Application DVD ASUS motherboard support DVD Documentation User guide If any of Hazardous Substances (RoHS). This is damaged or missing, contact your motherboard package for the following items. Motherboard ASUS P5N7A-VM Cables Serial ATA ...
...below. 1.2 Package contents Check your retailer. 1.3 Special features 1.3.1 Product highlights Green ASUS This motherboard and its packaging comply with the ASUS vision of creating environment-friendly and recyclable products/packaging to safeguard consumers' health while ...long line of ASUS quality motherboards! Retail version only) Application DVD ASUS motherboard support DVD Documentation User guide If any of Hazardous Substances (RoHS). This is damaged or missing, contact your motherboard package for the following items. Motherboard ASUS P5N7A-VM Cables Serial ATA ...
User Manual
Page 15
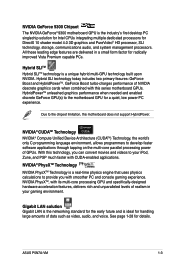
...these leading edge features are delivered in your iPod, Zune, and PSP much faster with this motherboard does not support HybridPower. Due to the motherboard GPU for handling large amounts of GPUs. With this technology, you with smoother PC and console...system management processors. HybridPowerTM unleashed graphics performance when needed and enabled discrete GeForce GPU(s) to the chipset limitation, this series motherboard GPUs. ASUS P5N7A-VM 1-3 NVIDIA® PhysXTM Technology NVIDIA PhysXTM Technology is a unique hybrid multi-GPU technology built upon NVIDIA. Hybrid SLI...
...these leading edge features are delivered in your iPod, Zune, and PSP much faster with this motherboard does not support HybridPower. Due to the motherboard GPU for handling large amounts of GPUs. With this technology, you with smoother PC and console...system management processors. HybridPowerTM unleashed graphics performance when needed and enabled discrete GeForce GPU(s) to the chipset limitation, this series motherboard GPUs. ASUS P5N7A-VM 1-3 NVIDIA® PhysXTM Technology NVIDIA PhysXTM Technology is a unique hybrid multi-GPU technology built upon NVIDIA. Hybrid SLI...
User Manual
Page 16
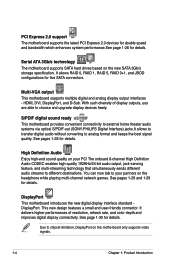
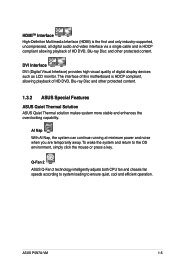
...PDIF-out (SONY-PHILIPS Digital Interface) jacks.It allows to transfer digital audio without converting to chipset limitation, DisplayPort on this motherboard only supports video signals. 1-4 Chapter 1: Product Introduction The onboard 8-channel High Definition Audio CODEC enables high-quality 192KHz/24-...end sound quality on your partners on the new SATA 3Gb/s storage specification. See page 1-30 for details. DisplayPort This motherboard introduces the new digital display interface standard DisplayPort. With such diversity of resolution, refresh rate, and color depth and improves ...
...PDIF-out (SONY-PHILIPS Digital Interface) jacks.It allows to transfer digital audio without converting to chipset limitation, DisplayPort on this motherboard only supports video signals. 1-4 Chapter 1: Product Introduction The onboard 8-channel High Definition Audio CODEC enables high-quality 192KHz/24-...end sound quality on your partners on the new SATA 3Gb/s storage specification. See page 1-30 for details. DisplayPort This motherboard introduces the new digital display interface standard DisplayPort. With such diversity of resolution, refresh rate, and color depth and improves ...
User Manual
Page 17
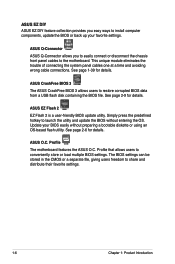
The interface of this motherboard is HDCP compliant allowing playback of HD DVD, Blu-ray Disc and other protected content. 1.3.2 ASUS Special Features ASUS Quiet Thermal Solution ASUS Quiet Thermal solution makes system more stable and enhances the overclocking capability. AI Nap With AI Nap, the ...system can continue running at minimum power and noise when you are temporarily away. ASUS P5N7A-VM 1-5 Q-Fan 2 ASUS Q-Fan 2 technology intelligently adjusts both CPU fan and chassis fan speeds according to system loading to the OS environment, simply click...
The interface of this motherboard is HDCP compliant allowing playback of HD DVD, Blu-ray Disc and other protected content. 1.3.2 ASUS Special Features ASUS Quiet Thermal Solution ASUS Quiet Thermal solution makes system more stable and enhances the overclocking capability. AI Nap With AI Nap, the ...system can continue running at minimum power and noise when you are temporarily away. ASUS P5N7A-VM 1-5 Q-Fan 2 ASUS Q-Fan 2 technology intelligently adjusts both CPU fan and chassis fan speeds according to system loading to the OS environment, simply click...
User Manual
Page 18
... and update the BIOS without preparing a bootable diskette or using an OS-based flash utility. ASUS EZ Flash 2 EZ Flash 2 is a user-friendly BIOS update utility. Profile The motherboard features the ASUS O.C. The BIOS settings can be stored in the CMOS or a separate file, giving users ...freedom to conveniently store or load multiple BIOS settings. ASUS EZ DIY ASUS EZ DIY feature collection provides you to easily connect or disconnect the chassis front panel cables to the motherboard. This unique module eliminates the trouble of connecting the system panel cables one...
... and update the BIOS without preparing a bootable diskette or using an OS-based flash utility. ASUS EZ Flash 2 EZ Flash 2 is a user-friendly BIOS update utility. Profile The motherboard features the ASUS O.C. The BIOS settings can be stored in the CMOS or a separate file, giving users ...freedom to conveniently store or load multiple BIOS settings. ASUS EZ DIY ASUS EZ DIY feature collection provides you to easily connect or disconnect the chassis front panel cables to the motherboard. This unique module eliminates the trouble of connecting the system panel cables one...

User Manual
Page 19
... without entering Windows at 1 meter accuracy. Simply shut down and reboot the system, and the BIOS automatically restores the CPU default setting for details. ASUS P5N7A-VM 1-7 Messenger to keep in touch with friends, or quickly check on the system configuration, hardware configuration, and product model. •... only 5 seconds to go online from SATA HDDs, ODDs and USB drive and downloading to overclocking. You can easily monitor the condition of the motherboard BIOS allows automatic re-setting to the BIOS default settings in case the system hangs due to USB drives only...
... without entering Windows at 1 meter accuracy. Simply shut down and reboot the system, and the BIOS automatically restores the CPU default setting for details. ASUS P5N7A-VM 1-7 Messenger to keep in touch with friends, or quickly check on the system configuration, hardware configuration, and product model. •... only 5 seconds to go online from SATA HDDs, ODDs and USB drive and downloading to overclocking. You can easily monitor the condition of the motherboard BIOS allows automatic re-setting to the BIOS default settings in case the system hangs due to USB drives only...
User Manual
Page 20
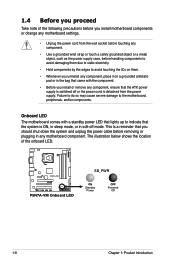
...ATX power supply is switched off or the power cord is ON, in sleep mode, or in soft-off mode. P5N7A-VM P5N7A-VM Onboard LED SB_PWR ON Standby Power OFF Powered Off 1-8 Chapter 1: Product Introduction 1.4 Before you proceed Take note of the onboard LED. Onboard LED The motherboard...the system is detached from the power supply. The illustration below shows the location of the following precautions before you install motherboard components or change any motherboard settings. • Unplug the power cord from the wall socket before touching any component. • Use a grounded wrist...
...ATX power supply is switched off or the power cord is ON, in sleep mode, or in soft-off mode. P5N7A-VM P5N7A-VM Onboard LED SB_PWR ON Standby Power OFF Powered Off 1-8 Chapter 1: Product Introduction 1.4 Before you proceed Take note of the onboard LED. Onboard LED The motherboard...the system is detached from the power supply. The illustration below shows the location of the following precautions before you install motherboard components or change any motherboard settings. • Unplug the power cord from the wall socket before touching any component. • Use a grounded wrist...
User Manual
Page 21
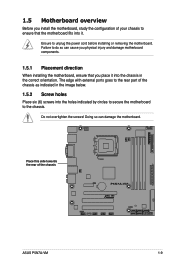
... external ports goes to the rear part of your chassis to ensure that you install the motherboard, study the configuration of the chassis as indicated in the correct orientation. Doing so can cause you physical injury and damage...motherboard, ensure that the motherboard fits into the holes indicated by circles to secure the motherboard to the chassis. Ensure to do so can damage the motherboard. Failure to unplug the power cord before installing or removing the motherboard. Do not overtighten the screws! Place this side towards the rear of the chassis P5N7A-VM ASUS P5N7A-VM...
... external ports goes to the rear part of your chassis to ensure that you install the motherboard, study the configuration of the chassis as indicated in the correct orientation. Doing so can cause you physical injury and damage...motherboard, ensure that the motherboard fits into the holes indicated by circles to secure the motherboard to the chassis. Ensure to do so can damage the motherboard. Failure to unplug the power cord before installing or removing the motherboard. Do not overtighten the screws! Place this side towards the rear of the chassis P5N7A-VM ASUS P5N7A-VM...
User Manual
Page 22
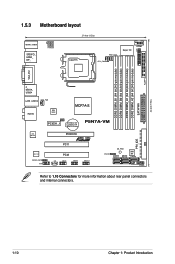
...-pin module) LPT EATXPWR FLOPPY 24.4cm (9.6in) 1.5.3 Motherboard layout 23.4cm (9.2in) KB/MS_USB56 SPDIFO_ HDMI_ DP_ ATX12V LGA775 PWR_FAN CPU_FAN Super I/O COM1 VGA_DVI F_ ESATA_ USB34 LAN1_USB12 CHA_FAN AUDIO 8Mb BIOS MCP7A-S CLRTC PCIEX1_1 CR2032 3V Lithium Cell CMOS Power P5N7A-VM RTL 8211CL PCIEX16 PRI_IDE ALC1200 SPDIF_OUT AAFP PCI1 PCI2...
...-pin module) LPT EATXPWR FLOPPY 24.4cm (9.6in) 1.5.3 Motherboard layout 23.4cm (9.2in) KB/MS_USB56 SPDIFO_ HDMI_ DP_ ATX12V LGA775 PWR_FAN CPU_FAN Super I/O COM1 VGA_DVI F_ ESATA_ USB34 LAN1_USB12 CHA_FAN AUDIO 8Mb BIOS MCP7A-S CLRTC PCIEX1_1 CR2032 3V Lithium Cell CMOS Power P5N7A-VM RTL 8211CL PCIEX16 PRI_IDE ALC1200 SPDIF_OUT AAFP PCI1 PCI2...
User Manual
Page 23
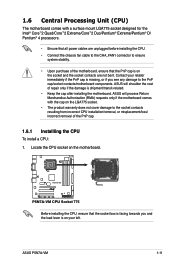
...motherboard, ensure that the socket box is facing towards you see any damage to the socket contacts resulting from incorrect CPU installation/removal, or misplacement/loss/ incorrect removal of the PnP cap. 1.6.1 Installling the CPU To install a CPU: 1. ASUS P5N7A-VM 1-11 Contact your left. ASUS...• The product warranty does not cover damage to the PnP cap/socket contacts/motherboard components. 1.6 Central Processing Unit (CPU) The motherboard comes with the cap on the motherboard. P5N7A-VM P5N7A-VM CPU Socket 775 Before installing the CPU, ensure that the PnP cap is on ...
...motherboard, ensure that the socket box is facing towards you see any damage to the socket contacts resulting from incorrect CPU installation/removal, or misplacement/loss/ incorrect removal of the PnP cap. 1.6.1 Installling the CPU To install a CPU: 1. ASUS P5N7A-VM 1-11 Contact your left. ASUS...• The product warranty does not cover damage to the PnP cap/socket contacts/motherboard components. 1.6 Central Processing Unit (CPU) The motherboard comes with the cap on the motherboard. P5N7A-VM P5N7A-VM CPU Socket 775 Before installing the CPU, ensure that the PnP cap is on ...
User Manual
Page 25
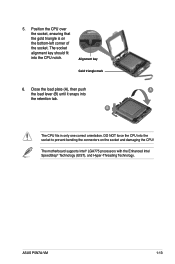
Alignment key Gold triangle mark 6. ASUS P5N7A-VM 1-13 The socket alignment key should fit into the retention tab. B The CPU fits in only one correct orientation. Position the CPU over the socket, ensuring that the gold triangle is on the socket and damaging the CPU! The motherboard supports Intel® LGA775 processors with the...
Alignment key Gold triangle mark 6. ASUS P5N7A-VM 1-13 The socket alignment key should fit into the retention tab. B The CPU fits in only one correct orientation. Position the CPU over the socket, ensuring that the gold triangle is on the socket and damaging the CPU! The motherboard supports Intel® LGA775 processors with the...
User Manual
Page 26
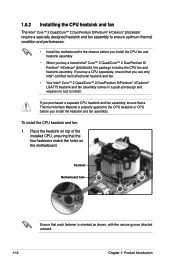
... a boxed Intel® Core™ 2 Quad/Core™ 2 Duo/Pentium D/ Pentium® 4/Celeron® processor, the package includes the CPU fan and heatsink assembly. Fastener Motherboard hole Ensure that each fastener is properly applied to the CPU heatsink or CPU before you install the CPU fan and heatsink assembly • When...8482; 2 Duo/Pentium D/Pentium® 4/Celeron® processor require a specially designed heatsink and fan assembly to ensure optimum thermal condition and performance. • Install the motherboard to install. If you install the heatsink and fan assembly.
... a boxed Intel® Core™ 2 Quad/Core™ 2 Duo/Pentium D/ Pentium® 4/Celeron® processor, the package includes the CPU fan and heatsink assembly. Fastener Motherboard hole Ensure that each fastener is properly applied to the CPU heatsink or CPU before you install the CPU fan and heatsink assembly • When...8482; 2 Duo/Pentium D/Pentium® 4/Celeron® processor require a specially designed heatsink and fan assembly to ensure optimum thermal condition and performance. • Install the motherboard to install. If you install the heatsink and fan assembly.
User Manual
Page 27
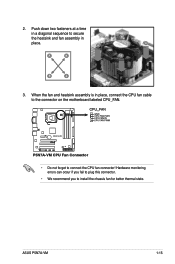
A A A B B B A 3. Hardware monitoring errors can occur if you fail to plug this connector. • We recommend you to the connector on the motherboard labeled CPU_FAN. When the fan and heatsink assembly is in place, connect the CPU fan cable to install the chassis fan for better thermal state. P5N7A-VM P5N7A-VM CPU Fan Connector • Do not forget to secure the heatsink and fan assembly in a diagonal sequence to connect the CPU fan connector! 2. ASUS P5N7A-VM 1-15 Push down two fasteners at a time in B place.
A A A B B B A 3. Hardware monitoring errors can occur if you fail to plug this connector. • We recommend you to the connector on the motherboard labeled CPU_FAN. When the fan and heatsink assembly is in place, connect the CPU fan cable to install the chassis fan for better thermal state. P5N7A-VM P5N7A-VM CPU Fan Connector • Do not forget to secure the heatsink and fan assembly in a diagonal sequence to connect the CPU fan connector! 2. ASUS P5N7A-VM 1-15 Push down two fasteners at a time in B place.
User Manual
Page 28
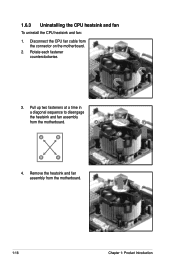
Rotate each fastener counterclockwise. 3. Disconnect the CPU fan cable from the motherboard. A A B A B B A 4. Pull up two fasteners at a time in a diagonal sequence to disengage the heatsink and fan assembly B from the connector on the motherboard. 2. 1.6.3 Uninstalling the CPU heatsink and fan To uninstall the CPU heatsink and fan: 1. Remove the heatsink and fan assembly from the motherboard. 1-16 Chapter 1: Product Introduction
Rotate each fastener counterclockwise. 3. Disconnect the CPU fan cable from the motherboard. A A B A B B A 4. Pull up two fasteners at a time in a diagonal sequence to disengage the heatsink and fan assembly B from the connector on the motherboard. 2. 1.6.3 Uninstalling the CPU heatsink and fan To uninstall the CPU heatsink and fan: 1. Remove the heatsink and fan assembly from the motherboard. 1-16 Chapter 1: Product Introduction


