
P5N32-E SLI English Edition User's Manual
Page 4
... PCI slots 2-20 2.5.5 PCI Express x1 slot 2-20 2.5.6 PCI Express x16 slots 2-20 2.6 Jumper 2-21 2.7 Audio card installation 2-22 2.8 Connectors 2-23 2.8.1 Rear panel connectors 2-23 2.8.2 Internal connectors 2-26 Chapter 3: Powering up 3.1 ... shut down function 3-2 3.2.2 Using the dual function power switch 3-2 Chapter 4: BIOS setup 4.1 Managing and updating your BIOS 4-1 4.1.1 ASUS Update utility 4-1 4.1.2 Creating a bootable floppy disk 4-4 4.1.3 ASUS EZ Flash 2 utility 4-5 4.1.4 Updating the BIOS 4-6 4.1.5 Saving the current BIOS file 4-8 4.2 BIOS setup program 4-9 4.2.1 BIOS...
... PCI slots 2-20 2.5.5 PCI Express x1 slot 2-20 2.5.6 PCI Express x16 slots 2-20 2.6 Jumper 2-21 2.7 Audio card installation 2-22 2.8 Connectors 2-23 2.8.1 Rear panel connectors 2-23 2.8.2 Internal connectors 2-26 Chapter 3: Powering up 3.1 ... shut down function 3-2 3.2.2 Using the dual function power switch 3-2 Chapter 4: BIOS setup 4.1 Managing and updating your BIOS 4-1 4.1.1 ASUS Update utility 4-1 4.1.2 Creating a bootable floppy disk 4-4 4.1.3 ASUS EZ Flash 2 utility 4-5 4.1.4 Updating the BIOS 4-6 4.1.5 Saving the current BIOS file 4-8 4.2 BIOS setup program 4-9 4.2.1 BIOS...

P5N32-E SLI English Edition User's Manual
Page 6
... information 5-9 5.3.1 ASUS MyLogo3 5-9 5.3.2 SoundMAX® High Definition Audio utility 5-11 5.3.3 ASUS PC Probe II 5-16 5.3.4 ASUS Music Alarm 5-22 5.3.5 ASUS AI Booster 5-25 5.4 RAID configurations 5-26 5.4.1 RAID definitions 5-26 5.4.2 NVIDIA® RAID configurations 5-27 5.5 Creating a RAID driver disk 5-34 Chapter 6: NVIDIA® SLI™ technology support 6.1 Overview 6-1 6.2 Dual graphics card setup 6-2 6.2.1 Installing SLI-ready graphics cards 6-2 6.2.2 Installing...
... information 5-9 5.3.1 ASUS MyLogo3 5-9 5.3.2 SoundMAX® High Definition Audio utility 5-11 5.3.3 ASUS PC Probe II 5-16 5.3.4 ASUS Music Alarm 5-22 5.3.5 ASUS AI Booster 5-25 5.4 RAID configurations 5-26 5.4.1 RAID definitions 5-26 5.4.2 NVIDIA® RAID configurations 5-27 5.5 Creating a RAID driver disk 5-34 Chapter 6: NVIDIA® SLI™ technology support 6.1 Overview 6-1 6.2 Dual graphics card setup 6-2 6.2.1 Installing SLI-ready graphics cards 6-2 6.2.2 Installing...

P5N32-E SLI English Edition User's Manual
Page 12
... port (continued on the rear panel) Intelligent overclocking tools: - P5N32-E SLI specifications summary High Definition Audio IEEE 1394 USB ASUS Exclusive Overclocking features ASUS Unique features Rear panel SupremeFX Audio Card - Profile Overclocking protection: - ADI 1988B 8-channel High Definition Audio CODEC - AI Booster - Supports Jack-Sensing, Multi‑streaming and Jack-Retasking Coaxial, Optical S/PDIF out...
... port (continued on the rear panel) Intelligent overclocking tools: - P5N32-E SLI specifications summary High Definition Audio IEEE 1394 USB ASUS Exclusive Overclocking features ASUS Unique features Rear panel SupremeFX Audio Card - Profile Overclocking protection: - ADI 1988B 8-channel High Definition Audio CODEC - AI Booster - Supports Jack-Sensing, Multi‑streaming and Jack-Retasking Coaxial, Optical S/PDIF out...

P5N32-E SLI English Edition User's Manual
Page 22
SupremeFX (ADI 1988b) The SupremeFX audio card is designed to connect or disconnect chassis front panel cables in all surround channels, no matter if you the best game sound experience. DTS® ... users the cost and hassle of plugging in a few clicks without preparing an additional floppy diskette or using an OS-based flash utility. ASUS EZ DIY ASUS Q-Connector The ASUS Q-Connector allows you to provide you 're hearing your game through headphones or 7.1 surround speakers, we'll deliver the effects loud and clear...
SupremeFX (ADI 1988b) The SupremeFX audio card is designed to connect or disconnect chassis front panel cables in all surround channels, no matter if you the best game sound experience. DTS® ... users the cost and hassle of plugging in a few clicks without preparing an additional floppy diskette or using an OS-based flash utility. ASUS EZ DIY ASUS Q-Connector The ASUS Q-Connector allows you to provide you 're hearing your game through headphones or 7.1 surround speakers, we'll deliver the effects loud and clear...

P5N32-E SLI English Edition User's Manual
Page 26
Chapter summary 2 2.1 Before you proceed 2-1 2.2 Motherboard overview 2-2 2.3 Central Processing Unit (CPU 2-7 2.4 System memory 2-15 2.5 Expansion slots 2-18 2.6 Jumper 2-21 2.7 Audio card installation 2-22 2.8 Connectors 2-23 ASUS P5N32-E SLI
Chapter summary 2 2.1 Before you proceed 2-1 2.2 Motherboard overview 2-2 2.3 Central Processing Unit (CPU 2-7 2.4 System memory 2-15 2.5 Expansion slots 2-18 2.6 Jumper 2-21 2.7 Audio card installation 2-22 2.8 Connectors 2-23 ASUS P5N32-E SLI

P5N32-E SLI English Edition User's Manual
Page 48
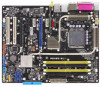
Align the card connector with the slot and press firmly until the card sits on the motherboard. 3. 2.7 Audio card installation 1. Locate the slot on the slot completely. 4. Take out the Audio card from the package. 2. The above photo shows the audio card installed on the motherboard. 2-22 Chapter 2: Hardware information
Align the card connector with the slot and press firmly until the card sits on the motherboard. 3. 2.7 Audio card installation 1. Locate the slot on the slot completely. 4. Take out the Audio card from the package. 2. The above photo shows the audio card installed on the motherboard. 2-22 Chapter 2: Hardware information

P5N32-E SLI English Edition User's Manual
Page 138
...the Line-Out (lime-colored) port on sound card. • Only IDE ATAPI devices from the optical drive to the 4-pin CD-In connector on the audio module. 2. BIOS configuration To enable ASUS Music Alarm in Windows®. Set the ASUS Music Alarm item to make the appropriate settings in... You may also connect speakers or a headphone to the output jack on the system. 2. Turn on the optical drive. 3. See section "4.8.1 ASUS Music Alarm" for audio output. Refer to the succeeding sections to [Enabled]. Go to enter BIOS setup. 3. During POST, press to the Tools menu, then select...
...the Line-Out (lime-colored) port on sound card. • Only IDE ATAPI devices from the optical drive to the 4-pin CD-In connector on the audio module. 2. BIOS configuration To enable ASUS Music Alarm in Windows®. Set the ASUS Music Alarm item to make the appropriate settings in... You may also connect speakers or a headphone to the output jack on the system. 2. Turn on the optical drive. 3. See section "4.8.1 ASUS Music Alarm" for audio output. Refer to the succeeding sections to [Enabled]. Go to enter BIOS setup. 3. During POST, press to the Tools menu, then select...


