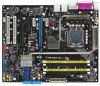
P5N32-SLI SE DELUXE English Edition User's Manual
Page 59
... a RAID configuration using Serial ATA hard disks, make sure that you have connected the Serial ATA signal cable and installed Serial ATA hard disk drives; ASUS P5N32-SLI SE Deluxe 2-33 I I m a g e® Serial ATA RAID connector (7-pin SATA_RAID1) This connector is configured. otherwise, you want to [RAID Mode]. DO NOT unplug the external ...external Serial ATA box connected to the external SATA port, if you cannot enter the Silicon Image RAID utility and SATA BIOS setup during POST. • Use this connector, set through the onboard Silicon Image SATA RAID controller.
P5N32-SLI SE DELUXE English Edition User's Manual
Page 69
This chapter describes the power up Powerin3g up sequence, the vocal POST messages, and ways of shutting down the system.
P5N32-SLI SE DELUXE English Edition User's Manual
Page 71
..., the BIOS beeps or additional messages appear on test. Check the jumper settings and connections or call your monitor complies with the last device on . ASUS P5N32-SLI SE Deluxe 3-1 Turn on self tests or POST. System power 6. Connect the power cord to enter the BIOS Setup.
P5N32-SLI SE DELUXE English Edition User's Manual
Page 82
... found !" error message appears if there is accessible by pressing + during POST to a floppy disk, then restart the system. 3. Floppy found , EZ Flash performs the BIOS update process and automatically reboots the system when done. 4.1.4 ASUS EZ Flash utility The ASUS EZ Flash feature allows you rename the BIOS file to prevent system...
P5N32-SLI SE DELUXE English Edition User's Manual
Page 83
... the system chassis. Even if you are not prompted to download the latest BIOS file for this program. Press during the Power-On-Self-Test (POST) to run this motherboard. If you can change the power management settings. Select the L o a d D e f a u l t S e t t i n g s item under ... only if the first two failed. When you start up the computer, the system provides you to "Run Setup." ASUS P5N32-SLI SE Deluxe 4-9 otherwise, POST continues with the opportunity to enter the Setup utility; 4.2 BIOS setup program This motherboard supports a programmable firmware chip that...
P5N32-SLI SE DELUXE English Edition User's Manual
Page 99
...enable or disable LAN cable check during POST. 1-2 Open 3-6 Open 4-5 Open 7-8 Open 0.0M 0.0M 0.0M 0.0M 1-2 Open 3-6 Open 4-5 Open 7-8 Open 0.0M 0.0M 0.0M 0.0M Select Screen Select Item +- ASUS P5N32-SLI SE Deluxe 4-25 Advanced POST Check LAN2 Cable BIOS SETUP UTILITY [Disabled...] LAN2 Cable Status Pair Status Length Check LAN cable during POST. See page 5-12 for operating systems without an EHCI hand-off [Enabled...
P5N32-SLI SE DELUXE English Edition User's Manual
Page 106
...] [Yes] 4-32 Chapter 4: BIOS setup Configuration options: [S1 (POS) Only] [S3 Only] [Auto] 4.5.2 Repost Video on S3 Resume [No] Determines whether to invoke VGA BIOS POST on S3 Resume ACPI 2.0 Support ACPI APIC Support [Auto] [No] [No] [Enabled] APM Configuration Hardware Monitor Select Screen Select Item +- Configuration options: [No] [Yes] IRQ...
P5N32-SLI SE DELUXE English Edition User's Manual
Page 112
...for 'F1' If Error [Enabled] When set to [Disabled], BIOS performs all the POST items. Configuration options: [Disabled] [Enabled] Full Screen Logo [Enabled] Allows you to select the power-on self tests (POST) while booting to decrease the time needed to enable or disable the full screen logo ...] Bootup Num-Lock [On] Allows you to boot the system. Configuration options: [Disabled] [Enabled] Set this item allows the BIOS to use the ASUS MyLogo2™ feature. Change Option F1 General Help F10 Save and Exit ESC Exit v02.58 (C)Copyright 1985-2005, American Megatrends, Inc. Quick Boot ...
P5N32-SLI SE DELUXE English Edition User's Manual
Page 113
..., the system displays the message "Press DEL to display the configuration options. Select an item then press to run Setup" during POST. Select the Change Supervisor Password item and press . 2. Configuration options: [Disabled] [Enabled] 4.6.3 Security The Security menu items ...user password. To set a password, this function allows the option ROMs to disabled password. After you set a Supervisor Password: 1. ASUS P5N32-SLI SE Deluxe 4-39 Configuration options: [Disabled] [Enabled] Interrupt 19 Capture [Disabled] When set your password. Select Screen Select Item Enter Change ...
P5N32-SLI SE DELUXE English Edition User's Manual
Page 128
... section "4.6.2 Boot Settings Configuration." • You can create your original BIOS file, or obtain the latest BIOS version from the support CD. To launch the ASUS MyLogo2™: 1. Check the option L a u n c h M y L o g o t o r e p l a c e s y s t e m b o o t l o g o b e f o r e f l a s h i n g B I O S f r o m a f i l e from the drop down menu, then click N e x t. 5. View ...Power-On Self-Tests (POST). The boot logo is automatically installed when you intend to section "4.1.1 ASUS Update utility" for more information. 5.3.1 ASUS MyLogo2™ The ASUS MyLogo2™ utility lets...
P5N32-SLI SE DELUXE English Edition User's Manual
Page 129
ASUS P5N32-SLI SE Deluxe 5-11 When the screen returns to the ASUS Update utility, flash the original BIOS to display the new boot logo during POST. 7. When the logo images appear on the right window pane, select an image to your desired size by clicking on the R a t i o box. 9. Adjust the boot image to enlarge by selecting a value on it. 8. After flashing the BIOS, restart the computer to load the new boot logo. 10.
P5N32-SLI SE DELUXE English Edition User's Manual
Page 142
.... Save your NVRAID settings after the CMOS is cleared; Boot the system and press during the Power-On Self-Test (POST) to configure as RAID. Select and enable the IDE or SATA drive(s) that you want to enter the BIOS Setup ...the BIOS before setting your RAID configuration. To set the n V i d i a R A I D E C o n f i g u r a t i o n menu item in the NVIDIA® nForce™ 4 SLI southbridge chipset. From the M a i n > I D F u n c t i o n item to install the Windows 2000 Service Pack 4 or later versions. 5-24 Chapter 5: Software support It supports RAID 0, RAID 1, RAID...
P5N32-SLI SE DELUXE English Edition User's Manual
Page 143
... the items on your computer. 2. The following submenu appears. Mirroring Striping Stripe Mirroring Spanning ASUS P5N32-SLI SE Deluxe 5-25 Define a New Array - Entering the NVIDIA® RAID utility To enter the NVIDIA® RAID utility: 1. Use the up your screen. During POST, press to move through and select menu options. Creating a RAID Volume To create...
P5N32-SLI SE DELUXE English Edition User's Manual
Page 149
... during the Power-On Self-Test (POST) to RAID Mode. From the A d v a n c e d > O n b o a r d D e v i c e s C o n f i g u r a t i o n menu item in the BIOS set the S i l i c o n I m a g e > Sam For details on the Silicon Image SATARaid™ RAID configuration, refer to the "Sil3132 SATA RAID User's Manual" in the BIOS before setting your RAID configuration. ASUS P5N32-SLI SE Deluxe 5-31 See section "4.4.6 Onboard Devices...
P5N32-SLI SE DELUXE English Edition User's Manual
Page 150
... Menu on a drive. The Main Menu options include the following lists the keys found in the drive. R e b u i l d R A I D s e t - creates a new legacy RAID set (e.g., swapped drives). During POST, press or . automatically restores disrupted drives on the legend box allow you to select an operation to create RAID set . deletes a RAID set . The keys...
P5N32-SLI SE DELUXE English Edition User's Manual
Page 156
Press during POST to avoid computer virus infection. 5-38 Chapter 5: Software support Insert the support CD into the optical drive. Place the motherboard support CD into the optical ...