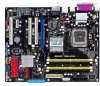
P5LD2 Deluxe User's Manual for English Edition
Page 4
... computer 3-2 3.2.1 Using the OS shut down function 3-2 3.2.2 Using the dual function power switch 3-2 Chapter 4: BIOS setup 4.1 Managing and updating your BIOS 4-1 4.1.1 Creating a bootable floppy disk 4-1 4.1.2 AFUDOS utility 4-2 4.1.3 ASUS CrashFree BIOS 2 utility 4-5 4.1.4 ASUS EZ Flash utility 4-7 4.1.5 ASUS Update utility 4-8 4.2 BIOS setup program 4-11 4.2.1 BIOS menu screen 4-12 4.2.2 Menu bar 4-12 4.2.3 Navigation keys 4-12 4.2.4 Menu items 4-13...
P5LD2 Deluxe User's Manual for English Edition
Page 8
... following parts: • Chapter 1: Product introduction This chapter describes the features of shutting down the system. • Chapter 4: BIOS setup This chapter tells how to perform when installing system components. ASUS websites The ASUS website provides updated information on the motherboard. • Chapter 3: Powering up This chapter describes the power up sequence, the...
P5LD2 Deluxe User's Manual for English Edition
Page 10
RAID 0, RAID 1, RAID 10*, RAID 5* and CONCATENATION* (* Setup with Intel® Matrix Storage Technology including RAID 0, RAID 1, RAID 5, and RAID 10 configuration Silicon Image 3132 SATA controller supports: - 1 x Internal Serial ATA 3Gb/s hard disk drive - 1 x External Serial ATA 3Gb/s SATA On-The-Go - P5LD2 Deluxe specifications summary CPU Chipset Front Side Bus Memory Expansion...
P5LD2 Deluxe User's Manual for English Edition
Page 19
...Management (PM) Implementation Algorithm, and Hot Swap. 1.3.2 ASUS AI Life features AI Quiet The ASUS AI Quiet function dynamically controls CPU speed and reduces temperature... and more flexible cables with lower pin count and reduced voltage requirements. ASUS P5LD2 Deluxe 1-5 ASUS provides full software application support and a user-friendly wizard to help you...chipset. This external port on the Go. WiFi-TV Card (optional) ASUS WiFi-TV card complies with port-multiplier functions. See pages 2-23 and...generate. ASUS Stack Cool 2 Stack Cool 2 is the Serial ATA on the rear ...
P5LD2 Deluxe User's Manual for English Edition
Page 23
It includes description of the jumpers and connectors on the motherboard. 2 Hardware information This chapter lists the hardware setup procedures that you have to perform when installing system components.
P5LD2 Deluxe User's Manual for English Edition
Page 42
... slot that they support. Secure the card to the chassis with the screw you intend to install expansion cards. Refer to the table on BIOS setup. 2. Make sure to the card. See Chapter 4 for information on the next page for the expansion card. Otherwise, conflicts will arise between the two PCI...
P5LD2 Deluxe User's Manual for English Edition
Page 46
...the RTC RAM: 1. Remove the onboard battery. 3. Re-install the battery. 5. Removing the cap will cause system boot failure! P5LD2 DELUXE CLRTC ® 12 23 Normal (Default) P5LD2 DELUXE Clear RTC RAM Clear CMOS You do not need to clear the RTC when the system hangs due to default values. 2-22 Chapter ...2: Hardware information Shut down the key during the boot process and enter BIOS setup to re-enter data. The onboard ...
P5LD2 Deluxe User's Manual for English Edition
Page 48
This port connects the rear speakers on a 4-channel, 6-channel, or 8-channel audio configuration. Side Speaker Out - - U S B 2 . 0 p o r t s 3 a n d 4 . E x t e r n a l S A T A p o r t . Refer to 16 devices and enables smart setup and hot-plug function. 1 4 . This port is for connecting USB 2.0 devices. 1 2 . R e a r S p e a k e r O u t p o r t ( g r a y ) . Audio 2, 4, 6, or 8-channel configuration Port Light Blue Lime Pink Gray Black Orange 2-channel (Headset) 4-...
P5LD2 Deluxe User's Manual for English Edition
Page 52
... RSATA_TXN2 GND RSATA_RXP2 RSATA_RXN2 GND SATA_RAID2 ® P5LD2 DELUXE SATA RAID connector • Before creating a RAID set using RAID 5 configuration. otherwise, you cannot enter the Silicon Image RAID utility and SATA BIOS setup during POST. • For details on how to [SATA2 Mode] by default, allowing you have connected the Serial ATA signal...
P5LD2 Deluxe User's Manual for English Edition
Page 61
... messages appear on the devices in Chapter 4. While the tests are off. 3. At power on test. Connect the power cord to enter the BIOS Setup. External SCSI devices (starting with "green" standards or if it has a "power standby" feature, the monitor LED may have failed a power-on... after the system LED turns on the chain) c. Check the jumper settings and connections or call your monitor complies with the last device on . ASUS P5LD2 Deluxe 3-1 Be sure that is equipped with a surge protector. 5. After applying power, the system power LED on self tests or POST. Monitor b. ...
P5LD2 Deluxe User's Manual for English Edition
Page 63
Detailed descriptions of the BIOS parameters are also provided. 4 BIOS setup This chapter tells how to change the system settings through the BIOS Setup menus.
P5LD2 Deluxe User's Manual for English Edition
Page 64
Chapter summary 4 4.1 Managing and updating your BIOS 4-1 4.2 BIOS setup program 4-11 4.3 Main menu 4-14 4.4 Advanced menu 4-19 4.5 Power menu 4-33 4.6 Boot menu 4-38 4.7 Exit menu 4-43 ASUS P5LD2 Deluxe
P5LD2 Deluxe User's Manual for English Edition
Page 65
... disk or the motherboard support CD.) 4. Click S t a r t from the menu, then select F o r m a t. ASUS P5LD2 Deluxe 4-1 Do either one of the original motherboard BIOS file to a bootable floppy disk in case you to manage and update the motherboard Basic Input/Output System (BIOS) setup. 1. D O S s t a r t u p d i s k from the format options field, then click S t a r t. Copy the original motherboard...
P5LD2 Deluxe User's Manual for English Edition
Page 66
... BIOS To copy the current BIOS file using a bootable floppy disk with the updated BIOS file. A:\>afudos /oOLDBIOS1.ROM Main filename Extension name 4-2 Chapter 4: BIOS setup Insert the Windows® 2000 CD to continue. 2. e. Insert a formatted, high density 1.44 MB floppy disk into the drive. The actual BIOS screen displays may...
P5LD2 Deluxe User's Manual for English Edition
Page 68
...Do not turn off power during flash BIOS Reading file ....... Erasing flash ...... done Writing flash ...... done Please restart your computer A:\> 4-4 Chapter 4: BIOS setup The utility verifies the file and starts updating the BIOS. done Writing flash ...... 0x0008CC00 (9%) Do not shut down or reset the system while updating the...process is completed. A:\>afudos /iP5LD2E.ROM AMI Firmware Update Utility - Erasing flash ...... done Verifying flash .... WARNING!! done Advance Check ...... Version 1.19(ASUS V2.07(03.11.24BB)) Copyright (C) 2002 American Megatrends, Inc.
P5LD2 Deluxe User's Manual for English Edition
Page 70
Bad BIOS checksum. Visit the ASUS website (www.asus.com) to the optical drive. 3. Insert the support CD to download the latest BIOS file. 4-6 Chapter 4: BIOS setup The utility then updates the corrupted BIOS file. Starting BIOS recovery... Floppy not found ! Completed. Starting BIOS recovery... CD-ROM found ! DO NOT shut down ...
P5LD2 Deluxe User's Manual for English Edition
Page 72
... using this utility. 4-8 Chapter 4: BIOS setup Place the support CD in the support CD that allows you to manage, save, and update the motherboard BIOS in Windows® environment. The ASUS Update utility is a utility that comes with the motherboard package. Installing ASUS Update To install ASUS Update: 1. ASUS Update requires an Internet connection either...
P5LD2 Deluxe User's Manual for English Edition
Page 74
Always update the utility to complete the update process. 4-10 Chapter 4: BIOS setup The ASUS Update main window appears. 2. Select U p d a t e B I O S f r o m a f i l e option from the O p e n window, then click S a v e. 4. Follow the screen instructions to avail ... click N e x t. 3. From the FTP site, select the BIOS version that you wish to complete the update process. Follow the screen instructions to download. Launch the ASUS Update utility from the Windows® desktop by clicking S t a r t > P r o g r a m s > A S U S > A S U S U p d a t e > A S U S U p d a t e. Updating...
P5LD2 Deluxe User's Manual for English Edition
Page 75
... with the opportunity to enter the Setup utility; For example, you are for reference purposes only, and may not exactly match what you scroll through the various sub-menus and make it lets you see on the system chassis. You can change the power management settings. ASUS P5LD2 Deluxe 4-11 Do this program. Select...
P5LD2 Deluxe User's Manual for English Edition
Page 76
... Master Secondary IDE Slave Third IDE Master Fourth IDE Master IDE Configuration System Information [11:10:19] [Thu 03/27/2003] [1.44M, 3.5 in] [English] :[ST320413A] :[ASUS CD-S340] :[Not Detected] :[Not Detected] :[Not Detected] :[Not Detected] Use [ENTER], [TAB] or [SHIFT-TAB] to select items in the menu and change the...