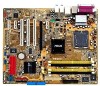

P5GD2 user's manual
Page 2
...intent to the owners' benefit, without the express written permission of ASUSTeK COMPUTER INC. ("ASUS"). ASUS ASSUMES NO RESPONSIBILITY OR LIABILITY FOR ANY ERRORS OR INACCURACIES THAT MAY APPEAR IN THIS MANUAL, INCLUDING THE PRODUCTS AND SOFTWARE DESCRIBED IN IT. or (2) the serial number of alteration...or explanation and to infringe. ii E1738 First Edition August 2004 Copyright © 2004 ASUSTeK COMPUTER INC. All Rights Reserved. ASUS PROVIDES THIS MANUAL "AS IS" WITHOUT WARRANTY OF ANY KIND, EITHER EXPRESS OR IMPLIED, INCLUDING BUT NOT LIMITED TO THE IMPLIED WARRANTIES OR ...
...intent to the owners' benefit, without the express written permission of ASUSTeK COMPUTER INC. ("ASUS"). ASUS ASSUMES NO RESPONSIBILITY OR LIABILITY FOR ANY ERRORS OR INACCURACIES THAT MAY APPEAR IN THIS MANUAL, INCLUDING THE PRODUCTS AND SOFTWARE DESCRIBED IN IT. or (2) the serial number of alteration...or explanation and to infringe. ii E1738 First Edition August 2004 Copyright © 2004 ASUSTeK COMPUTER INC. All Rights Reserved. ASUS PROVIDES THIS MANUAL "AS IS" WITHOUT WARRANTY OF ANY KIND, EITHER EXPRESS OR IMPLIED, INCLUDING BUT NOT LIMITED TO THE IMPLIED WARRANTIES OR ...

P5GD2 user's manual
Page 5
... Configuration 4-37 4.6.3 Security 4-38 4.7 Exit menu 4-41 Chapter 5: Software support 5.1 Installing an operating system 5-1 5.2 Support CD information 5-1 5.2.1 Running the support CD 5-1 5.2.2 Drivers menu 5-2 5.2.3 Utilities menu 5-3 5.2.4 Manuals menu 5-5 5.2.5 ASUS Contact information 5-6 5.2.6 Other information 5-6 v
... Configuration 4-37 4.6.3 Security 4-38 4.7 Exit menu 4-41 Chapter 5: Software support 5.1 Installing an operating system 5-1 5.2 Support CD information 5-1 5.2.1 Running the support CD 5-1 5.2.2 Drivers menu 5-2 5.2.3 Utilities menu 5-3 5.2.4 Manuals menu 5-5 5.2.5 ASUS Contact information 5-6 5.2.6 Other information 5-6 v
P5GD2 user's manual
Page 8
..., disconnect the power cable from the electrical outlet before relocating the system. • When adding or removing devices to fix it , carefully read all the manuals that came with the product, contact a qualified service technician or your retailer. Do not place the product in your power supply is broken, do not...
..., disconnect the power cable from the electrical outlet before relocating the system. • When adding or removing devices to fix it , carefully read all the manuals that came with the product, contact a qualified service technician or your retailer. Do not place the product in your power supply is broken, do not...

P5GD2 user's manual
Page 9
...chapter lists the hardware setup procedures that you need when installing and configuring the motherboard. About this guide is organized This manual contains the following sources for additional information and for product and software updates. 1. Where to find more information Refer to ...perform when installing system components. ix ASUS websites The ASUS website provides updated information on the motherboard. • Chapter 3: Powering up This chapter describes the power up sequence, ...
...chapter lists the hardware setup procedures that you need when installing and configuring the motherboard. About this guide is organized This manual contains the following sources for additional information and for product and software updates. 1. Where to find more information Refer to ...perform when installing system components. ix ASUS websites The ASUS website provides updated information on the motherboard. • Chapter 3: Powering up This chapter describes the power up sequence, ...

P5GD2 user's manual
Page 10
... linked with a plus sign (+) Example: Means that you must type the command exactly as shown, then supply the required item or value enclosed in this manual. I M P O R T A N T : Instructions that you perform certain tasks properly, take note of the following symbols used in brackets Example: At the DOS prompt, type the command line...
... linked with a plus sign (+) Example: Means that you must type the command exactly as shown, then supply the required item or value enclosed in this manual. I M P O R T A N T : Instructions that you perform certain tasks properly, take note of the following symbols used in brackets Example: At the DOS prompt, type the command line...

P5GD2 user's manual
Page 81
...on the T u r b o N O S item setting. The following item appears only when the AI Overclocking item is set to [AI N.O.S.] or [Manual]. Turbo NOS [Disabled] Disables or sets the overclocking threshold for the turbo non-delay overclocking system. Configuration options: [Disabled] [Overclock 3%] [Overclock 5%] [Overclock ... to Auto allows the BIOS to detect the VCore voltage of the CPU VCore voltage. Configuration options: [1.20V] [1.40V] [Auto] ASUS P5GD2 4-21 Configuration options: [1.50V] [1.60V] [Auto] CPU VCore Voltage [Auto] Allows selection of the CPU installed. Refer to Auto...
...on the T u r b o N O S item setting. The following item appears only when the AI Overclocking item is set to [AI N.O.S.] or [Manual]. Turbo NOS [Disabled] Disables or sets the overclocking threshold for the turbo non-delay overclocking system. Configuration options: [Disabled] [Overclock 3%] [Overclock 5%] [Overclock ... to Auto allows the BIOS to detect the VCore voltage of the CPU VCore voltage. Configuration options: [1.20V] [1.40V] [Auto] ASUS P5GD2 4-21 Configuration options: [1.50V] [1.60V] [Auto] CPU VCore Voltage [Auto] Allows selection of the CPU installed. Refer to Auto...

P5GD2 user's manual
Page 85
Configuration options: [2 Clocks] [3 Clocks] [4 Clocks] [5 Clocks] ASUS P5GD2 4-25 Select an item then press to the DDR SDRAM. Configuration options: [Disabled] [Enabled] DRAM CAS# Latency [5 Clocks] Controls the latency between the SDRAM read ... are set the DRAM timing parameters through the DRAM sub-items. The following sub-items appear when this item is Disabled. When disabled, you can manually set according to the DRAM SPD (Serial Presence Detect). CPU Internal Thermal Control [Auto] Disables or sets the CPU internal thermal control. Configuration options: [Disabled...
Configuration options: [2 Clocks] [3 Clocks] [4 Clocks] [5 Clocks] ASUS P5GD2 4-25 Select an item then press to the DDR SDRAM. Configuration options: [Disabled] [Enabled] DRAM CAS# Latency [5 Clocks] Controls the latency between the SDRAM read ... are set the DRAM timing parameters through the DRAM sub-items. The following sub-items appear when this item is Disabled. When disabled, you can manually set according to the DRAM SPD (Serial Presence Detect). CPU Internal Thermal Control [Auto] Disables or sets the CPU internal thermal control. Configuration options: [Disabled...

P5GD2 user's manual
Page 109
Install the Adobe® Acrobat® Reader from the U t i l i t i e s m e n u before opening a user manual file. • Some user manuals listed in Portable Document Format (PDF). ASUS P5GD2 5-5 Click an item to open the folder of supplementary user manuals. 5.2.4 Manuals menu The Manuals menu contains a list of the user manual. • Most user manual files are in this menu may not be applicable for this motherboard model.
Install the Adobe® Acrobat® Reader from the U t i l i t i e s m e n u before opening a user manual file. • Some user manuals listed in Portable Document Format (PDF). ASUS P5GD2 5-5 Click an item to open the folder of supplementary user manuals. 5.2.4 Manuals menu The Manuals menu contains a list of the user manual. • Most user manual files are in this menu may not be applicable for this motherboard model.

P5GD2 user's manual
Page 122
... hard disks for detailed information on RAID configurations. Install the hard disks into the drive bays. 2. Connect a 4-pin power cable to the RAID controllers user manual in the motherboard support CD for a RAID configuration: 1. Refer to the power connector on each hard disk as Master/Master or Slave/Slave. 2. Connect the... The motherboard supports Ultra DMA /133/100/66 and Serial ATA hard disk drives. For optimal performance, install identical drives of each drive. See section "5.2.4 Manuals menu". 5-18 Chapter 5: Software support
... hard disks for detailed information on RAID configurations. Install the hard disks into the drive bays. 2. Connect a 4-pin power cable to the RAID controllers user manual in the motherboard support CD for a RAID configuration: 1. Refer to the power connector on each hard disk as Master/Master or Slave/Slave. 2. Connect the... The motherboard supports Ultra DMA /133/100/66 and Serial ATA hard disk drives. For optimal performance, install identical drives of each drive. See section "5.2.4 Manuals menu". 5-18 Chapter 5: Software support


