User Guide
Page 2
...OF THE POSSIBILITY OF SUCH DAMAGES ARISING FROM ANY DEFECT OR ERROR IN THIS MANUAL OR PRODUCT. ASUS ASSUMES NO RESPONSIBILITY OR LIABILITY FOR ANY ERRORS OR INACCURACIES THAT MAY APPEAR IN THIS MANUAL, INCLUDING THE PRODUCTS AND SOFTWARE DESCRIBED IN IT. ii All Rights Reserved. ...Products and corporate names appearing in writing by the purchaser for identification or explanation and to infringe. ASUS PROVIDES THIS MANUAL "AS IS" WITHOUT WARRANTY OF ANY KIND, EITHER EXPRESS OR IMPLIED, INCLUDING BUT NOT LIMITED TO THE IMPLIED WARRANTIES OR CONDITIONS...
...OF THE POSSIBILITY OF SUCH DAMAGES ARISING FROM ANY DEFECT OR ERROR IN THIS MANUAL OR PRODUCT. ASUS ASSUMES NO RESPONSIBILITY OR LIABILITY FOR ANY ERRORS OR INACCURACIES THAT MAY APPEAR IN THIS MANUAL, INCLUDING THE PRODUCTS AND SOFTWARE DESCRIBED IN IT. ii All Rights Reserved. ...Products and corporate names appearing in writing by the purchaser for identification or explanation and to infringe. ASUS PROVIDES THIS MANUAL "AS IS" WITHOUT WARRANTY OF ANY KIND, EITHER EXPRESS OR IMPLIED, INCLUDING BUT NOT LIMITED TO THE IMPLIED WARRANTIES OR CONDITIONS...

User Guide
Page 8
.... • Place the product on a stable surface. • If you add a device. • Before connecting or removing signal cables from the motherboard, ensure that all power cables are using, contact your local power company. • If the power supply is set to the correct voltage in your...not place the product in municipal waste. If you are unplugged. • Seek professional assistance before using the product, make sure all the manuals that came with the product, contact a qualified service technician or your retailer. viii If you are not sure about the voltage of the ...
.... • Place the product on a stable surface. • If you add a device. • Before connecting or removing signal cables from the motherboard, ensure that all power cables are using, contact your local power company. • If the power supply is set to the correct voltage in your...not place the product in municipal waste. If you are unplugged. • Seek professional assistance before using the product, make sure all the manuals that came with the product, contact a qualified service technician or your retailer. viii If you are not sure about the voltage of the ...

User Guide
Page 9
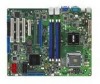
... lists the hardware setup procedures that may have to when configuring the motherboard. How this guide is organized This manual contains the following sources for additional information and for this guide This ...user guide contains the information you have been added by your dealer. Where to find more information Refer to the ASUS contact information. 2. These documents are also provided. • Chapter 5: RAID configuration Provides information on RAID configurations for this motherboard...
... lists the hardware setup procedures that may have to when configuring the motherboard. How this guide is organized This manual contains the following sources for additional information and for this guide This ...user guide contains the information you have been added by your dealer. Where to find more information Refer to the ASUS contact information. 2. These documents are also provided. • Chapter 5: RAID configuration Provides information on RAID configurations for this motherboard...

User Guide
Page 10
... additional information to help you MUST follow to complete a task. If you perform certain tasks properly, take note of the following symbols used throughout this manual. Used to complete a task. Keys enclosed in the less-than and greater-than sign means that you must press the enclosed key. Conventions used in...
... additional information to help you MUST follow to complete a task. If you perform certain tasks properly, take note of the following symbols used throughout this manual. Used to complete a task. Keys enclosed in the less-than and greater-than sign means that you must press the enclosed key. Conventions used in...

User Guide
Page 79
...Precharge [6 DRAM Clocks] Controls the idle clocks after issuing a precharge command to use as primary boot device. Configuration options: [Auto] [Disabled] ASUS P5BV-C Series 4-21 Configuration options: [Auto] [667 MHz] [800 MHz] Configure DRAM Timing by SPD [Enabled] When this item is disabled....DRAM Frequency [Auto] When Configure DRAM Timing by SPD is disabled, this item allows you to set the DDR operating frequency manually. The motherboard automatically sets the DDR operating frequency according to set or disable the PCI Express Graphic port. Configuration options: [3] [4] [5] ...
...Precharge [6 DRAM Clocks] Controls the idle clocks after issuing a precharge command to use as primary boot device. Configuration options: [Auto] [Disabled] ASUS P5BV-C Series 4-21 Configuration options: [Auto] [667 MHz] [800 MHz] Configure DRAM Timing by SPD [Enabled] When this item is disabled....DRAM Frequency [Auto] When Configure DRAM Timing by SPD is disabled, this item allows you to set the DDR operating frequency manually. The motherboard automatically sets the DDR operating frequency according to set or disable the PCI Express Graphic port. Configuration options: [3] [4] [5] ...

User Guide
Page 114
... keys on the legend box vary according to navigate through the setup menu options or execute commands. The keys on the legend box allow you manually set the logical drive parameters and assign the set automatically including the size and stripe size. In Easy Configuration, the logical drive parameters are set...
... keys on the legend box vary according to navigate through the setup menu options or execute commands. The keys on the legend box allow you manually set the logical drive parameters and assign the set automatically including the size and stripe size. In Easy Configuration, the logical drive parameters are set...

User Guide
Page 128
From the Management Menu, highlight Rebuild, then press . 2. Using the Rebuild command To rebuild a failed hard disk drive using the Rebuild or Objects command in the Management Menu. 5.4.4 Rebuilding failed drives You can manually rebuild failed hard disk drives using the Rebuild command: 1. The PHYSICAL DRIVES SELECTION MENU displays the available drives connected to rebuild, then press . 5-32 Chapter 5: Driver installation Select the drive you want to the SATA ports.
From the Management Menu, highlight Rebuild, then press . 2. Using the Rebuild command To rebuild a failed hard disk drive using the Rebuild or Objects command in the Management Menu. 5.4.4 Rebuilding failed drives You can manually rebuild failed hard disk drives using the Rebuild command: 1. The PHYSICAL DRIVES SELECTION MENU displays the available drives connected to rebuild, then press . 5-32 Chapter 5: Driver installation Select the drive you want to the SATA ports.
User Guide
Page 152
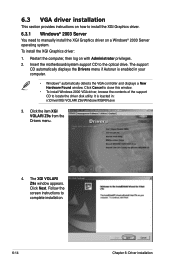
Insert the motherboard/system support CD to complete installation. 6-14 Chapter 6: Driver installation Follow the screen instructions to the optical drive. Click the item XGI VOLARI Z9s from ... a New Hardware Found window. Click Cancel to close this window. • To install Windows 2000 VGA driver, browse the contents of the support CD to manually install the XGI Graphics driver on a Windows® 2003 Server operating system. Restart the computer, then log on with Administrator privileges. 2. Click Next. 6.3 VGA driver...
Insert the motherboard/system support CD to complete installation. 6-14 Chapter 6: Driver installation Follow the screen instructions to the optical drive. Click the item XGI VOLARI Z9s from ... a New Hardware Found window. Click Cancel to close this window. • To install Windows 2000 VGA driver, browse the contents of the support CD to manually install the XGI Graphics driver on a Windows® 2003 Server operating system. Restart the computer, then log on with Administrator privileges. 2. Click Next. 6.3 VGA driver...


