User Guide
Page 2
Connectors 8 ii Motherboard layout 1 2. Central Processing Unit (CPU 2 3. Expansion slots 5 Standard interrupt assignments 5 IRQ assignments for this motherboard 5 PCI slots 6 AGP slot 6 5. Jumper 7 6. System memory 3 Memory configurations 3 Installing a DIMM 4 4. Checklist Contents P4SD-LA specifications summary iii 1.
Connectors 8 ii Motherboard layout 1 2. Central Processing Unit (CPU 2 3. Expansion slots 5 Standard interrupt assignments 5 IRQ assignments for this motherboard 5 PCI slots 6 AGP slot 6 5. Jumper 7 6. System memory 3 Memory configurations 3 Installing a DIMM 4 4. Checklist Contents P4SD-LA specifications summary iii 1.
User Guide
Page 11
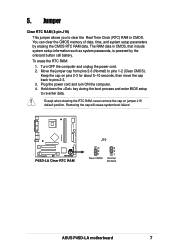
... data. Turn OFF the computer and unplug the power cord. 2. Move the jumper cap from pins 2-3 (Normal) to re-enter data. Removing the cap will cause system boot failure! P4SD-LA P4SD-LA Clear RTC RAM J19 3 2 1 Clear CMOS 3 2 1 Normal (Default) ASUS P4SD-LA motherboard 7 You can clear the CMOS memory of date, time, and system.... Plug the power cord and turn ON the computer. 4. Hold down the key during the boot process and enter BIOS setup to pins 1-2 (Clear CMOS). Jumper Clear RTC RAM (3-pin J19) This jumper allows you to pins 2-3. 3. Keep the cap on...
... data. Turn OFF the computer and unplug the power cord. 2. Move the jumper cap from pins 2-3 (Normal) to re-enter data. Removing the cap will cause system boot failure! P4SD-LA P4SD-LA Clear RTC RAM J19 3 2 1 Clear CMOS 3 2 1 Normal (Default) ASUS P4SD-LA motherboard 7 You can clear the CMOS memory of date, time, and system.... Plug the power cord and turn ON the computer. 4. Hold down the key during the boot process and enter BIOS setup to pins 1-2 (Clear CMOS). Jumper Clear RTC RAM (3-pin J19) This jumper allows you to pins 2-3. 3. Keep the cap on...
User Guide
Page 13
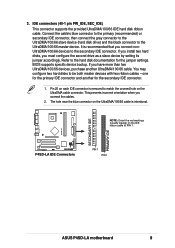
... the provided UltraDMA/100/66 IDE hard disk ribbon cable. If you must configure the second drive as a slave device by setting its jumper accordingly. one for the jumper settings. It is recommended that you connect the cables. 2. The hole near the blue connector on the UltraDMA/100/66 cable is removed... connector, then connect the gray connector to the UltraDMA/100/66 slave device (hard disk drive) and the black connector to the secondary IDE connector. P4SD-LA SECONDARY IDE PRIMARY IDE P4SD-LA IDE Connectors PIN 1 PIN 1 ASUS P4SD-LA motherboard 9 3.
... the provided UltraDMA/100/66 IDE hard disk ribbon cable. If you must configure the second drive as a slave device by setting its jumper accordingly. one for the jumper settings. It is recommended that you connect the cables. 2. The hole near the blue connector on the UltraDMA/100/66 cable is removed... connector, then connect the gray connector to the UltraDMA/100/66 slave device (hard disk drive) and the black connector to the secondary IDE connector. P4SD-LA SECONDARY IDE PRIMARY IDE P4SD-LA IDE Connectors PIN 1 PIN 1 ASUS P4SD-LA motherboard 9 3.

