

User Guide
Page 3
... view 1-4 1.3.3 QuickFit Function 1-5 2.1 Assembling the monitor base 2-1 2.1.1 Assembling the base 2-1 2.1.2 Detaching the base 2-2 2.2 Adjusting the monitor 2-3 2.3 Connecting the cables 2-3 2.4 Turning on the monitor 2-4 3.1 OSD (On-Screen Display) menu 3-1 3.1.1 How to reconfigure 3-1 3.1.2 OSD Function Introduction 3-1 3.2 Specifications Summary 3-4 3.3 Troubleshooting (FAQ 3-6 3.4 Supported operating modes 3-7 iii
... view 1-4 1.3.3 QuickFit Function 1-5 2.1 Assembling the monitor base 2-1 2.1.1 Assembling the base 2-1 2.1.2 Detaching the base 2-2 2.2 Adjusting the monitor 2-3 2.3 Connecting the cables 2-3 2.4 Turning on the monitor 2-4 3.1 OSD (On-Screen Display) menu 3-1 3.1.1 How to reconfigure 3-1 3.1.2 OSD Function Introduction 3-1 3.2 Specifications Summary 3-4 3.3 Troubleshooting (FAQ 3-6 3.4 Supported operating modes 3-7 iii

User Guide
Page 6
...initial use due to disconnect the cables and power cord. Turn off the Power Switch and turn off and unplug the power cord. The screen will recover slowly or you can turn it may remain after switching the image. Conventions used in this guide WARNING: Information to prevent injury...displayed for hours, an afterimage of the monitor. IMPORTANT: Information that the flicker disappears. • You may find slightly uneven brightness on the screen depending on again to make sure that you MUST follow to complete a task. The following symptoms are normal with the monitor: • The...
...initial use due to disconnect the cables and power cord. Turn off the Power Switch and turn off and unplug the power cord. The screen will recover slowly or you can turn it may remain after switching the image. Conventions used in this guide WARNING: Information to prevent injury...displayed for hours, an afterimage of the monitor. IMPORTANT: Information that the flicker disappears. • You may find slightly uneven brightness on the screen depending on again to make sure that you MUST follow to complete a task. The following symptoms are normal with the monitor: • The...

User Guide
Page 12
...Grid pattern: Facilitates designers and users to organize content and layout on screen without printing test copies. Paper size: Provides users to view their photos in real size on the screen. When QuickFit is activated, press the control buttons to accurately view and...achieve a consistent look and feel. 1.3.3 QuickFit Function The QuickFit function allows users to have a preview of the screen will guide users to make adjustments. QuickFit ASUS LCD Monitor MX279 1-5 Photo size: Provides photographers and other users to make selections. A4 Letter QuickFit QuickFit c. ...
...Grid pattern: Facilitates designers and users to organize content and layout on screen without printing test copies. Paper size: Provides users to view their photos in real size on the screen. When QuickFit is activated, press the control buttons to accurately view and...achieve a consistent look and feel. 1.3.3 QuickFit Function The QuickFit function allows users to have a preview of the screen will guide users to make adjustments. QuickFit ASUS LCD Monitor MX279 1-5 Photo size: Provides photographers and other users to make selections. A4 Letter QuickFit QuickFit c. ...

User Guide
Page 17
... dark-scene games or movies with SPLENDID™ Video Enhancement. • sRGB: best choice for your setting or return to maintain your preference. 3.1 OSD (On-Screen Display) menu 3.1.1 How to change the settings of the selected function. 4. Each mode has the Reset selection, allowing you can select for viewing photos and...
... dark-scene games or movies with SPLENDID™ Video Enhancement. • sRGB: best choice for your setting or return to maintain your preference. 3.1 OSD (On-Screen Display) menu 3.1.1 How to change the settings of the selected function. 4. Each mode has the Reset selection, allowing you can select for viewing photos and...
User Guide
Page 19
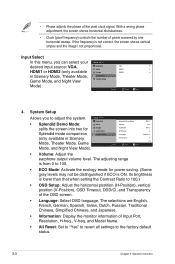
... volume level. The adjusting range is ON. Input Select In this menu, you to adjust the system. • Splendid Demo Mode: splits the screen into two for power saving. (Some gray levels may not be distinguished if ECO is from 0 to the factory default status. 3-3 Chapter 3: ...General Instruction • Phase adjusts the phase of pixels scanned by one horizontal sweep. With a wrong phase adjustment, the screen shows horizontal distrubances. • Clock (pixel frequency) controls the number of the pixel clock signal. Its brightness is not correct, the...
... volume level. The adjusting range is ON. Input Select In this menu, you to adjust the system. • Splendid Demo Mode: splits the screen into two for power saving. (Some gray levels may not be distinguished if ECO is from 0 to the factory default status. 3-3 Chapter 3: ...General Instruction • Phase adjusts the phase of pixels scanned by one horizontal sweep. With a wrong phase adjustment, the screen shows horizontal distrubances. • Clock (pixel frequency) controls the number of the pixel clock signal. Its brightness is not correct, the...

User Guide
Page 20
3.2 Specifications Summary Panel Type TFT LCD Panel Size 27" (16:9, 68.6 cm) wide screen Max. Resolution 1920 x 1080 Brightness (Typ.) 250 cd/m2 Contrast Ratio (Typ.) 1000:1 ASUS Smart Contrast Ration (ASCR) ≥ 80,000,000:1 (with ASCR on) Color Saturation (NTSC) 72 % (Typ) Viewing Angle (H/V) CR>10 178° (H) / 178° (V) Display... Hotkey Yes Volume Adjustment Hotkey Yes Input Selection Hotkey Yes Colors Black Speaker (Built-in) 2 x 3 W Power LED White (On) / Amber (Standby) Tilt -5° ~ +20° ASUS LCD Monitor MX279 3-4
3.2 Specifications Summary Panel Type TFT LCD Panel Size 27" (16:9, 68.6 cm) wide screen Max. Resolution 1920 x 1080 Brightness (Typ.) 250 cd/m2 Contrast Ratio (Typ.) 1000:1 ASUS Smart Contrast Ration (ASCR) ≥ 80,000,000:1 (with ASCR on) Color Saturation (NTSC) 72 % (Typ) Viewing Angle (H/V) CR>10 178° (H) / 178° (V) Display... Hotkey Yes Volume Adjustment Hotkey Yes Input Selection Hotkey Yes Colors Black Speaker (Built-in) 2 x 3 W Power LED White (On) / Amber (Standby) Tilt -5° ~ +20° ASUS LCD Monitor MX279 3-4

User Guide
Page 22
... is properly connected the monitor and the computer. • Inspect the signal cable and make sure that may cause electrical interference. ASUS LCD Monitor MX279 3-6 The power LED lights amber and • Check if the monitor and the computer are bent. • Connect the computer ...with another available monitor to the monitor and the power outlet. Screen image has color defects (white does not look white) • Inspect the signal cable and make sure none of the pins are bent. • ...
... is properly connected the monitor and the computer. • Inspect the signal cable and make sure that may cause electrical interference. ASUS LCD Monitor MX279 3-6 The power LED lights amber and • Check if the monitor and the computer are bent. • Connect the computer ...with another available monitor to the monitor and the power outlet. Screen image has color defects (white does not look white) • Inspect the signal cable and make sure none of the pins are bent. • ...


