

User Guide
Page 8
Thank you ! 1.2 Package contents Check your package for purchasing the ASUS® LCD monitor! The latest widescreen LCD monitor from ASUS provides a crisper, broader, and brighter display, plus a host of the above items is damaged or missing, contact your viewing experience. With these features, you can ... monitor 1 x Adapter 1 x Power cable 1 x VGA cable 1 x DVI-HDMI cable 1 x Audio cable 1 x Quick start guide 1 x Warranty card If any of features that enhance your retailer immediately. ASUS LCD Monitor MX279 1-1 1.1 Welcome!
Thank you ! 1.2 Package contents Check your package for purchasing the ASUS® LCD monitor! The latest widescreen LCD monitor from ASUS provides a crisper, broader, and brighter display, plus a host of the above items is damaged or missing, contact your viewing experience. With these features, you can ... monitor 1 x Adapter 1 x Power cable 1 x VGA cable 1 x DVI-HDMI cable 1 x Audio cable 1 x Quick start guide 1 x Warranty card If any of features that enhance your retailer immediately. ASUS LCD Monitor MX279 1-1 1.1 Welcome!

User Guide
Page 10
Press (Input Select button) to turn the monitor on/off. • The color definition of the power indicator is as the table below. Status White Amber OFF Description ON Standby mode OFF ASUS LCD Monitor MX279 1-3 Power Button/Power Indicator: • Press this button to display HDMI signals after you connect HDMI cable with the monitor. 7.
Press (Input Select button) to turn the monitor on/off. • The color definition of the power indicator is as the table below. Status White Amber OFF Description ON Standby mode OFF ASUS LCD Monitor MX279 1-3 Power Button/Power Indicator: • Press this button to display HDMI signals after you connect HDMI cable with the monitor. 7.

User Guide
Page 12
... has three patterns: a. Alignment Grid QuickFit b. Grid pattern: Facilitates designers and users to organize content and layout on screen without printing test copies. QuickFit ASUS LCD Monitor MX279 1-5 The QuickFit OSD displayed in real size on the screen. 4x6 3x5 2x2 8x10 5x7 QuickFit QuickFit To activate QuickFit, press the QuickFit hotkey...
... has three patterns: a. Alignment Grid QuickFit b. Grid pattern: Facilitates designers and users to organize content and layout on screen without printing test copies. QuickFit ASUS LCD Monitor MX279 1-5 The QuickFit OSD displayed in real size on the screen. 4x6 3x5 2x2 8x10 5x7 QuickFit QuickFit To activate QuickFit, press the QuickFit hotkey...

User Guide
Page 14
ASUS LCD Monitor MX279 2-2 Or, you may directly use a screwdriver to remove the screw that you cover the table surface with soft cloth to prevent damage to loosen the screw located at the bottom of the monitor face down on a clean table. 2. Use your fingers to the monitor. • Hold the base while removing the screw. Carefully put the front of the base, and remove the base from the stand. • We recommend that secures the base to the stand, and detach the base from the stand. 3. 2.1.2 Detaching the base 1. Disconnect power and signal cables.
ASUS LCD Monitor MX279 2-2 Or, you may directly use a screwdriver to remove the screw that you cover the table surface with soft cloth to prevent damage to loosen the screw located at the bottom of the monitor face down on a clean table. 2. Use your fingers to the monitor. • Hold the base while removing the screw. Carefully put the front of the base, and remove the base from the stand. • We recommend that secures the base to the stand, and detach the base from the stand. 3. 2.1.2 Detaching the base 1. Disconnect power and signal cables.

User Guide
Page 16
... end of the VGA/HDMI cable to a power outlet. • To connect the VGA/HDMI cable: a. Connect the adapter to show that the monitor ASUS LCD Monitor MX279 2-4 The power indicator is connected, connect the end with plug type to the monitor's earphone jack. Tighten the two screws to the monitor's VGA...
... end of the VGA/HDMI cable to a power outlet. • To connect the VGA/HDMI cable: a. Connect the adapter to show that the monitor ASUS LCD Monitor MX279 2-4 The power indicator is connected, connect the end with plug type to the monitor's earphone jack. Tighten the two screws to the monitor's VGA...

User Guide
Page 17
... the MENU button. Repeat step 2 and step 3 to navigate Image Input Select Theater Mode Game Mode through the sub-menu functions. MX279 Splendid Color Image Input Select System Setup Scenery Mode Standard Mode Theater Mode Game Mode Night View Mode sRGB Move Menu Exit • ...and ASCR functions are not user-configurable. To exit the OSD menu, press the button. Press and to reconfigure 1. Press the MENU button MX279 to navigate through the functions. Splendid Color Scenery Mode Standard Mode 2. If Move Menu Exit the function selected has a sub-menu, press and...
... the MENU button. Repeat step 2 and step 3 to navigate Image Input Select Theater Mode Game Mode through the sub-menu functions. MX279 Splendid Color Image Input Select System Setup Scenery Mode Standard Mode Theater Mode Game Mode Night View Mode sRGB Move Menu Exit • ...and ASCR functions are not user-configurable. To exit the OSD menu, press the button. Press and to reconfigure 1. Press the MENU button MX279 to navigate through the functions. Splendid Color Scenery Mode Standard Mode 2. If Move Menu Exit the function selected has a sub-menu, press and...

User Guide
Page 18
...to 100. the adjusting range is from 0 to 100 (only available for HDMI input.) • ASCR: turns on/off the ASCR (ASUS Smart Contrast Ratio) function (only available in Scenery Mode, Theater Mode, Game Mode, and Night View Mode) • Position: adjusts the... horizontal postition (H-Position) and the vertical position (V-Position) of the image by adjusting (Phase) and (Clock) separately. MX279 Splendid Color Image Input Select System Setup Brightness Contrast Saturation Color Temp. Color You can adjust Sharpness, Trace Free, Aspect Control, ASCR, ...
...to 100. the adjusting range is from 0 to 100 (only available for HDMI input.) • ASCR: turns on/off the ASCR (ASUS Smart Contrast Ratio) function (only available in Scenery Mode, Theater Mode, Game Mode, and Night View Mode) • Position: adjusts the... horizontal postition (H-Position) and the vertical position (V-Position) of the image by adjusting (Phase) and (Clock) separately. MX279 Splendid Color Image Input Select System Setup Brightness Contrast Saturation Color Temp. Color You can adjust Sharpness, Trace Free, Aspect Control, ASCR, ...
User Guide
Page 19
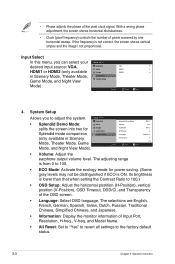
... mode for Splendid mode comparison (only available in Scenery Mode, Theater Mode, Game Mode, and Night View Mode) MX279 Splendid Color Image Input Select System Setup VGA HDMI1 HDMI2 Move Menu Exit 4. MX279 Splendid Color Image Input Select System Setup Splendid Demo Mode Volume ECO Mode OSD Setup Language Information Move Menu...
... mode for Splendid mode comparison (only available in Scenery Mode, Theater Mode, Game Mode, and Night View Mode) MX279 Splendid Color Image Input Select System Setup VGA HDMI1 HDMI2 Move Menu Exit 4. MX279 Splendid Color Image Input Select System Setup Splendid Demo Mode Volume ECO Mode OSD Setup Language Information Move Menu...

User Guide
Page 20
... Panel Type TFT LCD Panel Size 27" (16:9, 68.6 cm) wide screen Max. Resolution 1920 x 1080 Brightness (Typ.) 250 cd/m2 Contrast Ratio (Typ.) 1000:1 ASUS Smart Contrast Ration (ASCR) ≥ 80,000,000:1 (with ASCR on) Color Saturation (NTSC) 72 % (Typ) Viewing Angle (H/V) CR>10 178° (H) / 178° (V) Display... Hotkey Yes Volume Adjustment Hotkey Yes Input Selection Hotkey Yes Colors Black Speaker (Built-in) 2 x 3 W Power LED White (On) / Amber (Standby) Tilt -5° ~ +20° ASUS LCD Monitor MX279 3-4
... Panel Type TFT LCD Panel Size 27" (16:9, 68.6 cm) wide screen Max. Resolution 1920 x 1080 Brightness (Typ.) 250 cd/m2 Contrast Ratio (Typ.) 1000:1 ASUS Smart Contrast Ration (ASCR) ≥ 80,000,000:1 (with ASCR on) Color Saturation (NTSC) 72 % (Typ) Viewing Angle (H/V) CR>10 178° (H) / 178° (V) Display... Hotkey Yes Volume Adjustment Hotkey Yes Input Selection Hotkey Yes Colors Black Speaker (Built-in) 2 x 3 W Power LED White (On) / Amber (Standby) Tilt -5° ~ +20° ASUS LCD Monitor MX279 3-4

User Guide
Page 22
... sure none of the pins are bent. • Perform Reset via OSD. • Adjust the R/G/B color settings or select the Color Temperature via OSD. ASUS LCD Monitor MX279 3-6 No sound or sound is low • Make sure the audio cable is properly connected to the monitor. • Adjust the volume settings of...
... sure none of the pins are bent. • Perform Reset via OSD. • Adjust the R/G/B color settings or select the Color Temperature via OSD. ASUS LCD Monitor MX279 3-6 No sound or sound is low • Make sure the audio cable is properly connected to the monitor. • Adjust the volume settings of...
