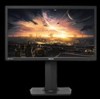
MG24UQ Series User Guide for English Edition
Page 2
... 1-2 1.3 Assembling the monitor 1-3 1.4 Connect cables 1-4 1.4.1 Rear of their respective companies, and are used only for identification or explanation and to the owners' benefit, without the express written permission of ASUSTeK COMPUTER INC. ("ASUS"). SPECIFICATIONS AND INFORMATION CONTAINED... this manual, including the products and software described in it, may not be registered trademarks or copyrights of the LCD monitor 1-4 1.5 Monitor introduction 1-5 1.5.1 Using the Controls button 1-5 2.1 Detaching the Quick Release stand (for backup purposes, without intent to ...
MG24UQ Series User Guide for English Edition
Page 5
...any damage, contact your local power standard. • Do not overload power strips and extension cords. If you encounter technical problems with the monitor, contact a qualified service technician or your retailer. • Before using the product, make sure all the documentation that came with the package.... • To prevent fire or shock hazard, never expose the monitor to rain or moisture. • Never try to fix it by yourself. Overloading can result in any kind into the slots on a stable...
MG24UQ Series User Guide for English Edition
Page 7
...or service center to fix it is displayed for hours, an afterimage of the previous screen may be removed with a cloth dampened with the monitor: • The screen may find slightly uneven brightness on the screen depending on again to complete a task. Turn off the Power Switch and...the cables and power cord. The following symptoms are normal with mild cleaner. • Avoid using a cleaner containing alcohol or acetone. Clean the monitor surface with the LCD. Never spray cleaner directly on the screen, as it on the desktop pattern you use with a lint-free, non-abrasive...
MG24UQ Series User Guide for English Edition
Page 8
Optional documentation Your product package may include optional documentation that may have been added by your dealer. These documents are not part of the standard package. ASUS websites The ASUS websites worldwide provide updated information on ASUS hardware and software products. ASUS LCD Monitor MG24U Series 1-1 Refer to the following sources for additional information and for product and software updates. 1. Where to find more information Refer to http://www.asus.com 2.
MG24UQ Series User Guide for English Edition
Page 9
... Introduction 1.1 Welcome! Thank you ! 1.2 Package contents Check your package for purchasing the ASUS® LCD monitor! The latest widescreen LCD monitor from ASUS provides a crisper, broader, and brighter display, plus a host of features that the monitor brings you for the following items: LCD Monitor Monitor Base Quick Start Guide Warranty Card 1x Power Cord CD Manual 1x...
MG24UQ Series User Guide for English Edition
Page 10
Place the display flat on a cloth on the table, assemble the base according to the drawing and use a coin to the angle that is most comfortable for you. 4 6 1 3 2 5 7 PUSH ASUS LCD Monitor MG24U Series 1-3 1.3 Assembling the monitor To assemble the monitor: 1. Put the cable clip inset the hole of stand, and adjust the monitor to turn the screw tight. 2.
MG24UQ Series User Guide for English Edition
Page 11
AC-IN Port 2. DisplayPort 6. HDMI-1(4K@60Hz) 5. HDMI-3 3. Earphone Jack 7. HDMI-2 4. Kensington Lock 7 HDMI-3 HDMI-2 HDMI-1 DP 2.0 2 34 5 6 1-4 Chapter 1: Product Introduction 1.4 Connect cables 1.4.1 Rear of the LCD monitor 1 1.
MG24UQ Series User Guide for English Edition
Page 12
... 1.5.1 Using the Controls button Use the control button on /off. • The color definition of the monitor to adjust the image settings. 6 5 4 3 2 1 1. Status Description White ON Amber Standby mode OFF OFF 2. Power Button/Power Indicator: • Press this hotkey to switch from ...Seven video preset modes (Scenery Mode, Racing Mode, Cinema Mode, RTS/RPG Mode, FPS Mode, sRGB and User Mode) with GameVisual ™ Video Intelligence Technology. 3. ASUS LCD Monitor MG24U Series 1-5
MG24UQ Series User Guide for English Edition
Page 14
...Mount Bracket with soft cloth to prevent damage to remove the four screws on a clean table. 2. Use a screwdriver to the monitor. • Hold the stand of the monitor while removing the screws. 2.1 Detaching the Quick Release stand (for VESA wall mount) The Quick Release Stand of the... • We recommend that you cover the table surface with minimum weight/load 28.8 kg (Screw size: M4 x 10 mm). Disconnect power and signal cables. ASUS LCD Monitor MG24U Series 2-1 To detach the Quick Release stand 1. Figure 1 Figure 2 2 1 1 • The VESA wall mount kit ( 100 x 100 mm) ...
MG24UQ Series User Guide for English Edition
Page 15
...you look at the full face of the monitor, then adjust the monitor to the angle that the monitor slightly shakes while you adjust the viewing angle. 2-2 Chapter 2: Setup Lift the monitor to its angle. • You can also adjust the monitor's height within +/- 15cm. -5°~20°...; 60° 60° Pivoting the monitor 1. Pivot the monitor clockwise to prevent the monitor from either left or right. You can adjust the monitor's angle from +20˚...
MG24UQ Series User Guide for English Edition
Page 16
... buttons, according to the indicators on the menu press the Center key. 4. As you move left / right menu. ASUS LCD Monitor MG24U Series 3-1 Press the / to move from one icon to make your changes. 6. Press the MENU button to reconfigure G GameVisual Scenery Mode Racing ...Mode Cinema Mode RTS/RPG Mode FPS Mode sRGB Mode User Mode ASUS MG24U FPS Mode HDMI-1 3840x2160@60Hz 1. To select the ...
MG24UQ Series User Guide for English Edition
Page 18
... is optimized setting. Blue Light Filter Adjust the energy level of blue light emitted from LED backlight G Blue Light Filter Level 0 Level 1 Level 2 Level 3 Level 4 ASUS MG24U FPS Mode HDMI-1 3840x2160@60Hz • Level 0: No change. • Level 1~4: The higher the level,the more blue light will be reduced. • When...; Between Level 1 to Level 3, the Brightness function is user-configurable. • Level 4 is not user-configurable. It is compliance with TUV Low Blue Light Certification. ASUS LCD Monitor MG24U Series 3-3 2.
MG24UQ Series User Guide for English Edition
Page 20
... FPS Mode HDMI-1 3840x2160@60Hz • Sharpness: Adjusts the picture sharpness. The adjusting range is from this main function. ASUS LCD Monitor MG24U Series 3-5 Image You can adjust the image Sharpness, Trace Free, Aspect Control, VividPixel, ASCR and Adaptive-Sync, from 0 to 100. ...dynamic contrast ratio function. • Adaptive-Sync:It can allow a Adaptive-Sync supported* graphics source to "Full", "4:3", "1:1", "Overscan". • VividPixel: ASUS Exclusive Technology that brings lifelike visuals for the HDMI input source. • Adaptive-Sync only support on full-screen.
MG24UQ Series User Guide for English Edition
Page 22
... GameVisual Demo Mode Volume GamePlus DisplayPort Stream ECO Mode OSD Setup Language More DP 1.1 DP 1.2 ASUS MG24U FPS Mode HDMI-1 3840x2160@60Hz G System Setup Back Key Lock Information Power Indicator Power Key Lock All Reset... ASUS MG24U FPS Mode HDMI-1 3840x2160@60Hz • GameVisual Demo Mode: Activate the demo mode for the GameVisual ...FPS) games. System Setup Adjusts the system configuration. Press to go off, and exit. ASUS LCD Monitor MG24U Series 3-7
MG24UQ Series User Guide for English Edition
Page 23
... graphic card DP version. • ECO Mode: Activate the ecology mode for more than five seconds to disable key lock function. • Information: Displays the monitor information. • Power Indicator: Turn the power LED indicator on/off. • Power Key Lock: To disable / enable power key. • All Reset: Selects "Yes...
MG24UQ Series User Guide for English Edition
Page 24
MyFavorite Load/Save all settings on the monitor. G MyFavorite Setting1 Setting 2 Setting 3 Setting 4 Load Save ASUS MG24U FPS Mode HDMI-1 3840x2160@60Hz ASUS LCD Monitor MG24U Series 3-9 7.
MG24UQ Series User Guide for English Edition
Page 26
...to a HDMI 2.0 card. (b) If it is HDMI 1.4, 3840x2160@60Hz output is properly installed and activated. Select "ON" to 3840x2160@30Hz ASUS LCD Monitor MG24U Series 3-11 for HDMI (a) If it is too light or dark • Adjust the Contrast and Brightness settings via OSD. No sound ...graphics card. Screen image bounces or a wave • Make sure the signal cable is properly connected to pattern is properly connected to the monitor and the power outlet. • Check Power Indicator function in main menu OSD. 3.3 Troubleshooting (FAQ) Problem Possible Solution Power LED is ...
MG24UQ Series User Guide for English Edition
Page 28
... 3840x2160@30Hz 3840x2160@60Hz HDMI1.4 V V V V V V V V V V V X V V V V X V V V V V V V V V V V X HDMI2.0 V V V V V V V V V V V X V V V V X V V V V V V V V V V V V Display Port 1.2 V V X X X V X V X X V X V X X X X V X V V X X X V V X X V * HDMI and DisplayPort, some graphics cards only support up to 1920 x 1200 resolution content transmission via HDMI. ASUS LCD Monitor MG24U Series 3-13 Please check with your local distributor or retailer on the hardware limitations of your laptop or desktop.