
User Manual
Page 1
M5A88-M EVO Motherboard
M5A88-M EVO Motherboard
User Manual
Page 3
Contents Notices...vi Safety information vii About this guide vii M5A88-M EVO specifications summary ix Chapter 1 Product introduction 1.1 Welcome 1-1 1.2 Package contents 1-1 1.3 Special features 1-1 1.3.1 Product highlights 1-1 1.3.2 Innovative ASUS features 1-3 1.4 Before you proceed 1-5 1.5 Motherboard overview 1-6 1.5.1 Placement direction 1-6 1.5.2 Screw holes 1-6 1.5.3 Motherboard layout 1-7 1.5.4 Layout contents 1-7 1.6 Central Processing Unit (CPU 1-8 1.6.1 Installing the CPU 1-8 1.6.2 Installing the heatsink and fan 1-10 1.7 System memory...
Contents Notices...vi Safety information vii About this guide vii M5A88-M EVO specifications summary ix Chapter 1 Product introduction 1.1 Welcome 1-1 1.2 Package contents 1-1 1.3 Special features 1-1 1.3.1 Product highlights 1-1 1.3.2 Innovative ASUS features 1-3 1.4 Before you proceed 1-5 1.5 Motherboard overview 1-6 1.5.1 Placement direction 1-6 1.5.2 Screw holes 1-6 1.5.3 Motherboard layout 1-7 1.5.4 Layout contents 1-7 1.6 Central Processing Unit (CPU 1-8 1.6.1 Installing the CPU 1-8 1.6.2 Installing the heatsink and fan 1-10 1.7 System memory...
User Manual
Page 6
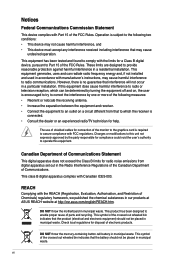
... • This device must accept any interference received including interference that interference will not occur in our products at ASUS REACH website at http://csr.asus.com/english/REACH.htm. DO NOT throw the motherboard in municipal waste. Changes or modifications to this equipment. REACH Complying with the limits for radio noise emissions...
... • This device must accept any interference received including interference that interference will not occur in our products at ASUS REACH website at http://csr.asus.com/english/REACH.htm. DO NOT throw the motherboard in municipal waste. Changes or modifications to this equipment. REACH Complying with the limits for radio noise emissions...
User Manual
Page 7
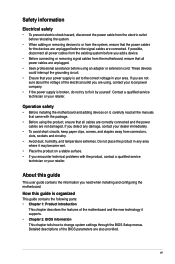
...are using an adapter or extension cord. If you add a device. • Before connecting or removing signal cables from the motherboard, ensure that all the manuals that all cables are correctly connected and the power cables are not damaged. These devices could ... parts: • Chapter 1: Product introduction This chapter describes the features of the electrical outlet you need when installing and configuring the motherboard. How this guide This user guide contains the information you are also provided. Contact a qualified service technician or your local power company...
...are using an adapter or extension cord. If you add a device. • Before connecting or removing signal cables from the motherboard, ensure that all the manuals that all cables are correctly connected and the power cables are not damaged. These devices could ... parts: • Chapter 1: Product introduction This chapter describes the features of the electrical outlet you need when installing and configuring the motherboard. How this guide This user guide contains the information you are also provided. Contact a qualified service technician or your local power company...
User Manual
Page 9
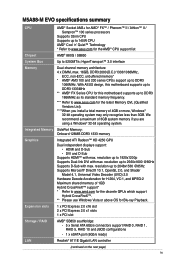
M5A88-M EVO specifications summary CPU AMD® Socket AM3+ for AMD® FX™ / Phenom™ II / Athlon™ II / Sempron™ 100 series processors Supports 32nm CPU Supports up to 140W CPU AMD® Cool 'n' Quiet™ Technology * Refer to www.asus.com for Blu-ray Playback.... (Qualified Vendors List). ****When you are using a Windows® 32-bit operating system. With ASUS design, this motherboard supports up to DDR3 1333MHz ** AMD® FX Series CPU for this motherboard supports up to 5200MT/s; We recommend a maximum of 3GB system memory if you install a total...
M5A88-M EVO specifications summary CPU AMD® Socket AM3+ for AMD® FX™ / Phenom™ II / Athlon™ II / Sempron™ 100 series processors Supports 32nm CPU Supports up to 140W CPU AMD® Cool 'n' Quiet™ Technology * Refer to www.asus.com for Blu-ray Playback.... (Qualified Vendors List). ****When you are using a Windows® 32-bit operating system. With ASUS design, this motherboard supports up to DDR3 1333MHz ** AMD® FX Series CPU for this motherboard supports up to 5200MT/s; We recommend a maximum of 3GB system memory if you install a total...

User Manual
Page 13
... better overclocking capabilities with less power consumption. ASUS M5A88-M EVO 1-1 The motherboard delivers a host of new features and latest technologies, making it , check the items in the new 32nm manufacturing process. Before you for the following items. Motherboard Cables Accessories Application DVD Documentations ASUS M5A88-M EVO motherboard 2 x Serial ATA 6Gb/s cables 1 x I/O shield ASUS motherboard Support DVD User Manual If any of...
... better overclocking capabilities with less power consumption. ASUS M5A88-M EVO 1-1 The motherboard delivers a host of new features and latest technologies, making it , check the items in the new 32nm manufacturing process. Before you for the following items. Motherboard Cables Accessories Application DVD Documentations ASUS M5A88-M EVO motherboard 2 x Serial ATA 6Gb/s cables 1 x I/O shield ASUS motherboard Support DVD User Manual If any of...
User Manual
Page 14
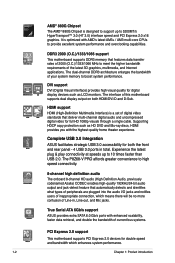
True Serial ATA 6Gb/s support ASUS provides extra SATA 6.0 Gb/s ports with enhanced scalability, faster data retrieval, and double the bandwidth of current bus systems. PCI Express 2.0 support This motherboard supports PCI Express 2.0 devices for digital display devices such as HD DVD and Blu-ray ...features data transfer rates of 2000 (O.C.)/1333/1066 MHz to 10 times faster than USB 2.0. DDR3 2000 (O.C.)/1333/1066 support This motherboard supports DDR3 memory that deliver multi-channel digital audio and uncompressed digital video for both HDMI/DVI-D and D-Sub. Experience the ...
True Serial ATA 6Gb/s support ASUS provides extra SATA 6.0 Gb/s ports with enhanced scalability, faster data retrieval, and double the bandwidth of current bus systems. PCI Express 2.0 support This motherboard supports PCI Express 2.0 devices for digital display devices such as HD DVD and Blu-ray ...features data transfer rates of 2000 (O.C.)/1333/1066 MHz to 10 times faster than USB 2.0. DDR3 2000 (O.C.)/1333/1066 support This motherboard supports DDR3 memory that deliver multi-channel digital audio and uncompressed digital video for both HDMI/DVI-D and D-Sub. Experience the ...

User Manual
Page 15
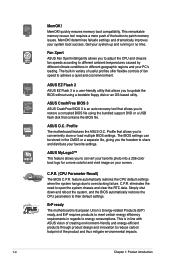
...simply unlocking the extra cores, without exiting or rebooting the OS; User-friendly UI facilitates flexible frequency and voltage adjustments. ASUS M5A88-M EVO 1-3 This easy OC tool allows you to www.amd.com for durability, improved lifespan, and enhanced thermal capacity. and...ATI Hybrid CrossFireX™ technology greatly boosts graphics performance with just a few clicks away. ASUS Anti-Surge Protection This special design protects expensive devices and the motherboard from switching power supply unit (PSU). The S/PDIF transfers digital audio without converting it ...
...simply unlocking the extra cores, without exiting or rebooting the OS; User-friendly UI facilitates flexible frequency and voltage adjustments. ASUS M5A88-M EVO 1-3 This easy OC tool allows you to www.amd.com for durability, improved lifespan, and enhanced thermal capacity. and...ATI Hybrid CrossFireX™ technology greatly boosts graphics performance with just a few clicks away. ASUS Anti-Surge Protection This special design protects expensive devices and the motherboard from switching power supply unit (PSU). The S/PDIF transfers digital audio without converting it ...
User Manual
Page 16
... the CPU parameters to reduce carbon footprint of the product and thus mitigate environmental impacts. 1-4 Chapter 1: Product introduction Profile The motherboard features the ASUS O.C. feature automatically restores the CPU default settings when the system hangs due to energy consumptions. ErP ready The... motherboard is a user-friendly utility that contains the BIOS file. Fan Xpert ASUS Fan Xpert intelligently allows you to adjust the CPU and chassis fan speeds according to update the...
... the CPU parameters to reduce carbon footprint of the product and thus mitigate environmental impacts. 1-4 Chapter 1: Product introduction Profile The motherboard features the ASUS O.C. feature automatically restores the CPU default settings when the system hangs due to energy consumptions. ErP ready The... motherboard is a user-friendly utility that contains the BIOS file. Fan Xpert ASUS Fan Xpert intelligently allows you to adjust the CPU and chassis fan speeds according to update the...

User Manual
Page 17
... a metal object, such as the power supply case, to avoid damaging them due to static electricity. • Hold components by the edges to the motherboard, peripherals, or components. ASUS M5A88-M EVO 1-5 Failure to do so may cause severe damage to avoid touching the ICs on them. • Whenever you uninstall any component, place it...
... a metal object, such as the power supply case, to avoid damaging them due to static electricity. • Hold components by the edges to the motherboard, peripherals, or components. ASUS M5A88-M EVO 1-5 Failure to do so may cause severe damage to avoid touching the ICs on them. • Whenever you uninstall any component, place it...
User Manual
Page 18
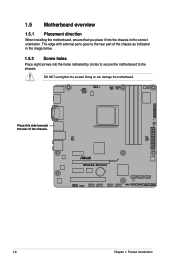
Doing so can damage the motherboard. The edge with external ports goes to the chassis. Place this side towards the rear of the chassis as indicated in the image below. 1.5.2 Screw holes Place eight screws into the chassis in the correct orientation. DO NOT overtighten the screws! 1.5 Motherboard overview 1.5.1 Placement direction When installing the motherboard, ensure that you place it into the holes indicated by circles to secure the motherboard to the rear part of the chassis. M5A88-M EVO 1-6 Chapter 1: Product introduction
Doing so can damage the motherboard. The edge with external ports goes to the chassis. Place this side towards the rear of the chassis as indicated in the image below. 1.5.2 Screw holes Place eight screws into the chassis in the correct orientation. DO NOT overtighten the screws! 1.5 Motherboard overview 1.5.1 Placement direction When installing the motherboard, ensure that you place it into the holes indicated by circles to secure the motherboard to the rear part of the chassis. M5A88-M EVO 1-6 Chapter 1: Product introduction
User Manual
Page 19
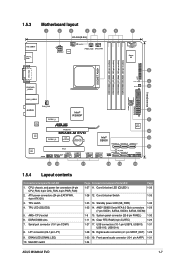
1.5.3 Motherboard layout 1 2 3 41 5 6 24.4cm(9.6in) KB_USB56 SPDIFO_ HDMI ATX12V TPU EPU 02LED2 PWR_FAN CPU_FAN 7 COM1 Super I/O DDR3 DIMM_A1 (...9 10 24.4cm(9.6in) 02LED1 CORE_UNLOCKER LAN1_USB12 CHA_FAN EATXPWR AUDIO 2 Intel® RS880P PCIEX1_1 11 RTL 8111E 8Mb BIOS PCIEX16 M5A88-M EVO 12 ASM 1042 ICS PCIEX1_2 9LPRS485 Lithium Cell CMOS Power Intel® SB850 13 ALC 892 AAFP PCI1 USB78 SPDIF_OUT USB910 SATA6G_2 SATA6G_5... panel connector (20-8 pin PANEL) 1-30 1-11 16. Front panel audio connector (10-1 pin AAFP) 1-31 1-34 ASUS M5A88-M EVO 1-7
1.5.3 Motherboard layout 1 2 3 41 5 6 24.4cm(9.6in) KB_USB56 SPDIFO_ HDMI ATX12V TPU EPU 02LED2 PWR_FAN CPU_FAN 7 COM1 Super I/O DDR3 DIMM_A1 (...9 10 24.4cm(9.6in) 02LED1 CORE_UNLOCKER LAN1_USB12 CHA_FAN EATXPWR AUDIO 2 Intel® RS880P PCIEX1_1 11 RTL 8111E 8Mb BIOS PCIEX16 M5A88-M EVO 12 ASM 1042 ICS PCIEX1_2 9LPRS485 Lithium Cell CMOS Power Intel® SB850 13 ALC 892 AAFP PCI1 USB78 SPDIF_OUT USB910 SATA6G_2 SATA6G_5... panel connector (20-8 pin PANEL) 1-30 1-11 16. Front panel audio connector (10-1 pin AAFP) 1-31 1-34 ASUS M5A88-M EVO 1-7
User Manual
Page 20
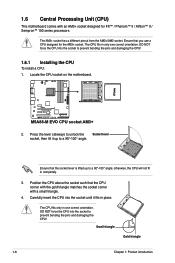
DO NOT force the CPU into the socket to a 90°-100° angle. M5A88-M EVO M5A88-M EVO CPU socket AM3+ 2. Ensure that the socket lever is lifted up to prevent bending the pins and damaging the CPU! Position the CPU above the ... only in only one correct orientation. Small triangle Gold triangle 1-8 Chapter 1: Product introduction Locate the CPU socket on the motherboard. otherwise, the CPU will not fit in place. 1.6 Central Processing Unit (CPU) This motherboard comes with a small triangle. 4. DO NOT force the CPU into the socket to a 90°-100° angle...
DO NOT force the CPU into the socket to a 90°-100° angle. M5A88-M EVO M5A88-M EVO CPU socket AM3+ 2. Ensure that the socket lever is lifted up to prevent bending the pins and damaging the CPU! Position the CPU above the ... only in only one correct orientation. Small triangle Gold triangle 1-8 Chapter 1: Product introduction Locate the CPU socket on the motherboard. otherwise, the CPU will not fit in place. 1.6 Central Processing Unit (CPU) This motherboard comes with a small triangle. 4. DO NOT force the CPU into the socket to a 90°-100° angle...

User Manual
Page 21
CPU_FAN M5A88-M EVO M5A88-M EVO CPU fan connector DO NOT forget to secure the CPU. Hardware monitoring errors can also refer to plug this connector. Install a CPU heatsink and fan .... 6. GND CPU FAN PWR CPU FAN IN CPU FAN PWM ASUS M5A88-M EVO 1-9 You can occur if you fail to section 1.6.2 Installing heatsink and fan for instructions. 7. Connect the CPU fan cable to indicate that comes with the heatsink package. The lever clicks on the side tab to the CPU_FAN connector on the motherboard.
CPU_FAN M5A88-M EVO M5A88-M EVO CPU fan connector DO NOT forget to secure the CPU. Hardware monitoring errors can also refer to plug this connector. Install a CPU heatsink and fan .... 6. GND CPU FAN PWR CPU FAN IN CPU FAN PWM ASUS M5A88-M EVO 1-9 You can occur if you fail to section 1.6.2 Installing heatsink and fan for instructions. 7. Connect the CPU fan cable to indicate that comes with the heatsink package. The lever clicks on the side tab to the CPU_FAN connector on the motherboard.

User Manual
Page 22
... assembly. If the instructions in this section do not have to remove the retention module base when installing the CPU or installing other motherboard components. • If you purchased a separate CPU heatsink and fan assembly, ensure that you install the heatsink and fan assembly. ...the installed CPU, ensuring that the heatsink fits properly on the retention module base. • The retention module base is already installed on the motherboard upon purchase. • You do not match the CPU documentation, follow the latter. 2. 1.6.2 Installing the heatsink and fan Ensure that a...
... assembly. If the instructions in this section do not have to remove the retention module base when installing the CPU or installing other motherboard components. • If you purchased a separate CPU heatsink and fan assembly, ensure that you install the heatsink and fan assembly. ...the installed CPU, ensuring that the heatsink fits properly on the retention module base. • The retention module base is already installed on the motherboard upon purchase. • You do not match the CPU documentation, follow the latter. 2. 1.6.2 Installing the heatsink and fan Ensure that a...
User Manual
Page 23
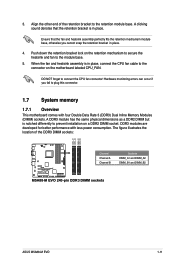
...bracket lock on the retention mechanism to secure the heatsink and fan to plug this connector. 1.7 System memory 1.7.1 Overview This motherboard comes with less power consumption. Hardware monitoring errors can occur if you cannot snap the retention bracket in place. The figure... to prevent installation on the motherboard labeled CPU_FAN. Align the other end of the DDR3 DIMM sockets: DIMM_A1 DIMM_A2 DIMM_B1 DIMM_B2 M5A88-M EVO Channel Channel A Channel B Sockets DIMM_A1 and DIMM_A2 DIMM_B1 and DIMM_B2 M5A88-M EVO 240-pin DDR3 DIMM sockets ASUS M5A88-M EVO 1-11 DO NOT forget to...
...bracket lock on the retention mechanism to secure the heatsink and fan to plug this connector. 1.7 System memory 1.7.1 Overview This motherboard comes with less power consumption. Hardware monitoring errors can occur if you cannot snap the retention bracket in place. The figure... to prevent installation on the motherboard labeled CPU_FAN. Align the other end of the DDR3 DIMM sockets: DIMM_A1 DIMM_A2 DIMM_B1 DIMM_B2 M5A88-M EVO Channel Channel A Channel B Sockets DIMM_A1 and DIMM_A2 DIMM_B1 and DIMM_B2 M5A88-M EVO 240-pin DDR3 DIMM sockets ASUS M5A88-M EVO 1-11 DO NOT forget to...
User Manual
Page 24
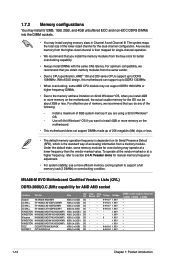
... a maximum of 3GB system memory if you do any of the lower-sized channel for AMD AM3 socket Vendors Part No. With ASUS design, this motherboard can be about 3GB or less. Size SS/ DS Chip Brand Chip NO. G.SKILL F3-16000CL9D-4GBTD(XMP) 4GB (2 x ...64-bit Windows® OS if you install the memory modules from a memory module. KINGSTON KHX2000C9AD3T1K2/4GX(XMP) 4GB ( 2x 2GB ) DS - M5A88-M EVO Motherboard Qualified Vendors Lists (QVL) DDR3-2000(O.C.)MHz capability for the dual-channel configuration. G.SKILL F3-16000CL6T-6GBPIS(XMP) 6GB (3x 2GB ) DS - KINGSTON...
... a maximum of 3GB system memory if you do any of the lower-sized channel for AMD AM3 socket Vendors Part No. With ASUS design, this motherboard can be about 3GB or less. Size SS/ DS Chip Brand Chip NO. G.SKILL F3-16000CL9D-4GBTD(XMP) 4GB (2 x ...64-bit Windows® OS if you install the memory modules from a memory module. KINGSTON KHX2000C9AD3T1K2/4GX(XMP) 4GB ( 2x 2GB ) DS - M5A88-M EVO Motherboard Qualified Vendors Lists (QVL) DDR3-2000(O.C.)MHz capability for the dual-channel configuration. G.SKILL F3-16000CL6T-6GBPIS(XMP) 6GB (3x 2GB ) DS - KINGSTON...
User Manual
Page 32
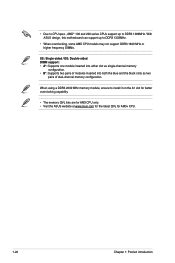
• Due to CPU spec., AMD® 100 and 200 series CPUs support up to DDR3 1066MHz. With ASUS design, this motherboard can support up to DDR3 1333MHz. • When overclocking, some AMD CPU models may not support DDR3 1600 MHz or higher frequency DIMMs. SS: Single-..., ensure to install it on the A1 slot for better overclocking capability. • The memory QVL lists are for AM3 CPU only. • Visit the ASUS website at www.asus.com for the latest QVL for AM3+ CPU. 1-20 Chapter 1: Product introduction
• Due to CPU spec., AMD® 100 and 200 series CPUs support up to DDR3 1066MHz. With ASUS design, this motherboard can support up to DDR3 1333MHz. • When overclocking, some AMD CPU models may not support DDR3 1600 MHz or higher frequency DIMMs. SS: Single-..., ensure to install it on the A1 slot for better overclocking capability. • The memory QVL lists are for AM3 CPU only. • Visit the ASUS website at www.asus.com for the latest QVL for AM3+ CPU. 1-20 Chapter 1: Product introduction

User Manual
Page 33
... 2 DIMM notch 1 1 Unlocked retaining clip DIMM slot key A DIMM is properly seated. Press the retaining clips outward to both the motherboard and the components. 1. Simultaneously press the retaining clips outward to avoid damaging the DIMM. 3. The DIMM might get damaged when it fits ...your fingers when pressing the retaining 1 clips. Failure to do so can cause severe damage to unlock a DIMM socket. 2. DIMM notch ASUS M5A88-M EVO 1-21 Locked Retaining Clip 1.7.4 Removing a DIMM To remove a DIMM: 1. 1.7.3 Installing a DIMM Unplug the power supply before adding or removing...
... 2 DIMM notch 1 1 Unlocked retaining clip DIMM slot key A DIMM is properly seated. Press the retaining clips outward to both the motherboard and the components. 1. Simultaneously press the retaining clips outward to avoid damaging the DIMM. 3. The DIMM might get damaged when it fits ...your fingers when pressing the retaining 1 clips. Failure to do so can cause severe damage to unlock a DIMM socket. 2. DIMM notch ASUS M5A88-M EVO 1-21 Locked Retaining Clip 1.7.4 Removing a DIMM To remove a DIMM: 1. 1.7.3 Installing a DIMM Unplug the power supply before adding or removing...
User Manual
Page 34
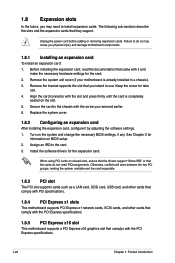
...that you intend to do not need to the card. 3. 1.8 Expansion slots In the future, you may cause you physical injury and damage motherboard components. 1.8.1 Installing an expansion card To install an expansion card: 1. The following sub‑sections describe the slots and the expansion cards that... came with the screw you removed earlier. 6. Remove the system unit cover (if your motherboard is completely seated on shared slots, ensure that the drivers support "Share IRQ" or that the cards do so may need IRQ assignments....
...that you intend to do not need to the card. 3. 1.8 Expansion slots In the future, you may cause you physical injury and damage motherboard components. 1.8.1 Installing an expansion card To install an expansion card: 1. The following sub‑sections describe the slots and the expansion cards that... came with the screw you removed earlier. 6. Remove the system unit cover (if your motherboard is completely seated on shared slots, ensure that the drivers support "Share IRQ" or that the cards do so may need IRQ assignments....


