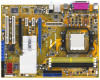
M2N4-SLI English Edition User's Manual
Page 6
Contents 5.4.1 Installing hard disks 5-17 5.4.2 NVIDIA® RAID configurations 5-18 5.5 Creating a RAID driver disk 5-25 Chapter 6: NVIDIA® SLI™ technology support 6.1 Overview 6-1 Requirements 6-1 6.2 Dual graphics card setup 6-2 6.2.1 Installing SLI-ready graphics cards 6-2 6.2.2 Installing the device drivers 6-5 6.2.3 Enabling the multi-GPU feature in Windows 6-5 vi
M2N4-SLI English Edition User's Manual
Page 7
... harmful interference to radio communications. The use of Communications. Notices Federal Communications Commission Statement This device complies with Part 15 of the monitor to the graphics card is required to assure compliance with FCC regulations. This equipment generates, uses and can be determined by turning the equipment off and on, the user...
M2N4-SLI English Edition User's Manual
Page 9
... CD that you need when installing and configuring the motherboard. How this guide This user guide contains the information you have to install SLI-ready PCI Express graphics cards. It includes description of the switches, jumpers, and connectors on the motherboard. • Chapter 3: Powering up This chapter describes the.... • Chapter 2: Hardware information This chapter lists the hardware setup procedures that comes with the motherboard package. • Chapter 6: NVIDIA® SLI™ technology support This chapter tells how to perform when installing system components.
M2N4-SLI English Edition User's Manual
Page 11
...10 USB 2.0/1.1 ports (six at mid-board, four on the next page) xi M2N4-SLI specifications summary CPU Chipset System bus Memory Expansion slots Scalable Link Interface (SLI™) Storage LAN Audio USB 2.0 ASUS Exclusive Overclocking features Socket AM2 for up to four Ultra DMA 133/100/66/33 ...MHz at x8 mode) 2 x PCI Express™ x1 slots 2 x PCI 2.2 slots Supports two identical NVIDIA® SLI™-ready graphics card ASUS two-slot thermal design NVIDIA® nForce® 4 SLI™ MCP supports: - 2 x IDE connector for AMD Athlon™ 64 FX/AMD Athlon™ 64 X2 /AMD...
M2N4-SLI English Edition User's Manual
Page 18
... This utility saves users the cost and hassle of connecting the system panel cables one at a time and avoiding wrong cable connections. ASUS EZ Flash 2 EZ Flash 2 is designed with customizable boot logos. 1- Chapter 1: Product introduction Simply press the predefined hotkey to your...user-friendly BIOS update utility. Update your system with two PCI Express x1 slots placed between the two PCI Express x16 graphics cards. ASUS Q-Fan 2 technology The ASUS Q-Fan technology smartly adjusts the CPU and chassis fan speeds according to the system loading to restore corrupted BIOS data ...
M2N4-SLI English Edition User's Manual
Page 38
... PCI Express x16 configurations Mode Non-SLI mode Dual graphics card in SLI Mode PCIEX16_1 (Blue) slot PCIE16_2 (Black) slot Card type Speed Card type Speed PCIe x16 graphics card x16 NA PCIe x16 graphics card x8 PCIe x16 graphics card x8 PCIe x16 graphics card x8 Other PCIe devices x8, x4, x1 Two identical NVIDIA® SLI™ Edition graphics cards at x8 speed. • Connect...
M2N4-SLI English Edition User's Manual
Page 45
right angle side ASUS M2N4-SLI 2-25 The RAID function of the SATA cable to the onboard SATA port to [Disabled] by default. Serial...cables for details. See section "4.4.7 Onboard Device Configuration" for Serial ATA 3.0 Gb/s hard disk and optical disk drives. M2N4-SLI R M2N4-SLI SATA Connectors SATA1 SATA2 SATA3 SATA4 GND RSATA_RXN1 RSATA_RXP1 GND RSATA_TXN1 RSATA_TXP1 GND GND RSATA_RXN2 RSATA_RXP2 GND RSATA_TXN2 RSATA_TXP2 GND GND RSATA_RXN3... Gb/s specification. 3. The Serial ATA 3.0 Gb/s is set using these connectors is backward compatible with huge graphics cards.
M2N4-SLI English Edition User's Manual
Page 88
... -/+: Change Value Enter: Select Sub-menu F5: Setup Defaults F10: Save and Exit AI-Selector[Auto] Allows selection of SLI EZ Selector Card. Configuration: [Auto] [Single Video Card] [Dual Video Card] ASUS M2N4-SLI 4-31 When set to Normal when using single PCI-E graphic cardpluged. Set to Auto, BIOS detects the setting of the Scalable Link Interface mode.
M2N4-SLI English Edition User's Manual
Page 131
NVIDIA S6LI™ This chapter tells how to install SLI‑ready PCI Express graphics cards. ® technology support
M2N4-SLI English Edition User's Manual
Page 132
Chapter summary 6.1 Overview 6-1 6.2 Dual graphics cards setup 6-2 ASUS M2N4-SLI
M2N4-SLI English Edition User's Manual
Page 133
...ASUS M2N4-SLI 6- Requirements • You should have two identical SLI-ready graphics cards that your system. See "8. Download the latest driver from the NVIDIA website (www.nvidia.com). • Make sure that allows you to install two identical PCI Express™ x16 graphics cards. ATX power connectors" on page 2-26 for details. • The NVIDIA SLI... • Visit the ASUS website (www.asus.com) for a list of qualified SLI‑ready graphics cards for the latest certified graphics card list. 6.1 Overview The motherboard supports the NVIDIA® SLI™ (Scalable Link ...
M2N4-SLI English Edition User's Manual
Page 134
6.2 6.2.1 Dual graphics card setup Installing SLI-ready graphics cards Install only identical SLI-ready graphics cards that are ASUS and NVIDIA® certified. Each graphics card should have goldfingers for the SLI connector. Remove the metal bracket covers opposite the two PCI Express x16 slots. 6- Chapter 6: NVIDIA® SLI™ technology support To install the graphics cards: 1. Prepare two graphics cards. Goldfingers 2. Different types of graphics cards will not work together properly.
M2N4-SLI English Edition User's Manual
Page 135
Make sure that the card is properly seated on the slot. ASUS M2N4-SLI 6- If required, connect an auxiliary power source to the PCI Express graphics cards. Insert one graphics card into the black slot labeled PCIEX16_2. Make sure that the card is properly seated on the slot. 4. Insert the second graphics card into the blue slot labeled PCIEX16_1. 3.
M2N4-SLI English Edition User's Manual
Page 136
...in place. ASUS EZ Plug™ The onboard red warning LED lights up if you do not plug a 4-pin ATX power cable to the goldfingers on each graphics card. If using a 20-pin ATX power connector, connect a 4-pin ATX power cable to the graphics card installed on ...your motherboard. Connect a VGA cable or a DVI-I cable to the EZ Plug™ labeled EZ_PLUG on the blue PCI Express slot. 6- Chapter 6: NVIDIA® SLI™ technology support SLI flexible cable connector 6. 5. Align and insert the SLI flexible cable connector to ...
M2N4-SLI English Edition User's Manual
Page 137
...-GPU feature in the NVIDIA nView properties. From the nView Desktop Manager window, select the Desktop Management tab. 4. ASUS M2N4-SLI 6- Click the NVIDIA Settings icon on your graphics cards and the device drivers, enable the Multi‑Graphics Processing Unit (GPU) feature in Windows After installing your Windows taskbar. 2. Make sure that came with your...