
User Manual
Page 28
...is used to enter the BIOS Setup. If the POST discovers a difference between the record and the existing hardware, it will display a message on the screen when you turn ON the Notebook PC, it will first run the BIOS Setup to set or modify the system configuration, press [F2] upon bootup... record should be correct when you to boot from your Notebook PC before turning it ON. Press [ESC] and you press [Tab] during the splash screen, standard boot information such as a carrying bag. To protect the hard disk drive, always wait at least 5 seconds after turning OFF your available drives. ...
...is used to enter the BIOS Setup. If the POST discovers a difference between the record and the existing hardware, it will display a message on the screen when you turn ON the Notebook PC, it will first run the BIOS Setup to set or modify the system configuration, press [F2] upon bootup... record should be correct when you to boot from your Notebook PC before turning it ON. Press [ESC] and you press [Tab] during the splash screen, standard boot information such as a carrying bag. To protect the hard disk drive, always wait at least 5 seconds after turning OFF your available drives. ...

User Manual
Page 30
... (Windows default uses STR). A fully-charged battery pack provides the Notebook PC a few hours of power and will be warned when battery power is depleted. Screen captures shown here are examples only and may not reflect what you use the power saving features, your system. Right-click the battery icon Pointer...
... (Windows default uses STR). A fully-charged battery pack provides the Notebook PC a few hours of power and will be warned when battery power is depleted. Screen captures shown here are examples only and may not reflect what you use the power saving features, your system. Right-click the battery icon Pointer...
User Manual
Page 36
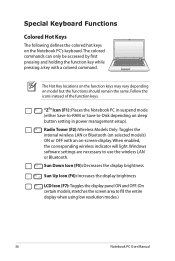
... Tower (F2): Wireless Models Only:Toggles the internal wireless LAN or Bluetooth (on selected models) ON or OFF with a colored command. stretches the screen area to use the wireless LAN or Bluetooth. Follow the icons instead of the function keys. Windows software settings are necessary to fill the entire...Notebook PC User Manual "ZZ" Icon (F1): Places the Notebook PC in suspend mode (either Save-to-RAM or Save-to-Disk depending on -screen-display. Sun Down Icon (F5): Decreases the display brightness Sun Up Icon (F6): Increases the display brightness LCD Icon (F7): Toggles the display panel...
... Tower (F2): Wireless Models Only:Toggles the internal wireless LAN or Bluetooth (on selected models) ON or OFF with a colored command. stretches the screen area to use the wireless LAN or Bluetooth. Follow the icons instead of the function keys. Windows software settings are necessary to fill the entire...Notebook PC User Manual "ZZ" Icon (F1): Places the Notebook PC in suspend mode (either Save-to-RAM or Save-to-Disk depending on -screen-display. Sun Down Icon (F5): Decreases the display brightness Sun Up Icon (F6): Increases the display brightness LCD Icon (F7): Toggles the display panel...

User Manual
Page 38
.... Power4Gear Hybrid (Fn+Space Bar): This key toggles power savings between AC mode and battery mode.You can see the current mode through the on-screen display (OSD). The other key, that looks like a Windows menu with the Windows Logo activates the Start menu located at the bottom left of the...
.... Power4Gear Hybrid (Fn+Space Bar): This key toggles power savings between AC mode and battery mode.You can see the current mode through the on-screen display (OSD). The other key, that looks like a Windows menu with the Windows Logo activates the Start menu located at the bottom left of the...

User Manual
Page 70
...[P0: Hitachi HTS545...] [P1: HL-DT-ST BDDVD.] Hard Drive BBS Priorities CD/DVD ROM Drive BBS Priorities Delete Boot Option : Select Screen : Select Item Enter: Select +/-: Change Opt. Boot Option Priorities Boot Option #1 Boot Option #2 [P0: Hitachi HTS545...] [P1: HL...Priorities CD/DVD ROM Drive BBS Priorities Delete Boot Option Boot Option #1 P0: Hitachi HTS545050B9A300 P1: HL-DT-ST BDDVDRW CT10N Disabled : Select Screen : Select Item Enter: Select +/-: Change Opt. Copyright (C) 2008 American Megatrends, Inc. A-4 Notebook PC User Manual Copyright (C) 2008 American ...
...[P0: Hitachi HTS545...] [P1: HL-DT-ST BDDVD.] Hard Drive BBS Priorities CD/DVD ROM Drive BBS Priorities Delete Boot Option : Select Screen : Select Item Enter: Select +/-: Change Opt. Boot Option Priorities Boot Option #1 Boot Option #2 [P0: Hitachi HTS545...] [P1: HL...Priorities CD/DVD ROM Drive BBS Priorities Delete Boot Option Boot Option #1 P0: Hitachi HTS545050B9A300 P1: HL-DT-ST BDDVDRW CT10N Disabled : Select Screen : Select Item Enter: Select +/-: Change Opt. Copyright (C) 2008 American Megatrends, Inc. A-4 Notebook PC User Manual Copyright (C) 2008 American ...
User Manual
Page 71
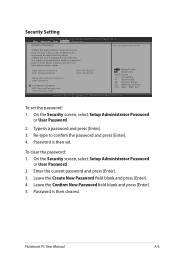
... Password Status NOT INSTALLED NOT INSTALLED Setup administrator password User Password I/O Interface Security HDD Security Configuration: HDD 0:Hitachi HTS5 : Select Screen : Select Item Enter: Select +/-: Change Opt. Leave the Confirm New Password field blank and press [Enter]. 5. Copyright (C) ...65533;��B�o��o�t Security Save & Exit Password Description Set the system boot order. On the Security screen, select Setup Administrator Password or User Password. 2. Security Setting Aptio Setup Utility - If ONLY the Administrator's password is ...
... Password Status NOT INSTALLED NOT INSTALLED Setup administrator password User Password I/O Interface Security HDD Security Configuration: HDD 0:Hitachi HTS5 : Select Screen : Select Item Enter: Select +/-: Change Opt. Leave the Confirm New Password field blank and press [Enter]. 5. Copyright (C) ...65533;��B�o��o�t Security Save & Exit Password Description Set the system boot order. On the Security screen, select Setup Administrator Password or User Password. 2. Security Setting Aptio Setup Utility - If ONLY the Administrator's password is ...

User Manual
Page 72
... Options Save Changes Discard Changes Restore Defaults Boot Override P0: Hitachi HTS545050B9A300 P1: HL-DT-ST BDDVDRW CT10N Launch EFI Shell from filesystem device : Select Screen : Select Item Enter: Select +/-: Change Opt. A-6 Notebook PC User Manual You must save changes to restore default settings, choose Restore Defaults. F1: General Help F2...
... Options Save Changes Discard Changes Restore Defaults Boot Override P0: Hitachi HTS545050B9A300 P1: HL-DT-ST BDDVDRW CT10N Launch EFI Shell from filesystem device : Select Screen : Select Item Enter: Select +/-: Change Opt. A-6 Notebook PC User Manual You must save changes to restore default settings, choose Restore Defaults. F1: General Help F2...
User Manual
Page 76
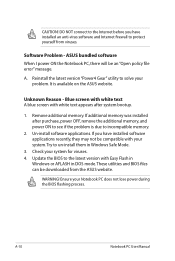
... white text A blue screen with your Notebook PC does not lose power during the BIOS flashing process. If you have installed software applications recently, they may not be compatible ... Easy Flash in Windows or AFLASH in Windows Safe Mode. 3. Check your problem. Update the BIOS to see if the problem is available on the ASUS website. These utilities and BIOS files can be an "Open policy file error" message. A. It is due to protect yourself from the...
... white text A blue screen with your Notebook PC does not lose power during the BIOS flashing process. If you have installed software applications recently, they may not be compatible ... Easy Flash in Windows or AFLASH in Windows Safe Mode. 3. Check your problem. Update the BIOS to see if the problem is available on the ASUS website. These utilities and BIOS files can be an "Open policy file error" message. A. It is due to protect yourself from the...
User Manual
Page 78
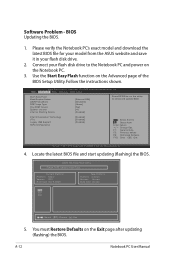
...Manual Connect your flash disk drive. 2. Intel Virtualization Technology VT-d Legacy USB Support SATA Configuration [Enabled] [Enabled] [Enabled] : Select Screen : Select Item Enter: Select +/-: Change Opt. Copyright (C) 2008 American Megatrends, Inc. 4. Software Problem - You must Restore Defaults on...Inc. �M���a��i�n� Advanced Boot Security Save & Exit Start Easy Flash Boot Graphic Select ASUS FancyStart POST Logo Type Play POST Sound Speaker Volume Internal Pointing Device [External VGA] [Disabled] [Static] [No] [4] [...
...Manual Connect your flash disk drive. 2. Intel Virtualization Technology VT-d Legacy USB Support SATA Configuration [Enabled] [Enabled] [Enabled] : Select Screen : Select Item Enter: Select +/-: Change Opt. Copyright (C) 2008 American Megatrends, Inc. 4. Software Problem - You must Restore Defaults on...Inc. �M���a��i�n� Advanced Boot Security Save & Exit Start Easy Flash Boot Graphic Select ASUS FancyStart POST Logo Type Play POST Sound Speaker Volume Internal Pointing Device [External VGA] [Disabled] [Static] [No] [4] [...

User Manual
Page 80
...secondary hard disk drive: For models installed two hard disk drives, you have Administrator rights. On the Security screen, select I /O Interface Security HDD Security Configuration: HDD 0:Hitachi HTS5 : Select Screen : Select Item Enter: Select +/-: Change Opt. Copyright (C) 2008 American Megatrends, Inc. �M�a�...boot or enter Setup. If ONLY the Administrator's password is only asked for updated drivers and utilities. Visit the ASUS website at www.asus.com for when entering Setup. In Setup, the User will have to lock the secondary hard disk drive before performing...
...secondary hard disk drive: For models installed two hard disk drives, you have Administrator rights. On the Security screen, select I /O Interface Security HDD Security Configuration: HDD 0:Hitachi HTS5 : Select Screen : Select Item Enter: Select +/-: Change Opt. Copyright (C) 2008 American Megatrends, Inc. �M�a�...boot or enter Setup. If ONLY the Administrator's password is only asked for updated drivers and utilities. Visit the ASUS website at www.asus.com for when entering Setup. In Setup, the User will have to lock the secondary hard disk drive before performing...

User Manual
Page 81
... ODD Interface USB Interface Security [Unlock] [Unlock] [Unlock] [Unlock] [Unlock] SATA 2nd HDD Interface Lock Unlcok If Locked, 2nd SATA HDD will be disabled. : Select Screen : Select Item Enter: Select +/-: Change Opt. Press [F10] to Lock. Prepare enough blank writable DVDs as instructed to Microsoft, you may lose important data because...
... ODD Interface USB Interface Security [Unlock] [Unlock] [Unlock] [Unlock] [Unlock] SATA 2nd HDD Interface Lock Unlcok If Locked, 2nd SATA HDD will be disabled. : Select Screen : Select Item Enter: Select +/-: Change Opt. Press [F10] to Lock. Prepare enough blank writable DVDs as instructed to Microsoft, you may lose important data because...

User Manual
Page 95
... must use approved power cords greater than or equal to CATV System Installer-Cable distribution system should include bonding the screen of the coaxial cable to the earth at http://csr.asus.com/english/REACH.htm. Notebook PC User Manual A-29 installation should be grounded (earthed) in accordance with ANSI/NFPA 70... Code (NEC), in particular Section 820.93, Grounding of Outer Conductive Shield of Chemicals) regulatory framework, we publish the chemical substances in our products at ASUS REACH website at the building entrance.
... must use approved power cords greater than or equal to CATV System Installer-Cable distribution system should include bonding the screen of the coaxial cable to the earth at http://csr.asus.com/english/REACH.htm. Notebook PC User Manual A-29 installation should be grounded (earthed) in accordance with ANSI/NFPA 70... Code (NEC), in particular Section 820.93, Grounding of Outer Conductive Shield of Chemicals) regulatory framework, we publish the chemical substances in our products at ASUS REACH website at the building entrance.


