User Manual
Page 7
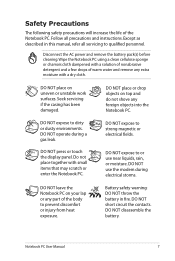
... and remove any extra moisture with a dry cloth. DO NOT expose to or use the modem during a gas leak. DO NOT press or touch the display panel. Disconnect the AC power and remove the battery pack(s) before cleaning. Do not place together with a solution of nonabrasive detergent and a few drops of...
... and remove any extra moisture with a dry cloth. DO NOT expose to or use the modem during a gas leak. DO NOT press or touch the display panel. Disconnect the AC power and remove the battery pack(s) before cleaning. Do not place together with a solution of nonabrasive detergent and a few drops of...

User Manual
Page 10
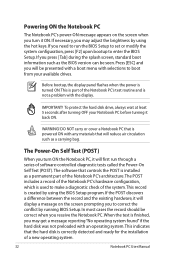
Carefully lift up the display panel with your thumb. 2. Push and release the power button located beneath the LCD display panel. 2. Slowly tilt the display panel forward or backward to adjust the LCD brightness. 10 Notebook PC User Manual Turning on the Power 1. Opening the LCD display panel 1. Use [Fn]+[F5] or [Fn]+[F6] to a comfortable viewing angle.
Carefully lift up the display panel with your thumb. 2. Push and release the power button located beneath the LCD display panel. 2. Slowly tilt the display panel forward or backward to adjust the LCD brightness. 10 Notebook PC User Manual Turning on the Power 1. Opening the LCD display panel 1. Use [Fn]+[F5] or [Fn]+[F6] to a comfortable viewing angle.

User Manual
Page 15
... viewing like that of desktop monitors. Use the switch once to turn OFF the Notebook PC. The power switch only works when the display panel is easier on the eyes. 1 Camera The built-in use plain water if necessary) to turn ON and once to clean the... liquids (use . 3 Microphone (Built-in) The built-in mono microphone can be used for video conferencing, voice narrations, or simple audio recordings. 4 Display Panel The display panel functions the same as a desktop monitor. Notebook PC User Manual 15 Unlike desktop monitors, the LCD panel does not produce any radiation or...
... viewing like that of desktop monitors. Use the switch once to turn OFF the Notebook PC. The power switch only works when the display panel is easier on the eyes. 1 Camera The built-in use plain water if necessary) to turn ON and once to clean the... liquids (use . 3 Microphone (Built-in) The built-in mono microphone can be used for video conferencing, voice narrations, or simple audio recordings. 4 Display Panel The display panel functions the same as a desktop monitor. Notebook PC User Manual 15 Unlike desktop monitors, the LCD panel does not produce any radiation or...

User Manual
Page 23
...) is an uncompressed all ATSC HDTV standards and supports 8-channel digital audio, with bandwidth to spare to accommodate future enhancements or requirements. 12 Display (Monitor) Output The 15-pin D-sub monitor port supports a standard VGA-compatible device such as a digital television (DTV). These security products... removed from a fixed object. Supports standard, enhanced, or high-definition video, plus multi-channel digital audio on a larger external display. 13 Kensington® Lock Port The Kensington® lock port allows the Notebook PC to sound an alarm when moved.
...) is an uncompressed all ATSC HDTV standards and supports 8-channel digital audio, with bandwidth to spare to accommodate future enhancements or requirements. 12 Display (Monitor) Output The 15-pin D-sub monitor port supports a standard VGA-compatible device such as a digital television (DTV). These security products... removed from a fixed object. Supports standard, enhanced, or high-definition video, plus multi-channel digital audio on a larger external display. 13 Kensington® Lock Port The Kensington® lock port allows the Notebook PC to sound an alarm when moved.

User Manual
Page 24
Ensure that paper, books, clothing, cables, or other objects do not block any of the air vents or else overheating may occur. 3 Display (Monitor) Output 4 HDMI HDMI Port 24 Notebook PC User Manual Left Side 14" model 1 2 15.6"/16" model 1 2 17.3" model HDMI 3 4 5 6 HDMI 3 4 5 76 2 85 9 10 11 12 1 Kensington® Lock Port 2 Air Vents The air vents allow cool air to enter and warm air to exit the Notebook PC.
Ensure that paper, books, clothing, cables, or other objects do not block any of the air vents or else overheating may occur. 3 Display (Monitor) Output 4 HDMI HDMI Port 24 Notebook PC User Manual Left Side 14" model 1 2 15.6"/16" model 1 2 17.3" model HDMI 3 4 5 6 HDMI 3 4 5 76 2 85 9 10 11 12 1 Kensington® Lock Port 2 Air Vents The air vents allow cool air to enter and warm air to exit the Notebook PC.
User Manual
Page 32
...installation of the Notebook PC's test routine and is finished, you may adjust the brightness by using the BIOS Setup program. Before bootup, the display panel flashes when the power is turned ON.This is part of a new operating system. 32 Notebook PC User Manual To protect the hard ...record should be seen. If necessary, you may get a message reporting "No operating system found" if the hard disk was not preloaded with the display. When the test is not a problem with an operating system. Powering ON the Notebook PC The Notebook PC's power-ON message appears on the screen...
...installation of the Notebook PC's test routine and is finished, you may adjust the brightness by using the BIOS Setup program. Before bootup, the display panel flashes when the power is turned ON.This is part of a new operating system. 32 Notebook PC User Manual To protect the hard ...record should be seen. If necessary, you may get a message reporting "No operating system found" if the hard disk was not preloaded with the display. When the test is not a problem with an operating system. Powering ON the Notebook PC The Notebook PC's power-ON message appears on the screen...
User Manual
Page 34
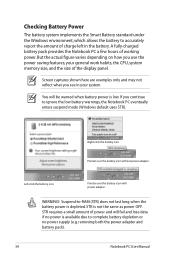
... Battery Power The battery system implements the Smart Battery standard under the Windows environment, which allows the battery to accurately report the amount of the display panel.
... Battery Power The battery system implements the Smart Battery standard under the Windows environment, which allows the battery to accurately report the amount of the display panel.
User Manual
Page 38
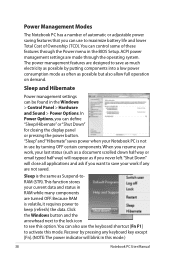
... when your current data and status in this mode. Sleep and Hibernate Power management settings can define "Sleep/Hibernate" or "Shut Down" for closing the display panel or pressing the power button. This function stores your Notebook PC is not in the Windows > Control Panel > Hardware and Sound > Power Options...
... when your current data and status in this mode. Sleep and Hibernate Power management settings can define "Sleep/Hibernate" or "Shut Down" for closing the display panel or pressing the power button. This function stores your Notebook PC is not in the Windows > Control Panel > Hardware and Sound > Power Options...
User Manual
Page 40
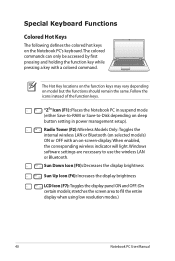
...an on model but the functions should remain the same. The Hot Key locations on the function keys may vary depending on -screen-display. When enabled, the corresponding wireless indicator will light. Windows software settings are necessary to use the wireless LAN or Bluetooth. Follow the... icons instead of the function keys. Sun Down Icon (F5): Decreases the display brightness Sun Up Icon (F6): Increases the display brightness LCD Icon (F7): Toggles the display panel ON and OFF. (On certain models; Special Keyboard Functions Colored Hot Keys The following ...
...an on model but the functions should remain the same. The Hot Key locations on the function keys may vary depending on -screen-display. When enabled, the corresponding wireless indicator will light. Windows software settings are necessary to use the wireless LAN or Bluetooth. Follow the... icons instead of the function keys. Sun Down Icon (F5): Decreases the display brightness Sun Up Icon (F6): Increases the display brightness LCD Icon (F7): Toggles the display panel ON and OFF. (On certain models; Special Keyboard Functions Colored Hot Keys The following ...
User Manual
Page 41
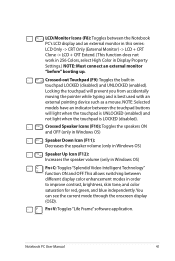
... Icon (F12): Increases the speaker volume (only in touchpad LOCKED (disabled) and UNLOCKED (enabled). LCD/Monitor Icons (F8): Toggles between different display color enhancement modes in order to improve contrast, brightness, skin tone, and color saturation for red, green, and blue independently. Locking the touchpad...and not light when the touchpad is best used with an external pointing device such as a mouse. This allows switching between the Notebook PC's LCD display and an external monitor in this series: LCD Only -> CRT Only (External Monitor) -> LCD + CRT Clone -> LCD + CRT Extend. (...
... Icon (F12): Increases the speaker volume (only in touchpad LOCKED (disabled) and UNLOCKED (enabled). LCD/Monitor Icons (F8): Toggles between different display color enhancement modes in order to improve contrast, brightness, skin tone, and color saturation for red, green, and blue independently. Locking the touchpad...and not light when the touchpad is best used with an external pointing device such as a mouse. This allows switching between the Notebook PC's LCD display and an external monitor in this series: LCD Only -> CRT Only (External Monitor) -> LCD + CRT Clone -> LCD + CRT Extend. (...
User Manual
Page 42
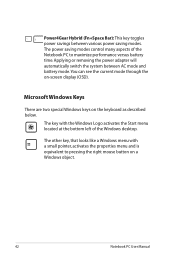
... Hybrid (Fn+Space Bar): This key toggles power savings between AC mode and battery mode.You can see the current mode through the on-screen display (OSD). Applying or removing the power adapter will automatically switch the system between various power saving modes. The key with a small pointer, activates the properties...
... Hybrid (Fn+Space Bar): This key toggles power savings between AC mode and battery mode.You can see the current mode through the on-screen display (OSD). Applying or removing the power adapter will automatically switch the system between various power saving modes. The key with a small pointer, activates the properties...
User Manual
Page 53
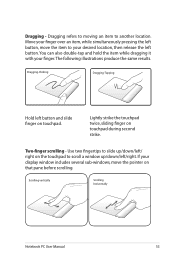
If your finger over an item, while simultaneously pressing the left button, move the pointer on touchpad. Move your display window includes several sub-windows, move the item to scroll a window up /down/left button. Dragging-Clicking Dragging-Tapping Hold left /right. You can also ...
If your finger over an item, while simultaneously pressing the left button, move the pointer on touchpad. Move your display window includes several sub-windows, move the item to scroll a window up /down/left button. Dragging-Clicking Dragging-Tapping Hold left /right. You can also ...


