Motherboard Pin Definition.English
Page 4
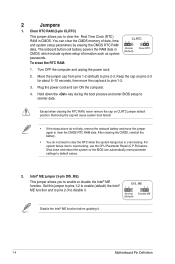
.... DIS_ME 12 23 Normal (Default) Disable ME Disable the Intel® ME function before updating it . Turn OFF the computer and unplug the power cord. 2. Hold down and reboot the system so the BIOS can clear the CMOS memory of date, time, and system setup parameters by erasing the ...10 seconds, then move the jumper again to overclocking, use the CPU Parameter Recall (C.P.R) feature. Shut down the key during the boot process and enter BIOS setup to default values. 2. The onboard button cell battery powers the RAM data in CMOS. Move the jumper cap from pins 1-2 (default) to ...
.... DIS_ME 12 23 Normal (Default) Disable ME Disable the Intel® ME function before updating it . Turn OFF the computer and unplug the power cord. 2. Hold down and reboot the system so the BIOS can clear the CMOS memory of date, time, and system setup parameters by erasing the ...10 seconds, then move the jumper again to overclocking, use the CPU Parameter Recall (C.P.R) feature. Shut down the key during the boot process and enter BIOS setup to default values. 2. The onboard button cell battery powers the RAM data in CMOS. Move the jumper cap from pins 1-2 (default) to ...

Motherboard Pin Definition.English
Page 16
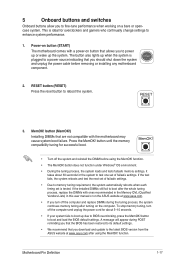
... drive connected to indicate that the system is a reminder that displays the system status. 1-16 Motherboard Pin Definition SB_PWR ON OFF Standby Power Powered Off 2. USB BIOS Flashback LED (FLBK_LED) This LED flashes when you should shut down the system and unplug the power cable before removing or plugging in sequence during... the root problem within seconds. 4. It blinks when data is solved. Standby Power LED The motherboard comes with a 2-digit error code that you press the BIOS Flashback button for BIOS update. 6.
... drive connected to indicate that the system is a reminder that displays the system status. 1-16 Motherboard Pin Definition SB_PWR ON OFF Standby Power Powered Off 2. USB BIOS Flashback LED (FLBK_LED) This LED flashes when you should shut down the system and unplug the power cable before removing or plugging in sequence during... the root problem within seconds. 4. It blinks when data is solved. Standby Power LED The motherboard comes with a 2-digit error code that you press the BIOS Flashback button for BIOS update. 6.
Motherboard Pin Definition.English
Page 17
.... 2. The button also lights up due to enhance system performance. 1. RESET button (RESET) Press the reset button to boot and load the BIOS default settings. button until the memory compatibility tuning for successful boot. • Turn off the computer and unplug the power cord for about 30...turn off the computer and replace DIMMs during POST reminding you that the BIOS has been restored to its default settings. • We recommend that you download and update to the latest BIOS version from the ASUS website at www.asus.com. • If you to fine-tune performance when working on...
.... 2. The button also lights up due to enhance system performance. 1. RESET button (RESET) Press the reset button to boot and load the BIOS default settings. button until the memory compatibility tuning for successful boot. • Turn off the computer and unplug the power cord for about 30...turn off the computer and replace DIMMs during POST reminding you that the BIOS has been restored to its default settings. • We recommend that you download and update to the latest BIOS version from the ASUS website at www.asus.com. • If you to fine-tune performance when working on...
Intel 100 Series Ai Suite3 ManualEnglish
Page 14
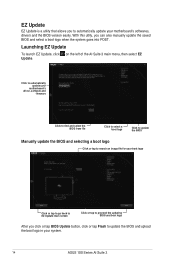
... that allows you to automatically update your system. 14 ASUS 100 Series AI Suite 3 Click to automatically update your motherboard's driver, software and firmware Click to find and select the BIOS from file Click to select a boot logo Click to update the BIOS Manually update the BIOS and selecting a boot logo..., drivers and the BIOS version easily. Launching EZ Update To launch EZ Update, click on the left of the AI Suite 3 main menu, then select EZ Update. With this utlity, you click or tap BIOS Update button, click or tap Flash to proceed the updating BIOS and boot logo After...
... that allows you to automatically update your system. 14 ASUS 100 Series AI Suite 3 Click to automatically update your motherboard's driver, software and firmware Click to find and select the BIOS from file Click to select a boot logo Click to update the BIOS Manually update the BIOS and selecting a boot logo..., drivers and the BIOS version easily. Launching EZ Update To launch EZ Update, click on the left of the AI Suite 3 main menu, then select EZ Update. With this utlity, you click or tap BIOS Update button, click or tap Flash to proceed the updating BIOS and boot logo After...

BIOSUpdateE-Manual English
Page 1
Motherboard BIOS Update and Management
Motherboard BIOS Update and Management
BIOSUpdateE-Manual English
Page 2
...IMPLIED, INCLUDING BUT NOT LIMITED TO THE IMPLIED WARRANTIES OR CONDITIONS OF MERCHANTABILITY OR FITNESS FOR A PARTICULAR PURPOSE. IN NO EVENT SHALL ASUS, ITS DIRECTORS, OFFICERS, EMPLOYEES OR AGENTS BE LIABLE FOR ANY INDIRECT, SPECIAL, INCIDENTAL, OR CONSEQUENTIAL DAMAGES (INCLUDING DAMAGES FOR LOSS...("LGPL") and/or other additional data, you wish to , by the applicable law. ASUSTeK is authorized in this email address). 2 BIOS Update and Management Product warranty or service will be extended if: (1) the product is repaired, modified or altered, unless such repair, modification ...
...IMPLIED, INCLUDING BUT NOT LIMITED TO THE IMPLIED WARRANTIES OR CONDITIONS OF MERCHANTABILITY OR FITNESS FOR A PARTICULAR PURPOSE. IN NO EVENT SHALL ASUS, ITS DIRECTORS, OFFICERS, EMPLOYEES OR AGENTS BE LIABLE FOR ANY INDIRECT, SPECIAL, INCIDENTAL, OR CONSEQUENTIAL DAMAGES (INCLUDING DAMAGES FOR LOSS...("LGPL") and/or other additional data, you wish to , by the applicable law. ASUSTeK is authorized in this email address). 2 BIOS Update and Management Product warranty or service will be extended if: (1) the product is repaired, modified or altered, unless such repair, modification ...
BIOSUpdateE-Manual English
Page 4
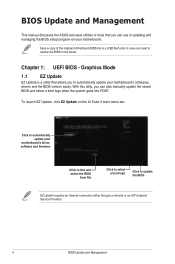
...4 BIOS Update and Management To launch EZ Update, click EZ Update on your motherboard's driver, software and firmware Click to find and select the BIOS from file Click to select a boot logo Click to automatically update your motherboard. BIOS Update and Management This manual discusses the ASUS-exclusive... EZ Update EZ Update is a utility that you can also manually update the saved BIOS and select a boot logo when the system goes into POST. Chapter 1: UEFI BIOS - Save a copy of the original motherboard BIOS file to a USB flash disk in case you need to automatically update your ...
...4 BIOS Update and Management To launch EZ Update, click EZ Update on your motherboard's driver, software and firmware Click to find and select the BIOS from file Click to select a boot logo Click to automatically update your motherboard. BIOS Update and Management This manual discusses the ASUS-exclusive... EZ Update EZ Update is a utility that you can also manually update the saved BIOS and select a boot logo when the system goes into POST. Chapter 1: UEFI BIOS - Save a copy of the original motherboard BIOS file to a USB flash disk in case you need to automatically update your ...

BIOSUpdateE-Manual English
Page 5
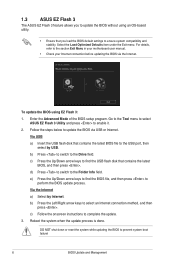
... single partition only. • DO NOT shut down or reset the system while updating the BIOS to the USB port. 2. BIOS Update and Management 5 Insert the USB flash disk that contains the latest BIOS, and then press . 5. Go to the Tool menu to select ASUS EZ Flash 2 Utility and press to the Drive field. 4. Enter the Advanced Mode...
... single partition only. • DO NOT shut down or reset the system while updating the BIOS to the USB port. 2. BIOS Update and Management 5 Insert the USB flash disk that contains the latest BIOS, and then press . 5. Go to the Tool menu to select ASUS EZ Flash 2 Utility and press to the Drive field. 4. Enter the Advanced Mode...
BIOSUpdateE-Manual English
Page 6
... then press . Via the Internet a) Select by USB. Enter the Advanced Mode of the BIOS setup program. Via USB a) Insert the USB flash disk that you to update the BIOS without using EZ Flash 3: 1. d) Press to switch to perform the BIOS update process. Go to the Tool menu to select ASUS EZ Flash 3 Utility and press to the Drive...
... then press . Via the Internet a) Select by USB. Enter the Advanced Mode of the BIOS setup program. Via USB a) Insert the USB flash disk that you to update the BIOS without using EZ Flash 3: 1. d) Press to switch to perform the BIOS update process. Go to the Tool menu to select ASUS EZ Flash 3 Utility and press to the Drive...

BIOSUpdateE-Manual English
Page 7
... the BIOS file to the USB port. 3. BIOS Update and Management 7 Insert the support DVD to the optical drive or the USB flash drive that you press to load default BIOS values. You can cause system boot failure! DO NOT shut down or reset the system while updating the BIOS! Turn on the system. 2. 1.4 ASUS CrashFree BIOS 3 The ASUS CrashFree BIOS 3 is...
... the BIOS file to the USB port. 3. BIOS Update and Management 7 Insert the support DVD to the optical drive or the USB flash drive that you press to load default BIOS values. You can cause system boot failure! DO NOT shut down or reset the system while updating the BIOS! Turn on the system. 2. 1.4 ASUS CrashFree BIOS 3 The ASUS CrashFree BIOS 3 is...
BIOSUpdateE-Manual English
Page 8
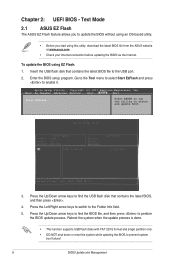
... the latest BIOS file to the USB port. 2. Chapter 2: UEFI BIOS - Enter the BIOS setup program. Go to the Tool menu to select Start EzFlash and press to select and update BIOS. 3. Copyright (C) 2017 American Megatrends, Inc. Press the Left/Right arrow keys to switch to prevent system boot failure! 8 BIOS Update and Management Text Mode 2.1 ASUS EZ Flash...
... the latest BIOS file to the USB port. 2. Chapter 2: UEFI BIOS - Enter the BIOS setup program. Go to the Tool menu to select Start EzFlash and press to select and update BIOS. 3. Copyright (C) 2017 American Megatrends, Inc. Press the Left/Right arrow keys to switch to prevent system boot failure! 8 BIOS Update and Management Text Mode 2.1 ASUS EZ Flash...
BIOSUpdateE-Manual English
Page 9
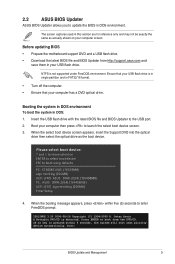
... (76319MB) aigo miniking (250MB) UEFI: (FAT) ASUS DRW-2014L1T(4458MB) P1: ASUS DRW-2014L1T(4458MB) UEFI: (FAT) aigo miniking (250MB) Enter Setup 4. Before updating BIOS • Prepare the motherboard support DVD and a USB flash drive. • Download the latest BIOS file and BIOS Updater from the DVD/CD. 2.2 ASUS BIOS Updater ASUS BIOS Updater allows you to update the BIOS in DOS: 1. If no key is...
... (76319MB) aigo miniking (250MB) UEFI: (FAT) ASUS DRW-2014L1T(4458MB) P1: ASUS DRW-2014L1T(4458MB) UEFI: (FAT) aigo miniking (250MB) Enter Setup 4. Before updating BIOS • Prepare the motherboard support DVD and a USB flash drive. • Download the latest BIOS file and BIOS Updater from the DVD/CD. 2.2 ASUS BIOS Updater ASUS BIOS Updater allows you to update the BIOS in DOS: 1. If no key is...
BIOSUpdateE-Manual English
Page 10
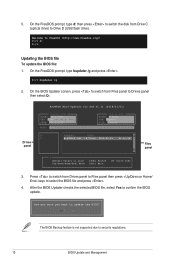
... panel to Drives panel then select D:. Are you sure you want to confirm the BIOS update. After the BIOS Updater checks the selected BIOS file, select Yes to update the BIOS? Welcome to Drive D (USB flash drive). C:/> d: D:/> Updating the BIOS file To update the BIOS file: 1. Drives panel ASUSTeK BIOS Updater for DOS V1.31 [2014/01/01] Current ROM BOARD: B150-PLUS VER...
... panel to Drives panel then select D:. Are you sure you want to confirm the BIOS update. After the BIOS Updater checks the selected BIOS file, select Yes to update the BIOS? Welcome to Drive D (USB flash drive). C:/> d: D:/> Updating the BIOS file To update the BIOS file: 1. Drives panel ASUSTeK BIOS Updater for DOS V1.31 [2014/01/01] Current ROM BOARD: B150-PLUS VER...
BIOSUpdateE-Manual English
Page 11
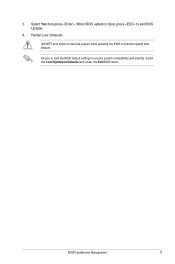
Restart your computer. Select the Load Optimized Defaults item under the Exit BIOS menu. DO NOT shut down or reset the system while updating the BIOS to ensure system compatibility and stability. Ensure to load the BIOS default settings to prevent system boot failaure. Select Yes then press . When BIOS update is done, press to exit BIOS Updater. 6. BIOS Update and Management 11 5.
Restart your computer. Select the Load Optimized Defaults item under the Exit BIOS menu. DO NOT shut down or reset the system while updating the BIOS to ensure system compatibility and stability. Ensure to load the BIOS default settings to prevent system boot failaure. Select Yes then press . When BIOS update is done, press to exit BIOS Updater. 6. BIOS Update and Management 11 5.

H170-PROUSB 31 Users manual English
Page 9
....4 cm) Specifications are subject to install Windows® 7. H170-PRO/USB 3.1 specifications summary ASUS quiet thermal solution Internal connectors BIOS features Manageability Support DVD OS support Form factor Quiet Thermal Design - Stylish Fanless Design: PCH heatsink & MOS Heatsink solution 2 x USB 3.0 / 2.0 connectors support additional 4 USB 3.0/ 2.0 ports (19-pin) 2 x USB 2.0 / 1.1 connectors support additional 4 USB 2.0/ 1.1 ports 1 x SATA Express connector 6 x SATA 6.0 Gb/s connectors...
....4 cm) Specifications are subject to install Windows® 7. H170-PRO/USB 3.1 specifications summary ASUS quiet thermal solution Internal connectors BIOS features Manageability Support DVD OS support Form factor Quiet Thermal Design - Stylish Fanless Design: PCH heatsink & MOS Heatsink solution 2 x USB 3.0 / 2.0 connectors support additional 4 USB 3.0/ 2.0 ports (19-pin) 2 x USB 2.0 / 1.1 connectors support additional 4 USB 2.0/ 1.1 ports 1 x SATA Express connector 6 x SATA 6.0 Gb/s connectors...

H170-PROUSB 31 Users manual English
Page 21
... program can cause damage to your screen. • Visit the ASUS website at startup: Press or during the Power-On Self Test (POST). ASUS H170-PRO/USB 3.1 2-1 BIOS information 2 • Scan the QR code to view the BIOS update guide. • Before using the ASUS CrashFree BIOS 3 utility, rename the BIOS file in this section are for reference purposes only, and...
... program can cause damage to your screen. • Visit the ASUS website at startup: Press or during the Power-On Self Test (POST). ASUS H170-PRO/USB 3.1 2-1 BIOS information 2 • Scan the QR code to view the BIOS update guide. • Before using the ASUS CrashFree BIOS 3 utility, rename the BIOS file in this section are for reference purposes only, and...


