
User Manual
Page 15
...memory is not connected. Visit an authorized service center or retailer for information on the user in the system and configures accordingly. The BIOS au- Manual The manual battery lock is secured in order to wirelessly connect to hold identification information on hard disk drive upgrades for ...position to the locked posi- Move the manual lock to insert or remove the battery pack. There is no hardware or software (including BIOS) setup required after inserting the battery pack. 4 Name Card Holder The Notebook PC has a name card holder glued to keep the battery ...
...memory is not connected. Visit an authorized service center or retailer for information on the user in the system and configures accordingly. The BIOS au- Manual The manual battery lock is secured in order to wirelessly connect to hold identification information on hard disk drive upgrades for ...position to the locked posi- Move the manual lock to insert or remove the battery pack. There is no hardware or software (including BIOS) setup required after inserting the battery pack. 4 Name Card Holder The Notebook PC has a name card holder glued to keep the battery ...

User Manual
Page 23
... working data. A fully charged pack will eventually decrease and a new battery pack must also take into account that the battery be purchased separately through the BIOS setup. IMPORTANT! If your Notebook PC is higher than the outside temperature. WARNING!
... working data. A fully charged pack will eventually decrease and a new battery pack must also take into account that the battery be purchased separately through the BIOS setup. IMPORTANT! If your Notebook PC is higher than the outside temperature. WARNING!

User Manual
Page 24
..., always wait at least 5 seconds after running a software disk checking utility, you should be correct when you may adjust the brightness by running BIOS Setup. If any materials that is not a problem with the display. If you turn it will run Window's disk checking program: click Start... hard disk is correctly detected and ready for servicing. NOTE: Before bootup, the display panel flashes when the power is installed as the BIOS version can also select "Scan ... This indicates that controls the POST is turned ON. If necessary, you receive the Notebook PC. If...
..., always wait at least 5 seconds after running a software disk checking utility, you should be correct when you may adjust the brightness by running BIOS Setup. If any materials that is not a problem with the display. If you turn it will run Window's disk checking program: click Start... hard disk is correctly detected and ready for servicing. NOTE: Before bootup, the display panel flashes when the power is installed as the BIOS version can also select "Scan ... This indicates that controls the POST is turned ON. If necessary, you receive the Notebook PC. If...
User Manual
Page 28
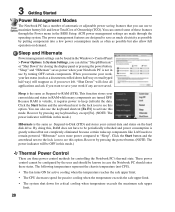
... demand. You can be configured by the user and should enter these features through the operating system. These power control cannot be found in the BIOS Setup. 3 Getting Started Power Management Modes The Notebook PC has a number of automatic or adjustable power saving features that you can control some of Ownership...
... demand. You can be configured by the user and should enter these features through the operating system. These power control cannot be found in the BIOS Setup. 3 Getting Started Power Management Modes The Notebook PC has a number of automatic or adjustable power saving features that you can control some of Ownership...

User Manual
Page 46
.... Only purchase expansion modules from authorized retailers of memory in the system and configures CMOS accordingly during the POST (Power-On-Self-Test) process. The BIOS automatically detects the amount of this Notebook PC to ensure maximum compatibility and 8 4 reliability. 7 5 6 Installing a Memory Card: Removing a Memory Card: 3 (This is only...4 Using the Notebook PC Memory (RAM) Additional memory will increase application performance by decreasing hard disk access. There is no hardware or software (including BIOS) setup required after the memory is only an example.)
.... Only purchase expansion modules from authorized retailers of memory in the system and configures CMOS accordingly during the POST (Power-On-Self-Test) process. The BIOS automatically detects the amount of this Notebook PC to ensure maximum compatibility and 8 4 reliability. 7 5 6 Installing a Memory Card: Removing a Memory Card: 3 (This is only...4 Using the Notebook PC Memory (RAM) Additional memory will increase application performance by decreasing hard disk access. There is no hardware or software (including BIOS) setup required after the memory is only an example.)

User Manual
Page 52
...selected models) The TPM, or Trusted Platform Module, is a security hardware device on the system board that contained in the system BIOS, operating system, or any customer that is interested in providing an addition layer of each individual computer system has a unique signature ... secured by the following cryptographic capabilities of security to the computer system. Use BIOS setup to backup your TPM security data. Each individual TPM on system startup). Enabling TPM Security Enter BIOS Setup (press [F2] on each TPM: hashing, random number generation, asymmetric...
...selected models) The TPM, or Trusted Platform Module, is a security hardware device on the system board that contained in the system BIOS, operating system, or any customer that is interested in providing an addition layer of each individual computer system has a unique signature ... secured by the following cryptographic capabilities of security to the computer system. Use BIOS setup to backup your TPM security data. Each individual TPM on system startup). Enabling TPM Security Enter BIOS Setup (press [F2] on each TPM: hashing, random number generation, asymmetric...

User Manual
Page 53
... the diagram. Select "Fingerprints" and click Next. This wizard will show you how to decrease the chance of problems. 53 ON OFF PUSH 1. enabled in BIOS (see Appendix). 4 Using the Notebook PC Fingerprint Registration (on selected models) The fingerprint scanner can be used for verification. 4. Click Next. 3. You must register at...
... the diagram. Select "Fingerprints" and click Next. This wizard will show you how to decrease the chance of problems. 53 ON OFF PUSH 1. enabled in BIOS (see Appendix). 4 Using the Notebook PC Fingerprint Registration (on selected models) The fingerprint scanner can be used for verification. 4. Click Next. 3. You must register at...

User Manual
Page 59
Appendix Optional Accessories & Connections Operating System and Software System BIOS Settings Common Problems and Solutions Windows Software Recovery Glossary Declarations and Safety Statements Notebook PC Information NOTE: Photos and icons in this manual are used for artistic purposes only and do not show what is actually used in the product itself.
Appendix Optional Accessories & Connections Operating System and Software System BIOS Settings Common Problems and Solutions Windows Software Recovery Glossary Declarations and Safety Statements Notebook PC Information NOTE: Photos and icons in this manual are used for artistic purposes only and do not show what is actually used in the product itself.

User Manual
Page 64
... drive is necessary, contact your Notebook PC came pre-configured in good working order. Support Software This Notebook PC comes with a support disc that provides BIOS, drivers and applications to its customers the choice of a pre-installed Microsoft Windows operating system. The stability and compatibility of hardware and software support may...
... drive is necessary, contact your Notebook PC came pre-configured in good working order. Support Software This Notebook PC comes with a support disc that provides BIOS, drivers and applications to its customers the choice of a pre-installed Microsoft Windows operating system. The stability and compatibility of hardware and software support may...

User Manual
Page 65
To clear the password: 2. Re-type the password and press [Enter]. 1. Password is then cleared. Type in a password and press [Enter]. 3. Select each item and press [Enter] to select a device. On the Security screen, select Change Supervisor or Change User Password. Leave the password field blank and press [Enter]. 4. Password is then set. 2. On the Boot screen, select Boot Device Priority. 2. Security Setting 1. System BIOS Settings Boot Device A Appendix 1.
To clear the password: 2. Re-type the password and press [Enter]. 1. Password is then cleared. Type in a password and press [Enter]. 3. Select each item and press [Enter] to select a device. On the Security screen, select Change Supervisor or Change User Password. Leave the password field blank and press [Enter]. 4. Password is then set. 2. On the Boot screen, select Boot Device Priority. 2. Security Setting 1. System BIOS Settings Boot Device A Appendix 1.

User Manual
Page 66
You must save changes to ask for a password during bootup (Always) or only when entering the BIOS setup utility (Setup). A Appendix System BIOS Settings (cont.) Password Check User Access Level Select whether to keep your configuration settings, you want to have in the BIOS setup utility. Select the level of access to allow the "User Password" to restore default settings, choose Load Manufacture Defaults. If you want to keep the manufacture default settings. Save Changes If you must then save changes before exiting the BIOS setup utility.
You must save changes to ask for a password during bootup (Always) or only when entering the BIOS setup utility (Setup). A Appendix System BIOS Settings (cont.) Password Check User Access Level Select whether to keep your configuration settings, you want to have in the BIOS setup utility. Select the level of access to allow the "User Password" to restore default settings, choose Load Manufacture Defaults. If you want to keep the manufacture default settings. Save Changes If you must then save changes before exiting the BIOS setup utility.

User Manual
Page 67
... the webcam driver to see if there are any problems. 2. Register the Notebook PC for assistance. Update the BIOS to an earlier date. 3. System Unstable Cannot wake up from the ASUS website. If problem still persists, try again. 2. Check "Device Manager" to solve the problem. 3. Do NOT... / Hotkey The Hotkey (FN) is strongly recommended that you will not damage the battery pack if it from the hibernation. 1. The ASUS battery pack has protection circuitry to prevent over-charging so it will not be using the Notebook PC with temperatures between 10℃ and ...
... the webcam driver to see if there are any problems. 2. Register the Notebook PC for assistance. Update the BIOS to an earlier date. 3. System Unstable Cannot wake up from the ASUS website. If problem still persists, try again. 2. Check "Device Manager" to solve the problem. 3. Do NOT... / Hotkey The Hotkey (FN) is strongly recommended that you will not damage the battery pack if it from the hibernation. 1. The ASUS battery pack has protection circuitry to prevent over-charging so it will not be using the Notebook PC with temperatures between 10℃ and ...

User Manual
Page 68
...ON/OFF Error I cannot power ON the Notebook PC. Problem caused by some viruses, use anti-virus software to detect them to see BIOS (ASUS Logo)? (Y = 7, N = A) 7. Adapter problem; check the power cord connections, otherwise visit a local service center for assistance.... system using the recovery partition or DVD. (IMPORTANT: You must backup all your data to another location before recovering.) (CAUTION: Do not connect to see BIOS (ASUS Logo)? (Y = 3, N = A) 3. Power On by Adapter only? (Y = 6, N = A) 6. Able to load the OS? (Y = D, N = A) Symptom & Solutions: A. Able to ...
...ON/OFF Error I cannot power ON the Notebook PC. Problem caused by some viruses, use anti-virus software to detect them to see BIOS (ASUS Logo)? (Y = 7, N = A) 7. Adapter problem; check the power cord connections, otherwise visit a local service center for assistance.... system using the recovery partition or DVD. (IMPORTANT: You must backup all your data to another location before recovering.) (CAUTION: Do not connect to see BIOS (ASUS Logo)? (Y = 3, N = A) 3. Power On by Adapter only? (Y = 6, N = A) 6. Able to load the OS? (Y = D, N = A) Symptom & Solutions: A. Able to ...

User Manual
Page 69
ASUS bundled software When I power ON the Notebook PC, there will be recognized.) 6. Remove additional memory. Check your system for assistance. It is due to the latest version with WINFLASH in Windows or AFLASH in Windows Safe Mode. 3. Update the BIOS to incompatible memory. 2. ... bootup. 1. Try to solve your local service center and ask an engineer for viruses. 4. Un-install software applications. These utilities and BIOS files can be an "Open policy file error" message. A Appendix Common Problems and Solutions (Cont.) Software Problem - Unknown Reason - If...
ASUS bundled software When I power ON the Notebook PC, there will be recognized.) 6. Remove additional memory. Check your system for assistance. It is due to the latest version with WINFLASH in Windows or AFLASH in Windows Safe Mode. 3. Update the BIOS to incompatible memory. 2. ... bootup. 1. Try to solve your local service center and ask an engineer for viruses. 4. Un-install software applications. These utilities and BIOS files can be an "Open policy file error" message. A Appendix Common Problems and Solutions (Cont.) Software Problem - Unknown Reason - If...

User Manual
Page 70
...and reboot the system again. Click Start | All Programs | ASUS Utility | WINFLASH | WINFLASH a. e. g. You must "Load Manufacture Defaults" after updating (flashing) the BIOS. Use the "WINFLASH" utility to update your model from the ASUS website. 2. Check the model, version, and data. Follow the.... d. Reboot the system. f. Extract the BIOS file to enter BIOS setup page when the ASUS logo appears during system boot-up. Select the new BIOS image file. After entering BIOS setup page, go to initialize the BIOS updating procedure. Assuming that came with your Driver...
...and reboot the system again. Click Start | All Programs | ASUS Utility | WINFLASH | WINFLASH a. e. g. You must "Load Manufacture Defaults" after updating (flashing) the BIOS. Use the "WINFLASH" utility to update your model from the ASUS website. 2. Check the model, version, and data. Follow the.... d. Reboot the system. f. Extract the BIOS file to enter BIOS setup page when the ASUS logo appears during system boot-up. Select the new BIOS image file. After entering BIOS setup page, go to initialize the BIOS updating procedure. Assuming that came with your Driver...

User Manual
Page 75
... This table is for general reference only and should not be used for power savings, thermal management, and reducing processing speed. The BIOS instructions are built into the EEPROM. Bit (Binary Digit) Represents the smallest unit of data used to represent a single alphanumeric character... updated using Windows 95 or later, selecting "Restart" from "Start | Shut Down..." When the manual instructs you to copy a new BIOS file into the computer's read-only memory. Glossary A Appendix ACPI (Advanced Configuration and Power Management Interface) Modern standard for reducing power usage...
... This table is for general reference only and should not be used for power savings, thermal management, and reducing processing speed. The BIOS instructions are built into the EEPROM. Bit (Binary Digit) Represents the smallest unit of data used to represent a single alphanumeric character... updated using Windows 95 or later, selecting "Restart" from "Start | Shut Down..." When the manual instructs you to copy a new BIOS file into the computer's read-only memory. Glossary A Appendix ACPI (Advanced Configuration and Power Management Interface) Modern standard for reducing power usage...

User Manual
Page 78
... to slower storage such as keyboard, mouse, joystick, scanner, printer and modem/ISDN to be automatically configured when they can help avoid attacks by the BIOS Setup. UltraDMA/66 or 100 UltraDMA/66 or 100 are not compatible with RJ-11 telephone connectors. Twisted-Pair Cable The cable used to sensitive...
... to slower storage such as keyboard, mouse, joystick, scanner, printer and modem/ISDN to be automatically configured when they can help avoid attacks by the BIOS Setup. UltraDMA/66 or 100 UltraDMA/66 or 100 are not compatible with RJ-11 telephone connectors. Twisted-Pair Cable The cable used to sensitive...

User Manual
Page 90
Owner's Name Owner's Telephone Manufacturer Model Serial Number Display Size Resolution Memory Size Retailer Location Purchase Date Hard Drive Manufacturer Capacity Optical Drive Manufacturer Type BIOS Version Date Accessories Accessories Software Operating System:___________Version Serial Number Software Version Serial Number Software Version Serial Number Security Supervisor Name Supervisor Password User Name ...
Owner's Name Owner's Telephone Manufacturer Model Serial Number Display Size Resolution Memory Size Retailer Location Purchase Date Hard Drive Manufacturer Capacity Optical Drive Manufacturer Type BIOS Version Date Accessories Accessories Software Operating System:___________Version Serial Number Software Version Serial Number Software Version Serial Number Security Supervisor Name Supervisor Password User Name ...

