
User Guide
Page 1
E10148b Revised Edition V2 January 2015 Mini Desktop PC (Thin Client) User Guide E210 Series
E10148b Revised Edition V2 January 2015 Mini Desktop PC (Thin Client) User Guide E210 Series
User Guide
Page 2
... TO CHANGE AT ANY TIME WITHOUT NOTICE, AND SHOULD NOT BE CONSTRUED AS A COMMITMENT BY ASUS. SERVICE AND SUPPORT Visit our multi-language web site at http://support.asus.com 2 Mini Desktop PC User Guide IN NO EVENT SHALL ASUS, ITS DIRECTORS, OFFICERS, EMPLOYEES OR AGENTS BE LIABLE FOR ANY INDIRECT, SPECIAL, INCIDENTAL, OR CONSEQUENTIAL...
... TO CHANGE AT ANY TIME WITHOUT NOTICE, AND SHOULD NOT BE CONSTRUED AS A COMMITMENT BY ASUS. SERVICE AND SUPPORT Visit our multi-language web site at http://support.asus.com 2 Mini Desktop PC User Guide IN NO EVENT SHALL ASUS, ITS DIRECTORS, OFFICERS, EMPLOYEES OR AGENTS BE LIABLE FOR ANY INDIRECT, SPECIAL, INCIDENTAL, OR CONSEQUENTIAL...
User Guide
Page 3
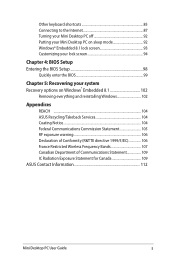
... disposal 9 Package contents 11 Chapter 1: Mini Desktop PC parts and features Getting to know your Mini Desktop PC 14 Front view...14 Rear view...16 Chapter 2: Hardware setup Positioning your Mini Desktop PC 20 Mounting your Mini Desktop PC on the stand 20 Installing your Mini Desktop PC to a monitor 21 Using your Mini Desktop PC 25 Connecting to an external display...
... disposal 9 Package contents 11 Chapter 1: Mini Desktop PC parts and features Getting to know your Mini Desktop PC 14 Front view...14 Rear view...16 Chapter 2: Hardware setup Positioning your Mini Desktop PC 20 Mounting your Mini Desktop PC on the stand 20 Installing your Mini Desktop PC to a monitor 21 Using your Mini Desktop PC 25 Connecting to an external display...
User Guide
Page 4
... wireless networks 60 Bluetooth ...62 Airplane mode 64 Connecting to wired networks 65 Configuring a dynamic IP/PPPoE network connection 65 Turning your Mini Desktop PC off 68 Putting your Mini Desktop PC to sleep 68 Working with Windows® Embedded 8.1 69 Starting for the first time 69 Windows® UI...70 Start button...74...
... wireless networks 60 Bluetooth ...62 Airplane mode 64 Connecting to wired networks 65 Configuring a dynamic IP/PPPoE network connection 65 Turning your Mini Desktop PC off 68 Putting your Mini Desktop PC to sleep 68 Working with Windows® Embedded 8.1 69 Starting for the first time 69 Windows® UI...70 Start button...74...
User Guide
Page 5
... ...104 ASUS Recycling/Takeback Services 104 Coating Notice 104 Federal Communications Commission Statement 105 RF exposure warning 106 Declaration of Conformity (R&TTE directive 1999/5/EC 106 France Restricted Wireless Frequency Bands 107 Canadian Department of Communications Statement 109 IC Radiation Exposure Statement for Canada 109 ASUS Contact Information 112 Mini Desktop PC User Guide...
... ...104 ASUS Recycling/Takeback Services 104 Coating Notice 104 Federal Communications Commission Statement 105 RF exposure warning 106 Declaration of Conformity (R&TTE directive 1999/5/EC 106 France Restricted Wireless Frequency Bands 107 Canadian Department of Communications Statement 109 IC Radiation Exposure Statement for Canada 109 ASUS Contact Information 112 Mini Desktop PC User Guide...
User Guide
Page 6
... about the hardware and software features of your Mini Desktop PC, organized through the following folder in your PC: C:\Program Files(X86)\ASUS\ eManual 6 Mini Desktop PC User Guide Chapter 4: BIOS setup This chapter provides information on how to enter BIOS mode in your Mini Desktop PC for your Mini Desktop PC. Chapter 2: Hardware setup This chapter provides you with...
... about the hardware and software features of your Mini Desktop PC, organized through the following folder in your PC: C:\Program Files(X86)\ASUS\ eManual 6 Mini Desktop PC User Guide Chapter 4: BIOS setup This chapter provides information on how to enter BIOS mode in your Mini Desktop PC for your Mini Desktop PC. Chapter 2: Hardware setup This chapter provides you with...
User Guide
Page 7
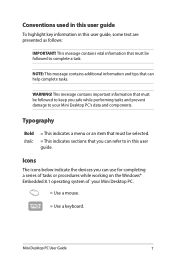
... that can use for completing a series of tasks or procedures while working on the Windows® Embedded 8.1 operating system of your Mini Desktop PC's data and components. Icons The icons below indicate the devices you safe while performing tasks and prevent damage to in this user guide.... Mini Desktop PC User Guide 7 WARNING! Conventions used in this user guide To highlight key information in this user guide, some text are presented ...
... that can use for completing a series of tasks or procedures while working on the Windows® Embedded 8.1 operating system of your Mini Desktop PC's data and components. Icons The icons below indicate the devices you safe while performing tasks and prevent damage to in this user guide.... Mini Desktop PC User Guide 7 WARNING! Conventions used in this user guide To highlight key information in this user guide, some text are presented ...
User Guide
Page 8
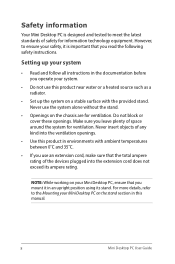
... ventilation. However, to ensure your safety, it in this product near water or a heated source such as a radiator. • Set up your Mini Desktop PC on a stable surface with ambient temperatures between 0˚C and 35˚C. • If you use an extension cord, make sure that the total...in the documentation before you operate your system. • Do not use the system alone without the stand. • Openings on your Mini Desktop PC, ensure that you mount it is designed and tested to the Mounting your system • Read and follow all instructions in environments with the...
... ventilation. However, to ensure your safety, it in this product near water or a heated source such as a radiator. • Set up your Mini Desktop PC on a stable surface with ambient temperatures between 0˚C and 35˚C. • If you use an extension cord, make sure that the total...in the documentation before you operate your system. • Do not use the system alone without the stand. • Openings on your Mini Desktop PC, ensure that you mount it is designed and tested to the Mounting your system • Read and follow all instructions in environments with the...
User Guide
Page 9
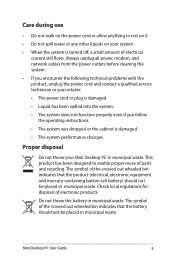
... not function properly even if you encounter the following technical problems with the product, unplug the power cord and contact a qualified service technician or your Mini Desktop PC in municipal waste. The symbol of parts and recycling. Proper disposal Do not throw your retailer. • The power cord or plug is damaged...
... not function properly even if you encounter the following technical problems with the product, unplug the power cord and contact a qualified service technician or your Mini Desktop PC in municipal waste. The symbol of parts and recycling. Proper disposal Do not throw your retailer. • The power cord or plug is damaged...
User Guide
Page 10
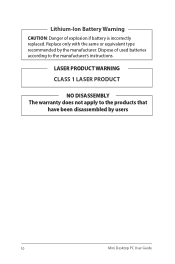
Replace only with the same or equivalent type recommended by users 10 Mini Desktop PC User Guide Lithium-Ion Battery Warning CAUTION: Danger of used batteries according to the products that have been disassembled by the manufacturer. LASER PRODUCT WARNING CLASS 1 LASER PRODUCT NO DISASSEMBLY The warranty does not apply to the manufacturer's instructions. Dispose of explosion if battery is incorrectly replaced.
Replace only with the same or equivalent type recommended by users 10 Mini Desktop PC User Guide Lithium-Ion Battery Warning CAUTION: Danger of used batteries according to the products that have been disassembled by the manufacturer. LASER PRODUCT WARNING CLASS 1 LASER PRODUCT NO DISASSEMBLY The warranty does not apply to the manufacturer's instructions. Dispose of explosion if battery is incorrectly replaced.
User Guide
Page 11
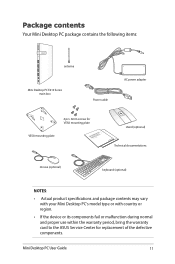
...Mini Desktop PC package contains the following items: X antenna Mini Desktop PC E210 Series main box AC power adapter Power cable 4 pcs. 8mm screws for VESA mounting plate VESA mounting plate stand (optional) Technical documentations mouse (optional) keyboard (optional) NOTES: • Actual product specifications and package contents may vary with your Mini Desktop PC...'s model type or with country or region. • If the device or its components fail or malfunction during normal and proper use within the warranty period, bring the warranty card to the ASUS Service...
...Mini Desktop PC package contains the following items: X antenna Mini Desktop PC E210 Series main box AC power adapter Power cable 4 pcs. 8mm screws for VESA mounting plate VESA mounting plate stand (optional) Technical documentations mouse (optional) keyboard (optional) NOTES: • Actual product specifications and package contents may vary with your Mini Desktop PC...'s model type or with country or region. • If the device or its components fail or malfunction during normal and proper use within the warranty period, bring the warranty card to the ASUS Service...
User Guide
Page 14
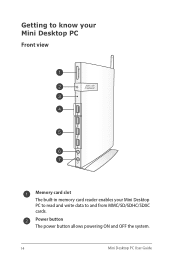
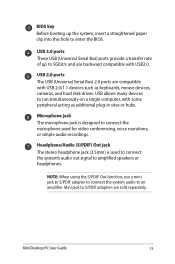
Power button The power button allows powering ON and OFF the system. 14 Mini Desktop PC User Guide Getting to know your Mini Desktop PC Front view X Memory card slot The built-in memory card reader enables your Mini Desktop PC to read and write data to and from MMC/SD/SDHC/SDXC cards.
Power button The power button allows powering ON and OFF the system. 14 Mini Desktop PC User Guide Getting to know your Mini Desktop PC Front view X Memory card slot The built-in memory card reader enables your Mini Desktop PC to read and write data to and from MMC/SD/SDHC/SDXC cards.
User Guide
Page 15
... compatible with USB 2.0/1.1 devices such as additional plug-in sites or hubs. Mini Desktop PC User Guide 15 NOTE: When using the S/PDIF Out function, use a mini jack to S/PDIF adapter to connect the system audio to enter the BIOS. Mini jack to S/PDIF adapters are backward compatible with some peripheral acting as keyboards...
... compatible with USB 2.0/1.1 devices such as additional plug-in sites or hubs. Mini Desktop PC User Guide 15 NOTE: When using the S/PDIF Out function, use a mini jack to S/PDIF adapter to connect the system audio to enter the BIOS. Mini jack to S/PDIF adapters are backward compatible with some peripheral acting as keyboards...
User Guide
Page 16
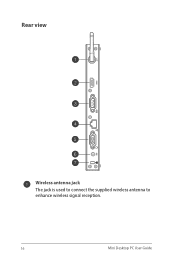
Rear view Wireless antenna jack The jack is used to connect the supplied wireless antenna to enhance wireless signal reception. 16 Mini Desktop PC User Guide
Rear view Wireless antenna jack The jack is used to connect the supplied wireless antenna to enhance wireless signal reception. 16 Mini Desktop PC User Guide
User Guide
Page 17
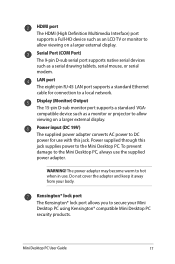
... display. Do not cover the adapter and keep it away from your Mini Desktop PC using Kensington® compatible Mini Desktop PC security products. Power supplied through this jack. The power adapter may become warm to the Mini Desktop PC. HDMI port The HDMI (High Definition Multimedia Interface) port supports a...a standard VGAcompatible device such as a serial drawing tablets, serial mouse, or serial modem. To prevent damage to a local network. Mini Desktop PC User Guide 17 Power input (DC 19V) The supplied power adapter converts AC power to DC power for connection to the...
... display. Do not cover the adapter and keep it away from your Mini Desktop PC using Kensington® compatible Mini Desktop PC security products. Power supplied through this jack. The power adapter may become warm to the Mini Desktop PC. HDMI port The HDMI (High Definition Multimedia Interface) port supports a...a standard VGAcompatible device such as a serial drawing tablets, serial mouse, or serial modem. To prevent damage to a local network. Mini Desktop PC User Guide 17 Power input (DC 19V) The supplied power adapter converts AC power to DC power for connection to the...
User Guide
Page 20
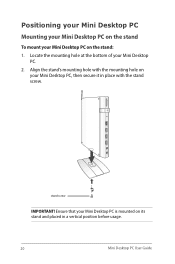
Positioning your Mini Desktop PC Mounting your Mini Desktop PC on the stand To mount your Mini Desktop PC on your Mini Desktop PC, then secure it in a vertical position before usage. 20 Mini Desktop PC User Guide Ensure that your Mini Desktop PC. 2. Align the stand's mounting hole with the mounting hole on the stand: 1. X stand screw IMPORTANT! Locate the mounting hole at the bottom of your Mini Desktop PC is mounted on its stand and placed in place with the stand screw.
Positioning your Mini Desktop PC Mounting your Mini Desktop PC on the stand To mount your Mini Desktop PC on your Mini Desktop PC, then secure it in a vertical position before usage. 20 Mini Desktop PC User Guide Ensure that your Mini Desktop PC. 2. Align the stand's mounting hole with the mounting hole on the stand: 1. X stand screw IMPORTANT! Locate the mounting hole at the bottom of your Mini Desktop PC is mounted on its stand and placed in place with the stand screw.

User Guide
Page 21
NOTE: Your monitor must comply with your monitor* with four screws bundled with VESA75 or VESA100 standard. * The Mini Desktop PC can be mounted on an ASUS VS228H monitor. Mini Desktop PC User Guide 21 Secure the VESA mount to a monitor: 1. Installing your Mini Desktop PC to a monitor To install your Mini Desktop PC to your VESA mount kit.
NOTE: Your monitor must comply with your monitor* with four screws bundled with VESA75 or VESA100 standard. * The Mini Desktop PC can be mounted on an ASUS VS228H monitor. Mini Desktop PC User Guide 21 Secure the VESA mount to a monitor: 1. Installing your Mini Desktop PC to a monitor To install your Mini Desktop PC to your VESA mount kit.
User Guide
Page 22
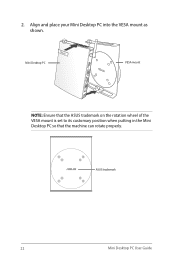
2. Mini Desktop PC VESA mount NOTE: Ensure that the ASUS trademark on the rotation wheel of the VESA mount is set to its customary position when putting in the Mini Desktop PC so that the machine can rotate properly. ASUS trademark 22 Mini Desktop PC User Guide Align and place your Mini Desktop PC into the VESA mount as shown.
2. Mini Desktop PC VESA mount NOTE: Ensure that the ASUS trademark on the rotation wheel of the VESA mount is set to its customary position when putting in the Mini Desktop PC so that the machine can rotate properly. ASUS trademark 22 Mini Desktop PC User Guide Align and place your Mini Desktop PC into the VESA mount as shown.
User Guide
Page 23
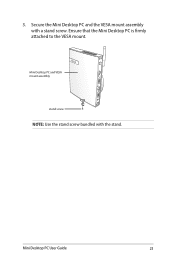
Mini Desktop PC User Guide 23 Secure the Mini Desktop PC and the VESA mount assembly with the stand. Mini Desktop PC and VESA mount assembly stand screw NOTE: Use the stand screw bundled with a stand screw. Ensure that the Mini Desktop PC is firmly attached to the VESA mount. 3.
Mini Desktop PC User Guide 23 Secure the Mini Desktop PC and the VESA mount assembly with the stand. Mini Desktop PC and VESA mount assembly stand screw NOTE: Use the stand screw bundled with a stand screw. Ensure that the Mini Desktop PC is firmly attached to the VESA mount. 3.
User Guide
Page 24
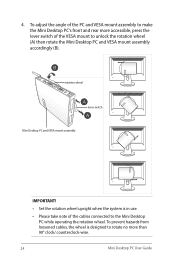
... assembly to make the Mini Desktop PC's front and rear more than 90° clock/ counterclock-wise. 24 Mini Desktop PC User Guide To prevent hazards from loosened cables, the wheel is in use. • Please take note of the VESA mount to the Mini Desktop PC while operating the rotation wheel.... rotation wheel lever switch Mini Desktop PC and VESA mount assembly IMPORTANT! • Set the rotation wheel upright when the system is designed to rotate...
... assembly to make the Mini Desktop PC's front and rear more than 90° clock/ counterclock-wise. 24 Mini Desktop PC User Guide To prevent hazards from loosened cables, the wheel is in use. • Please take note of the VESA mount to the Mini Desktop PC while operating the rotation wheel.... rotation wheel lever switch Mini Desktop PC and VESA mount assembly IMPORTANT! • Set the rotation wheel upright when the system is designed to rotate...


