
User Guide
Page 2
... under this manual may or may arise where because of ASUSTeK COMPUTER INC. ("ASUS"). UNDER NO CIRCUMSTANCES IS ASUS LIABLE FOR ANY OF THE FOLLOWING: (1) THIRDPARTY CLAIMS AGAINST YOU FOR DAMAGES; (2) LOSS OF, OR DAMAGE TO, YOUR RECORDS OR DATA; SERVICE AND SUPPORT Visit our multi-language web site at http://support.asus.com 2 Mini Desktop PC User Guide LIMITATION...
... under this manual may or may arise where because of ASUSTeK COMPUTER INC. ("ASUS"). UNDER NO CIRCUMSTANCES IS ASUS LIABLE FOR ANY OF THE FOLLOWING: (1) THIRDPARTY CLAIMS AGAINST YOU FOR DAMAGES; (2) LOSS OF, OR DAMAGE TO, YOUR RECORDS OR DATA; SERVICE AND SUPPORT Visit our multi-language web site at http://support.asus.com 2 Mini Desktop PC User Guide LIMITATION...
User Guide
Page 3
... a monitor 21 Using your Mini Desktop PC 25 Connecting to an external display 25 Connecting to a USB device 26 Connecting the wireless antenna 27 Turning on your Mini Desktop PC 28 Configuring the audio output via an HDMI device 29 Chapter 3: Supported operating systems Working with Windows® Embedded 7 32 Starting for the first time 32 Using the Start menu 33 Using the taskbar 34 Using the notification area 35 Using Windows® Explorer 36 Backing up files 38 Restoring...
... a monitor 21 Using your Mini Desktop PC 25 Connecting to an external display 25 Connecting to a USB device 26 Connecting the wireless antenna 27 Turning on your Mini Desktop PC 28 Configuring the audio output via an HDMI device 29 Chapter 3: Supported operating systems Working with Windows® Embedded 7 32 Starting for the first time 32 Using the Start menu 33 Using the taskbar 34 Using the notification area 35 Using Windows® Explorer 36 Backing up files 38 Restoring...
User Guide
Page 4
... keyboard shortcuts 58 Connecting to wireless networks 60 Bluetooth ...62 Airplane mode 64 Connecting to wired networks 65 Configuring a dynamic IP/PPPoE network connection 65 Turning your Mini Desktop PC off 68 Putting your Mini Desktop PC to sleep 68 Working with Windows® Embedded 8.1 69 Starting for the first time 69 Windows® UI...70 Start button...74 Customizing your Start screen 76 Working with Windows® apps 77 Customizing apps 77 Accessing the Apps screen...
... keyboard shortcuts 58 Connecting to wireless networks 60 Bluetooth ...62 Airplane mode 64 Connecting to wired networks 65 Configuring a dynamic IP/PPPoE network connection 65 Turning your Mini Desktop PC off 68 Putting your Mini Desktop PC to sleep 68 Working with Windows® Embedded 8.1 69 Starting for the first time 69 Windows® UI...70 Start button...74 Customizing your Start screen 76 Working with Windows® apps 77 Customizing apps 77 Accessing the Apps screen...
User Guide
Page 5
Other keyboard shortcuts 85 Connecting to the Internet 87 Turning your Mini Desktop PC off 92 Putting your Mini Desktop PC on sleep mode 92 Windows® Embedded 8.1 lock screen 93 Customizing your lock screen 94 Chapter 4: BIOS Setup Entering the BIOS Setup 98 Quickly enter the BIOS 99 Chapter 5: Recovering your system Recovery options on Windows® Embedded 8.1 102 Removing everything and reinstalling Windows 102 Appendices REACH ...104 ASUS Recycling/Takeback Services 104 Coating Notice...
Other keyboard shortcuts 85 Connecting to the Internet 87 Turning your Mini Desktop PC off 92 Putting your Mini Desktop PC on sleep mode 92 Windows® Embedded 8.1 lock screen 93 Customizing your lock screen 94 Chapter 4: BIOS Setup Entering the BIOS Setup 98 Quickly enter the BIOS 99 Chapter 5: Recovering your system Recovery options on Windows® Embedded 8.1 102 Removing everything and reinstalling Windows 102 Appendices REACH ...104 ASUS Recycling/Takeback Services 104 Coating Notice...
User Guide
Page 6
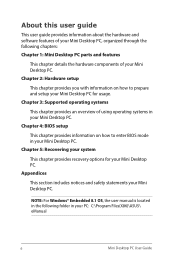
... system This chapter provides recovery options for usage. About this user guide This user guide provides information about the hardware and software features of your Mini Desktop PC, organized through the following folder in your PC: C:\Program Files(X86)\ASUS\ eManual 6 Mini Desktop PC User Guide Chapter 4: BIOS setup This chapter provides information on how to enter BIOS mode in your Mini Desktop PC. Chapter 3: Supported operating systems This chapter provides...
... system This chapter provides recovery options for usage. About this user guide This user guide provides information about the hardware and software features of your Mini Desktop PC, organized through the following folder in your PC: C:\Program Files(X86)\ASUS\ eManual 6 Mini Desktop PC User Guide Chapter 4: BIOS setup This chapter provides information on how to enter BIOS mode in your Mini Desktop PC. Chapter 3: Supported operating systems This chapter provides...
User Guide
Page 9
...all power, modem, and network cables from the power outlets before cleaning the system. • If you encounter the following technical problems with the product, unplug the power cord and contact a qualified service technician or your system. • When the system is damaged. • The system performance changes. ... retailer. • The power cord or plug is damaged. • Liquid has been spilled into the system. • The system does not function properly even if you follow the operating instructions. • The system was dropped or the cabinet is turned off, a small amount ...
...all power, modem, and network cables from the power outlets before cleaning the system. • If you encounter the following technical problems with the product, unplug the power cord and contact a qualified service technician or your system. • When the system is damaged. • The system performance changes. ... retailer. • The power cord or plug is damaged. • Liquid has been spilled into the system. • The system does not function properly even if you follow the operating instructions. • The system was dropped or the cabinet is turned off, a small amount ...
User Guide
Page 11
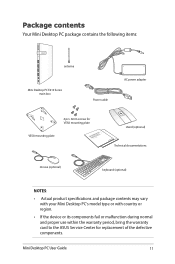
Mini Desktop PC User Guide 11 Package contents Your Mini Desktop PC package contains the following items: X antenna Mini Desktop PC E210 Series main box AC power adapter Power cable 4 pcs. 8mm screws for VESA mounting plate VESA mounting plate stand (optional) Technical documentations mouse (optional) keyboard (optional) NOTES: • Actual product specifications and package contents may vary with your Mini Desktop PC's model type or with country or region. • If...
Mini Desktop PC User Guide 11 Package contents Your Mini Desktop PC package contains the following items: X antenna Mini Desktop PC E210 Series main box AC power adapter Power cable 4 pcs. 8mm screws for VESA mounting plate VESA mounting plate stand (optional) Technical documentations mouse (optional) keyboard (optional) NOTES: • Actual product specifications and package contents may vary with your Mini Desktop PC's model type or with country or region. • If...
User Guide
Page 15
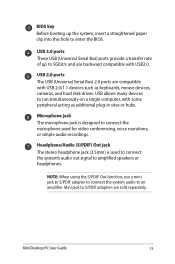
... to enter the BIOS. USB 2.0 ports The USB (Universal Serial Bus) 2.0 ports are sold separately. Mini Desktop PC User Guide 15 USB allows many devices to run simultaneously on a single computer, with some peripheral acting as keyboards, mouse devices, cameras, and hard disk drives. BIOS key Before booting up to 5Gbit/s and are backward compatible with USB2.0. Headphone/Audio (S/PDIF) Out jack The stereo headphone jack (3.5mm) is designed to connect the microphone used to connect...
... to enter the BIOS. USB 2.0 ports The USB (Universal Serial Bus) 2.0 ports are sold separately. Mini Desktop PC User Guide 15 USB allows many devices to run simultaneously on a single computer, with some peripheral acting as keyboards, mouse devices, cameras, and hard disk drives. BIOS key Before booting up to 5Gbit/s and are backward compatible with USB2.0. Headphone/Audio (S/PDIF) Out jack The stereo headphone jack (3.5mm) is designed to connect the microphone used to connect...
User Guide
Page 17
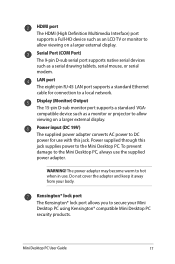
... on a larger external display. Mini Desktop PC User Guide 17 LAN port The eight-pin RJ-45 LAN port supports a standard Ethernet cable for use with this jack supplies power to secure your body. To prevent damage to hot when in use the supplied power adapter. HDMI port The HDMI (High Definition Multimedia Interface) port supports a Full-HD device such as an LCD TV or monitor to allow viewing on a larger external display. Do not cover the adapter and keep it...
... on a larger external display. Mini Desktop PC User Guide 17 LAN port The eight-pin RJ-45 LAN port supports a standard Ethernet cable for use with this jack supplies power to secure your body. To prevent damage to hot when in use the supplied power adapter. HDMI port The HDMI (High Definition Multimedia Interface) port supports a Full-HD device such as an LCD TV or monitor to allow viewing on a larger external display. Do not cover the adapter and keep it...
User Guide
Page 29
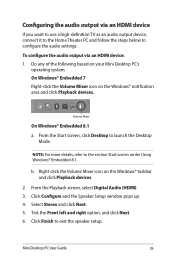
... click Playback devices. b. From the Playback screen, select Digital Audio (HDMI). 3. Click Finish to configure the audio settings. Configuring the audio output via an HDMI device: 1. Right-click the Volume Mixer icon on the Windows® taskbar and click Playback devices. 2. Mini Desktop PC User Guide 29 Tick the Front left and right option, and click Next. 6. Volume Mixer On Windows® Embedded 8.1 a. Click Configure and the Speaker Setup window pops up...
... click Playback devices. b. From the Playback screen, select Digital Audio (HDMI). 3. Click Finish to configure the audio settings. Configuring the audio output via an HDMI device: 1. Right-click the Volume Mixer icon on the Windows® taskbar and click Playback devices. 2. Mini Desktop PC User Guide 29 Tick the Front left and right option, and click Next. 6. Volume Mixer On Windows® Embedded 8.1 a. Click Configure and the Speaker Setup window pops up...

User Guide
Page 32
.... Working with Windows® Embedded 7 Starting for the first time When you start your Mini Desktop PC for the first time, a series of screens appear to set up the security settings of your Windows® Embedded 7 operating system. The system loads the new settings then restarts. 9. Turn on your date and time settings. Key in the necessary information to the Setting up a user account and password section in configuring the...
.... Working with Windows® Embedded 7 Starting for the first time When you start your Mini Desktop PC for the first time, a series of screens appear to set up the security settings of your Windows® Embedded 7 operating system. The system loads the new settings then restarts. 9. Turn on your date and time settings. Key in the necessary information to the Setting up a user account and password section in configuring the...

User Guide
Page 34
... to pin, then select Pin to this list. 34 Mini Desktop PC User Guide From the jumplist, right-click the item you right-click an icon on the jumplist such as favorite websites, frequently visited folders or drives, and recently played media files. Launching a program from this list. You may pin items on the taskbar, a jumplist appears to provide quick-access...
... to pin, then select Pin to this list. 34 Mini Desktop PC User Guide From the jumplist, right-click the item you right-click an icon on the jumplist such as favorite websites, frequently visited folders or drives, and recently played media files. Launching a program from this list. You may pin items on the taskbar, a jumplist appears to provide quick-access...

User Guide
Page 36
... the location of the drive or folder. Launch Windows® Explorer. 2. From the view menu, move the slider to select how you to view, manage, and organize your preferred arrangement type. 36 Mini Desktop PC User Guide Launch Windows® Explorer. 2. From the Arrange by field, click to launch the Start menu then click Computer. Select your files folders. Using Windows® Explorer Windows®...
... the location of the drive or folder. Launch Windows® Explorer. 2. From the view menu, move the slider to select how you to view, manage, and organize your preferred arrangement type. 36 Mini Desktop PC User Guide Launch Windows® Explorer. 2. From the Arrange by field, click to launch the Start menu then click Computer. Select your files folders. Using Windows® Explorer Windows®...
User Guide
Page 40
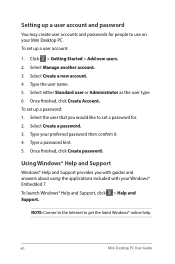
Select Manage another account. 3. Once finished, click Create Account. Type your Windows® Embedded 7. Using Windows® Help and Support Windows® Help and Support provides you would like to get the latest Windows® online help. 40 Mini Desktop PC User Guide To set up a user account and password You may create user accounts and passwords for . 2. Click > Getting Started > Add new users. 2. Select either Standard user or Administrator as the user type. 6. Select...
Select Manage another account. 3. Once finished, click Create Account. Type your Windows® Embedded 7. Using Windows® Help and Support Windows® Help and Support provides you would like to get the latest Windows® online help. 40 Mini Desktop PC User Guide To set up a user account and password You may create user accounts and passwords for . 2. Click > Getting Started > Add new users. 2. Select either Standard user or Administrator as the user type. 6. Select...

User Guide
Page 45
.... Follow the onscreen instructions to configure the following basic items: • Keep your PC secure • Personalize • Wireless • Settings • Sign in configuring your Windows® Embedded 8 operating system. Mini Desktop PC User Guide 45 Working with Windows® Embedded 8 Starting for the first time When you start your Mini Desktop PC's keyboard. Watch this to use on your Mini Desktop PC. 3. From the setup screen, pick a language...
.... Follow the onscreen instructions to configure the following basic items: • Keep your PC secure • Personalize • Wireless • Settings • Sign in configuring your Windows® Embedded 8 operating system. Mini Desktop PC User Guide 45 Working with Windows® Embedded 8 Starting for the first time When you start your Mini Desktop PC's keyboard. Watch this to use on your Mini Desktop PC. 3. From the setup screen, pick a language...
User Guide
Page 65
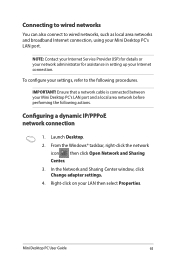
... to wired networks You can also connect to the following actions. Ensure that a network cable is connected between your Mini Desktop PC's LAN port. In the Network and Sharing Center window, click Change adapter settings. 4. Configuring a dynamic IP/PPPoE network connection 1. To configure your settings, refer to wired networks, such as local area networks and broadband Internet connection, using your Mini Desktop PC's LAN port and a local area network before performing the following procedures. Mini Desktop PC User Guide 65 NOTE: Contact your Internet Service...
... to wired networks You can also connect to the following actions. Ensure that a network cable is connected between your Mini Desktop PC's LAN port. In the Network and Sharing Center window, click Change adapter settings. 4. Configuring a dynamic IP/PPPoE network connection 1. To configure your settings, refer to wired networks, such as local area networks and broadband Internet connection, using your Mini Desktop PC's LAN port and a local area network before performing the following procedures. Mini Desktop PC User Guide 65 NOTE: Contact your Internet Service...
User Guide
Page 69
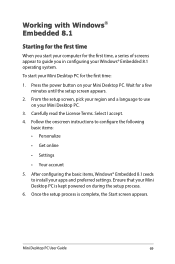
... Start screen appears. Mini Desktop PC User Guide 69 From the setup screen, pick your region and a language to install your Mini Desktop PC. 3. Follow the onscreen instructions to guide you in configuring your Windows® Embedded 8.1 operating system. After configuring the basic items, Windows® Embedded 8.1ceeds to use on your apps and preferred settings. Carefully read the License Terms. Select I accept. 4. Press the power button on during the setup...
... Start screen appears. Mini Desktop PC User Guide 69 From the setup screen, pick your region and a language to install your Mini Desktop PC. 3. Follow the onscreen instructions to guide you in configuring your Windows® Embedded 8.1 operating system. After configuring the basic items, Windows® Embedded 8.1ceeds to use on your apps and preferred settings. Carefully read the License Terms. Select I accept. 4. Press the power button on during the setup...

User Guide
Page 86
Launches the Project pane Opens the Everywhere option from the Search charm Opens the Run window Opens Ease of Access Center Opens the Settings option under the Search charm Opens the context menu of the Start button Launches the magnifier icon and zooms in your screen Zooms out your screen Opens the Narrator Settings 86 Mini Desktop PC User Guide
Launches the Project pane Opens the Everywhere option from the Search charm Opens the Run window Opens Ease of Access Center Opens the Settings option under the Search charm Opens the context menu of the Start button Launches the magnifier icon and zooms in your screen Zooms out your screen Opens the Narrator Settings 86 Mini Desktop PC User Guide
User Guide
Page 98
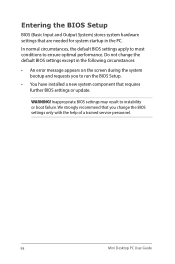
...; An error message appears on the screen during the system bootup and requests you change the BIOS settings only with the help of a trained service personnel. 98 Mini Desktop PC User Guide WARNING! Entering the BIOS Setup BIOS (Basic Input and Output System) stores system hardware settings that requires further BIOS settings or update. In normal circumstances, the default BIOS settings apply to most conditions to instability or boot failure. Inappropriate BIOS settings may result...
...; An error message appears on the screen during the system bootup and requests you change the BIOS settings only with the help of a trained service personnel. 98 Mini Desktop PC User Guide WARNING! Entering the BIOS Setup BIOS (Basic Input and Output System) stores system hardware settings that requires further BIOS settings or update. In normal circumstances, the default BIOS settings apply to most conditions to instability or boot failure. Inappropriate BIOS settings may result...

User Guide
Page 99
...'s power connector. Press during POST. • When your PC is a series of the following: • Before booting up the system, insert a straightened paper clip into the OS, try any of software controlled diagnostic tests that run when you turn your PC back on your PC. Reconnect the power cord and press the power button to turn on your PC. X Quickly enter the BIOS To access the BIOS before...
...'s power connector. Press during POST. • When your PC is a series of the following: • Before booting up the system, insert a straightened paper clip into the OS, try any of software controlled diagnostic tests that run when you turn your PC back on your PC. Reconnect the power cord and press the power button to turn on your PC. X Quickly enter the BIOS To access the BIOS before...


